Friday, March 30, 2012

Pin 43

Original pin:
Pinned Image
http://www.delicateconstruction.com/2011/11/monogram-ornaments-from-this-crazy.html


When I originally pinned this I pictured yarn wrapped letters for the wall. The pin was linked to the blog but not the specific post so I couldn't find the directions prior to attempting this. Now, when I went back to snag the link and picture for my post I was able to find it. I was initially thrown off the trail because these are actually ornaments so the title "Monogram ornaments" didn't seem like what I was looking for. I set about with only the above picture as a guide, but turns out my technique was pretty similar to hers only my product was much bigger and with a different purpose.

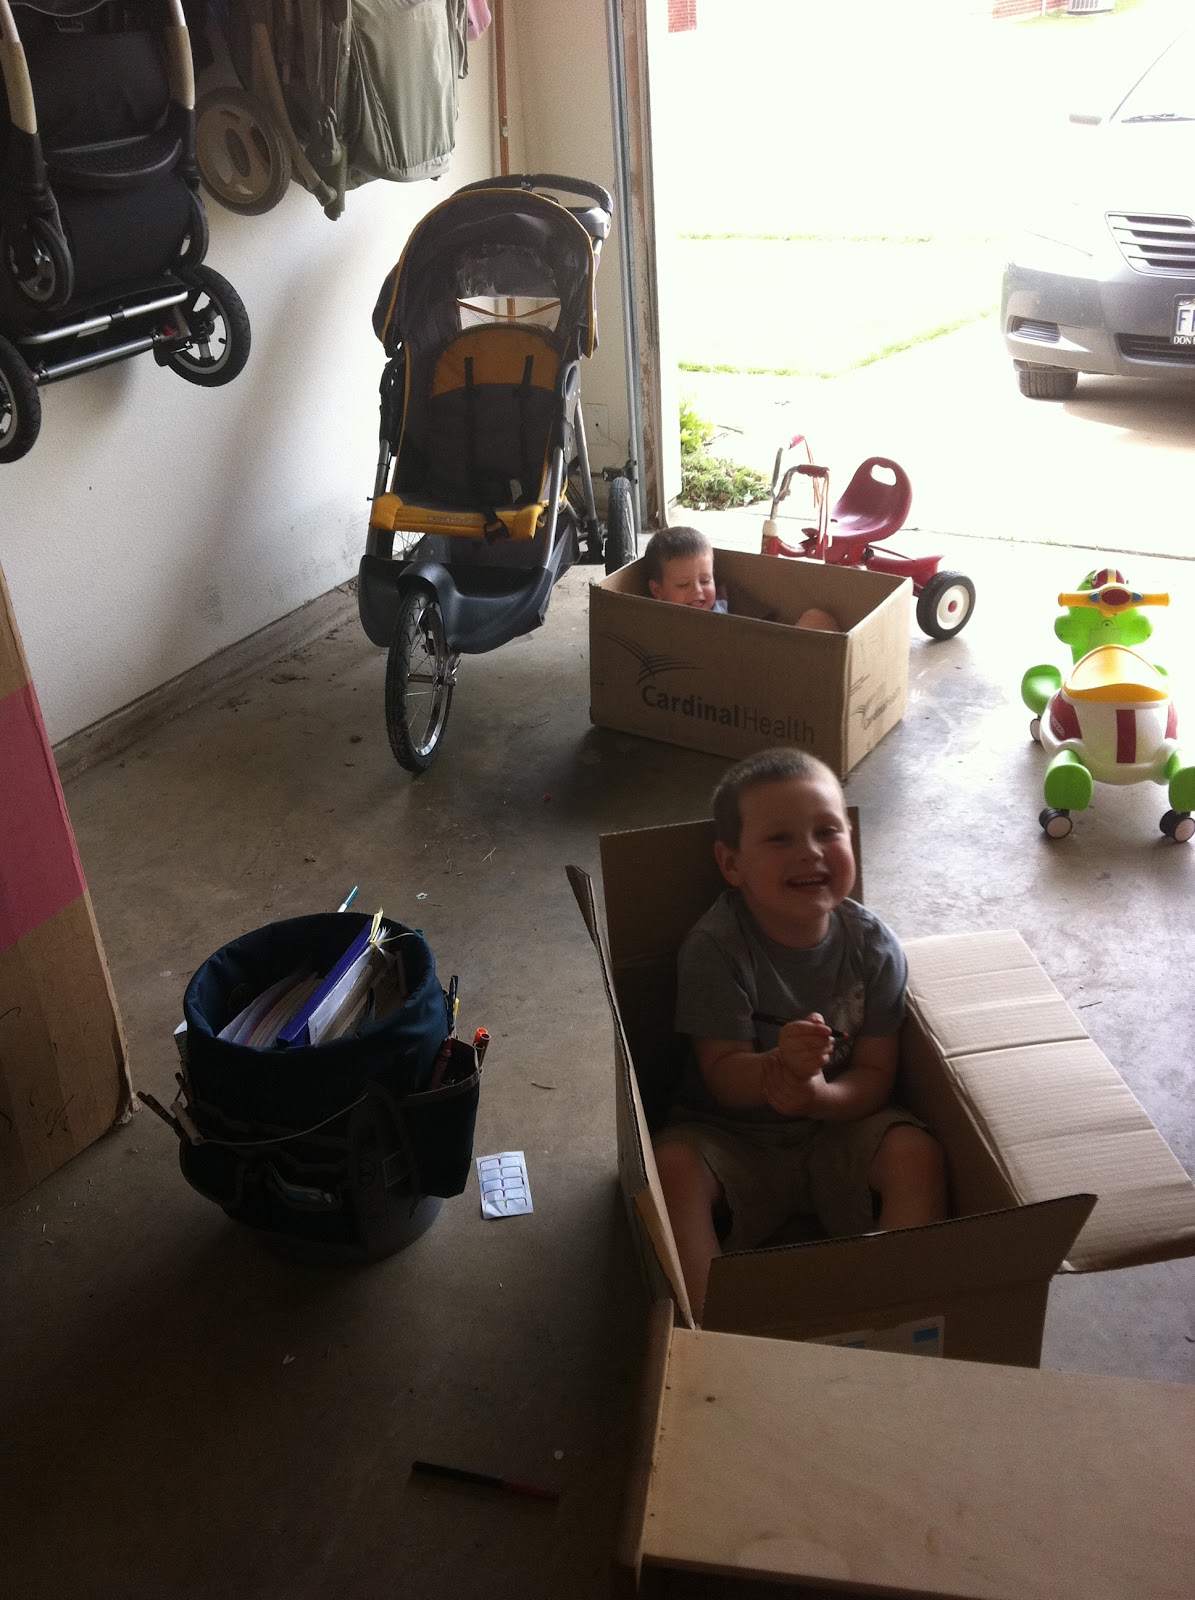
Luke just turned 5 last week and I always like to get portraits made around their birthdays. Like most everyone, we are trying to spend money wisely. I am the worlds biggest sucker when it comes to buying pictures and I will go in determined to spend $50 and leave spending three or four times that much.  This was my first attempt at "professional-style" pictures. I don't own a professional camera (although I dream of them. Daily.) My first step was to get a good photo prop number. I went to the craft store intending to buy a cardboard shaped number to either wrap or paint but all they had were letters. Sticking to the pin, I went and dug a good sized box out of the hubby's box hoard. I wanted it to have some stability because it was going to be manhandled by a five year old so I doubled up on the cardboard and cut two number fives. I hot glued these together and then started wrapping with some neutral colored yarn I found in the craft stash. I burned myself a bunch with the hot glue gun and said quite a few curse words but it was late and no little ears heard me.

My finished 5 perched atop one of my newly covered chairs.
Turns out there are tons of different techniques to get this done. Just search "yarn wrapped" for a billion different tutorials. I was happy with my final product. The hardest part were the straight corners. I thought the curved parts would be the hardest, but trying to get the whole corner covered was actually where I burned myself the most.

Beautiful, cooperative weather today and a handsome, cooperative five year old led to some results I am pretty proud of:


In the car on the way there big brother mentioned that if we turned it upside down it could be a 2 so we let the two-year old have a shot with it as well. You can see the glued ends on the back.

Total cost: $0

Total time: The wrapped letter took about 30 minutes.

Final verdict: I love the way it looks in the pictures. It was pretty sturdy and held up for the whole shoot. We may stick it on the play room wall for an interest piece. Maybe we'll start making them for every birthday until we have a complete number set? It would be cute to have all the numbers or all the alphabet on the playroom walls. It would make cute baby pictures to make a whole set of numbers the same size and take monthly pictures with the numbers and baby to mark milestones. This has tons of possibility.

Thursday, March 29, 2012

Pin 42

Original pin:
2009_08_19-IceCream.jpg
http://www.thekitchn.com/how-to-make-creamy-ice-cream-w-93414

"One ingredient ice cream," it said. It should have said, "One ingredient, guilt-free ice cream." I would feed this to my kids every day. I stumbled across it one day when I was looking for something to do with bananas that were getting ripe that wasn't banana bread.  It is simply frozen bananas run through the food processor. My kids love it. They totally think it is really ice cream. I top it with a little chocolate syrup or sprinkles and it turns into a special treat that really is healthy for them. 

This is the third time we have made this and they still love it.


The boys love to push the buttons on the food processor

Little chocolate syrup totally makes it a sundae.
Total cost: Less than $1

Total time: 5 minutes plus freezer time

Final verdict: Its a winner around here.

Pin 41

Original pin:

 www.crittersandcrayons.com

In line at the craft store the other day Luke picked up a magazine that had a picture similar to this in it and started immediately begging to do this. I wasn't sure exactly what the material inside was; I thought it might be cornmeal. I started googling around and found this which is actually something called cloud dough (flour + baby oil) and is slightly moldable. One trip to the dollar store later and we have a bucket of cloud dough out on the back patio. 

Our bucket isn't quite as long as the one in the picture, but that just makes it easier to store. It gives him some depth to work with so that he can dig holes and build piles and such. It is messy! You ARE in fact, giving your child a bucket of flour to play with, after all. I would definitely recommend it is an outside activity.

Luke was so excited. I only had three vehicles in it when I showed it to him and he immediately ran to his room to get some more trucks. 


Total cost: $2

Total time: 3 minutes to mash together. Hours of entertainment

Final verdict: I don't think I could tear him away from it if I tried. He's going to need a bath tonight, but at least with the baby oil it has a nice scent to it. Maybe it is softening his skin too?

Wednesday, March 28, 2012

Pin 40

Original Pin:
Terrycloth Toothbrush and Paste Travel Pouch in Spring Green...popular little gift...free shipping
http://www.etsy.com/listing/85900364/terrycloth-toothbrush-and-paste-travel

Very clever--and so easy to make. So why would I choose the easy way?? So I have a few factors working together here on this project. First, I am a newly reformed dental patient. I used to brush and floss and swish regularly. I have an old roommate once that told me I inspired her to floss. That is pretty high flattery in the dental world. So, then I turned 21 and flossing didn't happen much after a long night out. Eventually I got around to flossing often enough that I had to buy new floss once or twice a year. About six months ago I got strung up by that floss when I visited a new dentist and had to have a bunch of work done. Not only did she try to take away my Diet Coke, but she also said I've got to start flossing again. And so I did. I'm pretty proud to say that now. I have cut back on my Diet Coke consumption to about twice a week (down from once or twice a day) and I floss at least 5-6 times a week. I am human, though. I will skip a night here and there.

Second factor: I work a lot of twelve hour shifts. A gal's got to brush and floss at least once during that period right? Otherwise my mouth is disgusting by the end of my shift.

I thought this would be a great way to tote all my dental hygiene supplies to and fro from work. I loved that I could just toss it in the wash when it was icky. Here is what I didn't love about this particular one. Do you see where the top of the brush hits the top of the pouch. It leaves the brush exposed to the elements. Any neonatal nurse worth their salt is a major germ-o-phobe. We are right up there with those oncology nurses when it comes to germs. Currently I have three bottles of hand sanitizer within my reach just sitting here at my computer. And within my house I probably have about an ounce of the stuff per 50 square feet.  I used to carry tiny bottles of Lysol spray in my diaper bag. I digress. I don't want the tip of my toothbrush floating around with all the other things in my purse. I decided to tackle this one head on and use the pin as merely a starting point, a Pinspiration, if you will.

Clearly the standard sized washcloth was not going to be large enough for me. Luckily I had a big hunk of terry cloth in my scrap stash. I grabbed some leftover fabric from Pin 19 that matched my terry cloth and went to work. I pulled out a new tooth brush just to make sure I got the measurements right.

All tied up to go

A good inch or so of brush protection, however. . .

I will probably tote the brush like this for even more security.
 I did hit one little snag with the finished product, however. It would be easy enough to fix, but, eh, it works fine for now. I put the ties on opposite ends. They should both be on the same end so that it can be rolled up. The good news is that I left the ties long enough that even the one rolled to the inside is long enough to be rolled and then pulled out and around to tie (see first picture.)

I could also lay it flat and tie it just in half. Might come in hand for stowing other items when I am actually using this for traveling (Ha! Like I go anywhere!)

Total cost: $0, made totally from scraps

Total time: 45 minutes

Final verdict: I am happy with the level of protection it is able to provide, but next time I will remember to position the ties correctly!

Oh, and go buy one from this chick on etsy.com if you want one!
http://www.etsy.com/listing/85900364/terrycloth-toothbrush-and-paste-travel

My Favorite French Fries

These were adapted from a fancy recipe. The original recipe had lots of garlic and butter and salt. Don't get me wrong, I love garlic and butter and salt. But there was just too much for a french fry. I tamed it down for myself and my kids to make them more like recognizable french fries and encourage my family to eat them! I adjusted some of the cooking times and now I love them! I want them right now. I don't feel guilty about these at all because they don't come out of a vat fryer in a drive-thru.

It's really very simple. Peel and slice potatoes into whatever shape you want. I usually aim for french fry shaped. I usually prepare about one potato per person. Place potatoes in large Ziploc bag and add 1-2 tsp canola oil per potato, depending on your potato size. Shake to coat evenly and then pour potatoes onto a large baking sheet sprayed with a little non-stick spray. Arrange potatoes into a single layer and salt as desired. Bake at 400 for 45 minutes. After 45 minutes, turn over and bake an additional 15 minutes or so until they are your desired level of done-ness (that's for those of you who like your fries extra-crispy).  Let them cool a little and then gobble them up while you think of me.

This was an extra 10 minutes after the toss.
Total cost: Free this time--my mother sent me some potatoes!

Total time 1 hour 15 minutes (including baking time)

Final verdict: Well, I said these are my favorite, right?

Pin 39

Original Pin:
Top 10 Time-Saving, MacGyver-Style Cleaning Tricks
http://lifehacker.com/5383447/top-10-time+saving-macgyver+style-cleaning-tricks

A washing with vinegar and baking soda to freshen towels and remove residue, and improve drying time. It promised me I wouldn't have to give Target large amounts of money for new towels again.

Meh. I did a whole load of towels and washcloths just as directed. I notice no difference. I actually don't think they smell fresher either. I usually wash my towels, sheets, and anything smelling like a kid with about 1/2 cup of Borax added to the wash with the detergent. The Borax usually kills any funky smells and gets stuff pretty clean. The vinegar & baking soda didn't remove the smell all the way and I think it lightened some of the colors--which would be fine if all the towels were white.

Maybe you are supposed to follow up with a wash with detergent afterwards. This link didn't say. That might make them fresher smelling. I don't use fabric softener so maybe I don't have as much residue.

Total cost: $0

Total time: Usual laundry time.

Final verdict: I'm actually rewashing them with my detergent and Borax because there was still funky smell to some of them. I'll stick with this method.


Monday, March 26, 2012

Pin 38

Original Pin:

http://www.theworldwidegourmet.com/recipes/dried-strawberries-ruscalleda/

Another pinner said these dried strawberries tasted like candy! Yay!

My friend commented on my pin that he had tried it and couldn't get them to dehydrate all the way and that the time and/or temperature needed adjustment.

I had some strawberries that were going to go bad if they didn't get gobbled up soon so I thought this would be a perfect time to try this one out.

My results were like neither the pinner before nor my friends. I followed the directions closely. I actually tossed a few blackberries on the baking sheet just to see what might happen to those. The directions said to halve or quarter depending on the strawberry size. Mine were medium-ish sized and since my friend had trouble getting them to dehydrate I opted to quarter them.

Heading into the oven with a couple blackberry friends
 Within minutes they started to smell delicious and my whole house smelled like strawberries!! The recipe called for a baking time of three hours. At two hours I pulled them out and they looked like this sad mess.

 And some close-ups of the destruction:

What is the funky black-purplish color in the center/

These LOOKED HORRIBLE! Totally unappetizing. They were mostly dehydrated. The bits that weren't had turned to this awful goo-like substance. The outsides were dry and nearly crunchy and the flesh had turned purplish-black. If you attempt this recipe let me give you one piece of advice: For the love of all that is precious--line your baking sheet(and maybe spray some non-stick stuff)!! Some of these were practically cemented to the baking sheet! My husband and I both were brave enough to taste them and they weren't awful. Not like candy, quite, but not awful. Sort of just like a concentrated strawberry. But, gee, they were ugly. Then, good sport that he is, my husband went about the task of cleaning up the carnage and soaking/scraping them from the baking tray, along the way suggesting that we just buy new.

Total cost: It was about 1/2 pint of strawberries so lets say probably around $2

Total time: Prep-5 minutes, cook time 2 hours

Final verdict: Nope. Not even attempting this one again. There is nothing better than a good kitchen gadget unless it a quality tool for the job at hand. In this case, if I want dried strawberries I'll just have to buy a food dehydrator.

Sunday, March 25, 2012

New Chairs!!

Well, like new! If you don't have kids, let me show you what happens when babies turn into kids that eat real people food.  Your dining table chairs turn into napkins. It doesn't matter if you provide the finest cloth napkins or the coolest Yo Gabba Gabba napkins, they will prefer to use the seat cushions as a napkin every time.
This chair apparently did time as an art canvas as well.
 So, my solution to the problem was to keep the chairs covered with towels. Uggh. So tacky and ugly. I would clean the cushions and then cover them, but they always got icky again. The kids would pull them off or they would get spilled on without me knowing and soak through. It was one of those things that would stir the kids suspicions if I was removing the towels. "Who is coming over, Mama?" because that is when the towels came off.
So tacky :(
 I have been wanting to recover them for ages. Pretty much since the first born was eating real food. Good quality upholstery material isn't cheap and I wanted something that wouldn't absorb and could wipe clean.

Here comes the local craft store super coupon. I was in there picking up fabric for my dress (last post) when they stuffed this weekend coupon in my bag that I just couldn't resist redeeming on this project.

I intended on getting some faux leather-looking vinyl but ended up getting some real leather because my coupon was so awesome. I hope I don't regret it.

This isn't my first go-round recovering chairs. I've actually done it a few times now but it was my first for this table. I am no furniture recovering expert, but it is really easy and I thought I'd share my technique. All you need is a stapler gun with staples and whatever fabric you want to cover with. I start with squares that are wide enough to wrap around each side.

Remove the cushion from the chair and lay upside down on your fabric. I always start with the straightest and longest side (usually the front of the chair) and wrap it up and around stapling from the center and moving outward. Hold the fabric taut without stretching it.


Next, I do each front corner hospital-style and staple in place. I don't know if this is a real term, but it is the same way you make a bed with hospital corners.

Front corners, hospital style
 I staple the sides up about midway and then move to the back. Starting in the middle, place a staple and then work towards the corners, but not quite all the way. This next part is always the trickiest for me, but it doesn't have to be perfect. This is where the slack gets gathered up. I pinch up the two sides together at the corner like in the picture below.

Don't hate on my favorite orange sweatpants.
 Then, keeping the ends together, I flatten them down so that there is a crease on each side (see below) and staple into place.


 Now, straighten the remaining fabric and staple into place.

Because I started with a square and covered a trapezoid, I have a lot of excess fabric. Trim back to about a half inch or so from where the staples are. Too much fabric will make it hard to fit it back on your chair frame. Also, I would recommend making sure you leave the areas where your screws go uncovered just to make it easier to put the seats back in place.

Hank the Cowdog wanted in on the chair action.
 Now you can screw the seat back into place.

Tada! My finished master piece! It looks soooooo much better.


All the happy chairs together! What a beautiful after picture!

Total cost: $54

Total time: 1 1/2 hours

Final verdict: I love, love, love the new look!!! Hoping it stays looking this awesome!

Saturday, March 24, 2012

Pin 37

Original pin:


http://asmallsnippet.blogspot.com/2011/09/wanna-make-dress.html

I started out planning on using an old tank I already had, but when I found the fabric I wanted to use for the skirt I decided to splurge and pick up a different colored one at Wal-Mart for $3.88.

This was really very easy and I made the whole thing in less than two hours.

I am a sucker for a good, comfy sundress. I live in them in the summer so this was perfect! The first fabric I picked out was too sheer and would need a lining so, even though it was beautiful and would have matched my old tank, I put it back because I knew in the summer I would regret that extra layer of insulation.  I used the recommended measurement of 1 1/2 times around the waist and it seems a bit full, but I can live with it. I may use a little less than that next time. And I say next time because I want to make the the short version, too. I played with the sash a little. I can't decide if I like it better in the front or back but it looks good either way. It has to have either the sash or a cute belt because without it it looks like a jumper my mom might have worn about 20 years ago!

Here is my finished project:

Not a great picture because I had to convince my sleepy husband to take the shot and I didn't get a good warning before the shutter went followed by a dead battery. I'll try to get a better picture soon.

Total cost:  $10.60

Total time: 1 hour 45 min

Final verdict: Totally cool and comfortable. I think I will get a lot of use out of it this summer! And you can't beat the price for a maxi-dress

Friday, March 23, 2012

Pin 36

Original pin:

http://playathomemom3.blogspot.com/2011/09/bouncing-bubbles.html

A pinner before me had described this pin "bubbles that won't pop" but on the actual post the title is "Bouncing Bubbles" which is actually much, much more accurate. Since the weather warmed up, Will found the bubble bucket in the stash of outside toys and has been asking to play bubbles. (We have the most awesome bubble bucket, by the way, if you are looking for one.)


Little Kids No Spill Big Bubble Bucket, Colors May Vary
We got this as a gift for one of the boys' birthdays. It is awesome because it won't spill, has three long wands that are easy for little hands to hold, and has been hanging around our yard at least a few years with little wear and tear.
I made up the special bubble solution last night and prayed for good weather today. My prayers were answered as it was a gorgeous day! I busted out the special bubble surprise while dinner was in the oven tonight. You have to use a sock/glove to keep the bubbles bouncing and that element was way over Will's understanding. Luke thought it was just as much fun to smash the bubbles with the sock than to bounce them, but that's boys for you.

The bubbles were heavy in that as soon as they were blown, they sunk to the ground unless you bounced them. They also seemed a little harder for the boys to blow compared to regular solution. Each dip didn't produce a whole lot of bubbles like some solutions do.

A moment of bouncing.

They actually had just as much fun with the "put this sock on your hand" element of the activity as they did with the bubble blowing. See little man back there wearing his sock off to the swing set?

Daddy came home right in the middle of everything and he went and got his own sock to join in on the fun. It was a pretty cool thing to see. I think this would be a lot of fun to do with elementary aged kids who can grasp the concept a little bit better. Will was just looking for some bubble blowing fun and I think he would have enjoyed the lighter, bubblier bubbles more.

Total cost: $5.49 for pure glycerin

Total time: 2 minutes +24 hour sit time

Final verdict: Everyone had fun and was engaged in it for a long time. It was a fun activity to do as a family. We will use the solution until its gone, but I will probably put this recipe away until the boys are older. I just imagine it would be more fun in about 4 years or so.


Wednesday, March 21, 2012

Pin 35

Original pin:

http://www.greatoakcircle.com/homemade-sugar-scrub

This was totally my kind of tutorial because there were few actual measurements included! Ha! I didn't actually have to measure anything!

I didn't have sleepy tea on hand but I did have vanilla chai tea which I used. Then, inspired by the vanilla in the chai, I decided to add a little vanilla extract to the mix as well. So, I ended up with Honey almond vanilla chai sugar scrub which sounds a little like ingredient overkill, but actually turned out quite lovely smelling. (And tasting, which I discovered on accident.)

I had this perfect jar left over from Christmas gifts this year but even two batches of the stuff didn't fill it. I guess it was bigger than I thought! I didn't want to make a third batch just to fill the jar until I knew if I liked it or not. Thanks to the jar, I had everything on hand and didn't have to spend a dime for baby soft hands. Just make sure to wash it all off when you are done. I missed a spot above my wrist the first time and thanks to the honey + sugar combo it was incredibly sticky, at which point I discovered it was tasty as well (don't ask, I'm embarrassed).

After sitting for about thirty minutes the mixture separated into distinct layers with a lot of the sugar settled on the bottom and the darker layer of tea on top. There is also some weird frothy layer which I am hoping doesn't mean this is a science experiment about to explode! But if you dig way in and get a scoop of the sugar out, you get enough mix to still get a good scrub.

Total cost: $0

Total time: 4 minutes

Final verdict: Baby soft hands so far. I'm going to watch this for about a week or so before I decide it is gift worthy. I might try it on my feet, too.

Tuesday, March 20, 2012

Pin 34

Original pin:

Pinned Image
http://lostinstash.blogspot.com/

I had pinned this to my "crochet, you say?" board because the pinner before me had qualified it as a crochet pattern. One of my friends pointed out to me that this was a knit pattern rather than crochet but I never got around to moving it to the "knitty witty" board.

Anyway, it is actually a link to a link to a ravelry.com pattern, that is in fact knit and, thankfully, qualified as easy. I am a self-taught knitter
and have been doing it off and on for about three years but I would in no way call myself a qualified, skilled, or competent knitter. But this one is easy, right?

I was also totally inspired by the beautiful colors!

Well here is my pretty stack of washcloths:


Look nice all folded up?? Ok just don't unfold them. I am going to clean up my inner thoughts here and spare you all the obscenities that have been filtering through my head for this project. I can not make these suckers square for the life of me. I didn't start out this project intending to make four, going on five, but my inability to create this square has me totally obsessed with it right now. It has become a personal mission. I have tried adjusting my tension, tighter here, looser there, but the darn things come out kite-shaped every time!  And the real kicker is that it will look perfect--absolutely perfect. . . until there is about four or three rows to go and it is then that it starts to look wonky. I made three of these in two days and my fingers started to go numb.

These are in order of creation (L to R, 1st, 2nd, 3rd, 4th)
Somehow the second one looks best.

Another side by side comparison shot
What am I doing wrong??? It seems simple, adding a stitch every row and then when you get to a certain number, decreasing a stitch every row. No fancy stitches, no complex counting. I can't figure this out!!! I even followed the directions and bought the recommended brand of yarn and a new set of knitting needles of their recommended gauge. I was secretly hoping that I would be able to give these as a wedding shower gift, but so far there is no way I am gifting these. I would be embarassed for someone to take them!

So, the obsession continues until I create a real square or I run out of yarn. Whichever comes first.

Total cost: $11 for enough yarn for 9 cloths and new needles.

Total time: Infinite. But so far, approximately 2 hours per cloth, if there are no tear outs along the way


Saturday, March 17, 2012

Pin 33

Original Pin:


http://partiesandholidays.blogspot.com/2009/01/drive-in-movie-night.html

So this was actually a birthday party idea for a drive-in movie themed party. I took her fabulous party down about 70 notches.

A few weeks ago Daddy had a shipment that came in this ridiculously oversized box. When I saw it I thought perhaps he had purchased an elephant. Once the saxophone was removed from the box (y'all, I am not exaggerating. The box was nearly as tall as I am and at least three times as wide) the boys spent a good part of the next four days scribbling all over the inside and outside of this thing. I had pinned this drive-in idea a while back and since they had so much fun with one box I thought I could be a really good mom and give them each a box of their own.

This week I snagged two good sized boxes from work and stashed them away for Daddy's night out. I have a pretty big pin project I am working on for tomorrow and I had some prep work to get done today, so the boys and I went to the garage with their art bucket (still fabulous as ever) and they worked on their boxes as I did my prep work. I put the idea in their head that it should be a car, but at 4 and 2 years old, not only do they not know what a drive-in movie is, but it was going to be fun whether it looked like a car or not.


Hard at work with the markers.


After dinner we set up their boxes in front of the TV and I padded them with blankets and pillows to make them more comfortable. Luke requested a "table" to be in between so we found a smaller box (did I mention my husband is hoarding boxes in the garage?) to serve as their table. When it came time to pick their movie, Will wanted Mickey Mouse Clubhouse and Luke wanted Jake and the Neverland Pirates so they ended up just watching shows off the DVR for about an hour.

I had promised popcorn so they settled in with their popcorn cups and really didn't move for the entire time. This was like five special mommy treats in one: 1. Popcorn. 2. Popcorn in the living room!! 3. Popcorn in the living room AND watching TV. 4. Watching TV!! (I'm a wee bit restrictive on TV time) 5. Their own comfy box. Who knew kids could be so easy to please?


Waiting on the popcorn to pop!

Soooo... I way undershot this one as far as meeting the actual pin. No concession stand, no wheels or headlights on the "cars," they technically didn't even watch a movie.  But I still consider it a total success because they LOVED it. And later on I used the boxes to manipulate good behavior out of them, as in "Little boys who fight over toys might not have boxes in the morning. . . " (read it in a sing-songy voice).


Total cost: $0

Total time: Zero-ish minutes for me--they did all the work. Well, there was that 15 seconds it took to put the popcorn in the microwave. . . and the 1 second it took to turn on the TV... So I will revise that to : Total time: 16 seconds.

Final Verdict: I imagine the boxes will linger around for a few days and they will beg to do this again and again. It was a super easy way for me to get some of my things done as well. I still think it would be a cute idea for a party when the boys are old enough to know what a drive in is!