Showing posts with label knitting. Show all posts

Thursday, July 26, 2012

Pin 108

Original pin:
Pinned Image
The link associated to this pin is a link to a link to a link to a link to a website in a language I can't read. It is not a tutorial. After a little research, I found it's home on etsy at http://www.etsy.com/shop/KnitStorm

These are adorable. I fell in love immediately. I pinned them to my knitting/crochet boards for the inspiration.

They are sooooo super easy to make. Whether you knit or crochet, you can make this!  If you don't knit or crochet, go buy one from KnitStorm! It is simply a rectangle with a few slip stitches to hold the ends together.

I am not going to post specific directions here because mug sizes are different and such. I started by picking a basic mug. (I knitted both of the ones below). Cast on (or chain if you are crochet) enough stitches to compensate for the height of your mug. Leave a little room at the top. You don't want the cozy to reach all the way to the rim of the mug, otherwise you will have a mouthful of fuzz with your tea!

After you have cast on/chained create a rectangle using whatever pattern suits you. Continue along until your rectangle measures from one side of the handle, around the mug, and is just a little shy of the other side of the handle. You want a little stretch so that the cozy is snug on the mug. Here I picked up the first stitch from the first row with the first stitch on the working needle and knit through both. (With crochet you could either work another crochet row through both the first stitch on the first row or just join the two ends with a slip stitch). I did this again for the second stitch and then cast of the first stitch so that there was only one stitch left on the needle. I knit through the third stitch and then cast off the second. For the fourth stitch I started to knit and cast off without going through the stitch on the first row. I knit and cast off all the stitches until there were only three remaining at which point I knit through the first row again as I cast off.

As I have said before, I am not a knitting pro, so if those directions are confusing, I apologize.

When the cozy was finished, I used some embroidery floss and cheap felt scraps to whip up the little tags and sew them on. I free handed them so they are surely less than perfect.

Before starting this project I looked around for some patterns. There are quite a few that use a button to connect the two sides, so you could go that route if you wanted. I didn't have any buttons handy and I really wanted mine to slip over the handle.

I know you are dying to see them.

I made this one first


Showing the way the cozy fits around the mug handle

Total cost: $0. I used yarn and felt leftovers from other projects.

Total time: About 3 hours each.

Final verdict: Very happy with the way they turned out. Just looking at these makes me want to curl up with a cup of hot tea. These will make great gifts in the fall.  Look out teachers. . .

Wednesday, July 11, 2012

Top Ten Favorite Pinterest Pins

As I promised yesterday, here are my top 10 pins.  These are MY favorite either because I have used them over and over again, or because they were just awesome to begin with.

10. Pin 80: Knitted swiffer cover. I have already received requests for these for Christmas gifts. Better get started now!
9.  Pin 49: Mommy dress.  I wear this all the time and always get compliments on the color combo. I did go back and fix the sleeves, just in case you were wondering.

8.  Pin 31: Frozen yogurt dots. We can't walk by the yogurt at the grocery store without my kids asking to make these.
7. Pin 71: Lemon slices and daisies. I am still amazed at how long these flowers stayed beautiful and fresh. Weeks.
6.  Pin 53: Homemade pita bread. Simple and delicious. So many ways to stuff the leftovers never last long. But best right as they are coming out of the oven hot.
5.  Pin 35: Honey Almond Sugar Scrub. I love this as a facial scrub and use it nearly every day. I have used this basic formula to create other varieties by using flavored teas and different extracts.


4.  Pin 23: Sock bun. A pinterest legacy. I don't get super awesome curls but I think it is a fun way to wear my hair up and out of the way. A change from the boring ponytail, a comfortable way to sleep, and a great way to hide hot-mess-mommy hair. I still think its weird when people know I'm wearing a sock on my head though.
3. Pin 12: Glow bath. My kids ask for this all the time. I use it as a reward for good behavior or as a trick to get them into a bath when I am just too exhausted to fight.
2.  Pin 5: Make your own foaming soap. Genius. I will never buy foaming soap for my children ever again. You can create this for pennies.
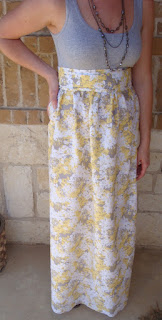
1. Pin 37 & Pin 90: Technically two projects but they came from the same pin so I am considering them one. The tank maxi and short dresses. I always get compliments on these when I wear them out.


My top five posts based on YOU! Ranked by popularity & views:

5. Pin 69: Microwave corn to remove silks & husks lickety-split


4.  Pin 89: Cafe Rio Chicken: Made in the slow cooker with so many uses.

3.  Pin 92: Classic Baby Blanket Crochet Tutorial. Almost done with number 2.


2.  Pin 90: Short tank dress
1. Pin 91: Jillian Michaels Detox Drink. Aren't we all looking for a quick way to lose weight?


Friday, June 1, 2012

Pin 80

Firstly, let me say that I never expected the boys getting out of school to slow down my crafting soo much! Just finding time to go to the store for supplies is a chore! Trying to pick up the pace now. . .

Original pin:

Pinned Image
http://www.michaels.com/Lily-Sugar-'N-Cream%C2%AE-Knit-Duster-Cover/25582,default,pd.html

I decided to work on this little project this week at knitting/crochet circle. Since we installed our new floors we have been doing a lot of "Swiffering" and we are actually low on cloths. Instead of buying more, I thought this would be awesome. To be able to wash and reuse these puppies sounds fantastic.

This was my first visit to the circle. I learned that I can't talk and knit at the same time without making mistakes. I am not a pro knitter. I decided mistakes were fine since this was going to be used on the floor and just plowed through the project, mistakes and all.

Not the prettiest swiffer cover
I finished this in one day and tested it out. It worked almost as good as those cloths. It had trouble picking up the larger small particles--think cracker bits or thick grass pieces--that sometimes the cloths will pick up. It did great with the dust and, more important, dog hair.

 Only one small snag. I didn't have a measuring tape a knitting circle so when the directions said to knit until it was four inches wide, I just had to guess. I was a little off.

Total cost: $3.99 for a skein of yarn that is probably enough to make 5 of these.

Total time: Four hours

Final verdict: Ugliest project ever! But who cares? Its for cleaning the floor and it worked good enough to keep me from running out to buy more covers. You could even dampen this and use it as a damp mop. I am already working on number two--which will be measured :)

Tuesday, March 20, 2012

Pin 34

Original pin:

Pinned Image
http://lostinstash.blogspot.com/

I had pinned this to my "crochet, you say?" board because the pinner before me had qualified it as a crochet pattern. One of my friends pointed out to me that this was a knit pattern rather than crochet but I never got around to moving it to the "knitty witty" board.

Anyway, it is actually a link to a link to a ravelry.com pattern, that is in fact knit and, thankfully, qualified as easy. I am a self-taught knitter
and have been doing it off and on for about three years but I would in no way call myself a qualified, skilled, or competent knitter. But this one is easy, right?

I was also totally inspired by the beautiful colors!

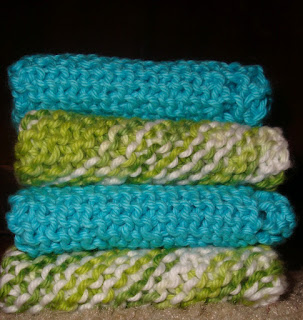
Well here is my pretty stack of washcloths:


Look nice all folded up?? Ok just don't unfold them. I am going to clean up my inner thoughts here and spare you all the obscenities that have been filtering through my head for this project. I can not make these suckers square for the life of me. I didn't start out this project intending to make four, going on five, but my inability to create this square has me totally obsessed with it right now. It has become a personal mission. I have tried adjusting my tension, tighter here, looser there, but the darn things come out kite-shaped every time!  And the real kicker is that it will look perfect--absolutely perfect. . . until there is about four or three rows to go and it is then that it starts to look wonky. I made three of these in two days and my fingers started to go numb.

These are in order of creation (L to R, 1st, 2nd, 3rd, 4th)
Somehow the second one looks best.

Another side by side comparison shot
What am I doing wrong??? It seems simple, adding a stitch every row and then when you get to a certain number, decreasing a stitch every row. No fancy stitches, no complex counting. I can't figure this out!!! I even followed the directions and bought the recommended brand of yarn and a new set of knitting needles of their recommended gauge. I was secretly hoping that I would be able to give these as a wedding shower gift, but so far there is no way I am gifting these. I would be embarassed for someone to take them!

So, the obsession continues until I create a real square or I run out of yarn. Whichever comes first.

Total cost: $11 for enough yarn for 9 cloths and new needles.

Total time: Infinite. But so far, approximately 2 hours per cloth, if there are no tear outs along the way