Showing posts with label crafty. Show all posts

Monday, May 13, 2013

Pin 204 & Pin 205: Wristlet Key Chain with Hand-stamped Charm

Original pin:

http://prudentbaby.com/2010/11/hot-mess/accessories-hot-mess/how-to-make-a-wristlet-key-fob-2/

A wristlet keychain tutorial from the ladies over at Prudent Baby.

As I mentioned a  few weeks ago, I was putting last minute details together on Teacher Appreciation week. Like last year, I was in charge of putting together gifts for the whole preschool. Since I am on a super tight budget, I am always looking for inexpensive gifts to make for the teachers. Since I have to put together so many, they have to be quick and inexpensive. These keychains seemed to be perfect. I also was able to tie the whole luncheon theme together with the keychains. As I am sure many schools experienced this year, our preschool was entirely rekeyed with strict implementation of renewed security measures. All the teachers are having to carry their keys everywhere. We made keys the theme of our lunch.

I found a super deal on the webbing and picked up some matching ribbon. I had to order the key fob sets from Amazon because I could not find them anywhere locally. Click the picture to see the kit I am referring to:


I used the one inch width.

I brought all these supplies along on my girl's crafting weekend last weekend and went to work.
I actually skipped the step on fusing the ribbon to the webbing. I was feeling a little lazy. Instead I just held it in place and sewed along. Not much later I had this big pile of ribbons and webbing.
Time to start trimming!
I discovered a severe miscalculation at this moment. I needed 21 keychains and had somehow purchased and sewn enough ribbon and webbing to make nearly 80!! I only had hardware for 25 at my retreat so I packed the excess up. Guess I'll be giving a lot of keychain gifts in the near future!! I clamped up the 25 sets I did have and went to work on step two of my project.

Original pin:

http://happyhourprojects.com/jewelry-stamping/

Metal stamping is something I have taken up fairly recently (I asked for my first alphabet set for Christmas last year) and I kind of jumped into it blindly. I need all the help and tips I can get and this tutorial had some good advice. I picked up a few new tricks and learned that some of what I was already doing was on the right track.

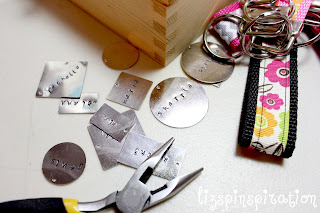
I wanted to do some hand-stamped metal name charms to add to my wristlets. Lucky me! My friend across the crafting table at our retreat had some cuter stamping letters than mine so I borrowed hers and went to work.

In metal stamping, it always takes me a few tries to warm up to good stamping. Here was my first attempt at a charm that night:

I was talking and twirled the L without thinking! oops.
Just like with exercising, I must always warm up my stamping fingers before getting down to the serious stuff!

The rest went much more smoothly.


After my names were all stamped up and stained, I used a jump ring to attach them to the key fob hardware.

My busy, busy work station:
All the important supplies: stamping bench, pliers, nylon hammer, glass of wine. . . 
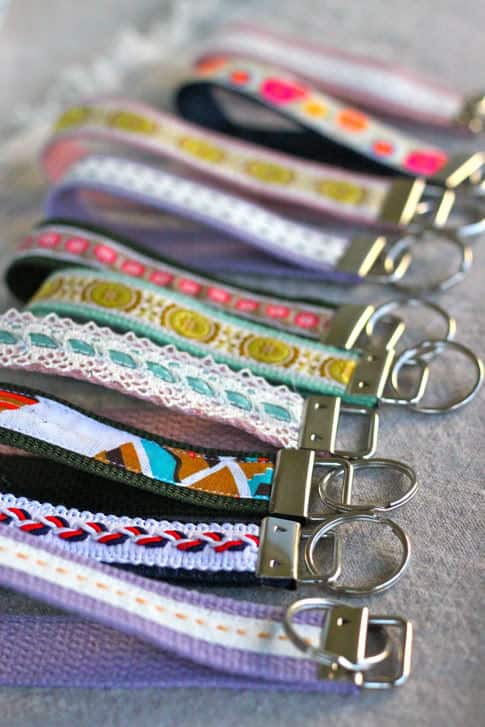
Once they were all put together I had these little beauties ready for all the teachers!


So cute! And fit right in my budget. 

Total cost: Prudent Baby put hers together for less than $1 each, but since I added the charm, mine were closer to $1.50. Still a pretty good price. I found a comparable wristlet selling for $9.99 without the personalized charm!

Total time: These were much faster to put together than I anticipated. Again, however, due to my sweet, sweet crafting scene, I wasn't much paying attention to time. It probably took around one hour to sew all 24 yards of webbing and ribbon together. With clamping and stamping, I would estimate another 2 1/2 hours or so. . . its fuzzy--there was pineapple lush cake involved in there somewhere. . . 

Final verdict: I love the way they turned out. They were so easy! I ordered some additional hardware when I got home from my trip to put together the rest of the wristlets. Hate to ruin the surprise, but if its your birthday. . . or anniversary. . . or if you are graduating. . . . or lonely. . . you may be getting one of these!

Friday, April 19, 2013

Pin 199: Scrappy Alphabet Wall Art

Original pin:

http://aussiescrapsource.typepad.com/aussie_scrap_source/2011/03/weekend-inspiration-the-girls-paperie.html

You can't see this pin on my Pinterest because its hiding on one of my secret boards. I love the secret boards feature! Now I can surprise more people. I wanted to make something to donate to an auction fundraiser at my youngest son's preschool.  I thought this was really cute and could be reproduced easily.

Step one was to find a good children's book that I did not mind tearing up. This is really hard for me because I just have a sacred spot in my soul for books. I went out to thrift one book and ended up coming home with 15! The book I chose to destroy was one illustrated by my favorite illustrator, Quentin Blake. I had never heard of the title, but I just love his illustrations so much I knew I wanted it to be part of this art piece.


I selected the pages I wanted, and mod podged the back only to a canvas.

Even though these pages were already a bit aged, I decided to stain them. I loved the way the stain turned out! I used this stain,  Ranger TDW-29892 Tim Holtz Distress Stain Fluid Water-Based Dye, Vintage Photo, 1-Ounce , which you can spray with water to create variations in the color.

Now I had this to work with.
I know you are seeing all these wrinkles and thinking what a mess it looks now, but have you seen my post on the greatest mod podge trick ever??? Back at Pin 52 I learned what an asset the blow dryer is for mod podge projects.

Next step was to cut out all the letters. Y'all probably can guess by now that there is NO WAY I was going to measure and trace and precisely cut letters out for this. I flipped on the DVR and went freestyle with my letters. Guess where that ended me?? Well, they didn't quite fit the canvas in a way I was happy with.

So I cut another entire alphabet. Alphabet number two was a bit too small.

 (This is sounding a little like a Goldilocks story. . . ) Alphabet number three was juuuussstt right.  Sorry, I couldn't resist.

No, there was no alphabet three. I just mixed and matched letters from set one and set two to make it fit like I wanted.
There was just one teensy, weensy problem left. You see, this illustrator, Quentin Blake, well I just love his work. I really wanted to make sure some of it was seen in the final result. And there was one picture I was particularly enamored with that I didn't want covered up. Letter spacing now became a problem.

Luckily, I had this giant pile of letters from which to work and I was able to save most of this picture. I don't know why I liked it so much. I didn't actually even read the story so I'm not sure what is even going on here.
a big ol' pile of letters
I skipped a part of the background story I wanted to tell you. . . 

I love mixed media art. As a child, I would spend hours cutting up magazines and creating these gigantic collages of words and pictures I liked. They covered my doors and walls in my room. LITERALLY. Ask my sisters, I'm sure they remember. No magazine was safe in my house.  

I knew when I started this that I would have to add other elements to the canvas besides the alphabet. I added a measuring tape cut. There were a few hits and misses here as well. Thankfully, I had extra book pages because I had to remove a few items I didn't like after they were in place. I decided to go with hand sewn buttons to complete the look. A few people were surprised that I had actually sewn them on, but since it was on canvas, it was a fairly easy endeavor. 

Here is the final project. 


I have never sold an art piece before. I have only gifted one and it was to my mother a few years ago. Giving this away was a little humbling for me because, . . . well. . . .honestly?  I put a lot of time, and a lot of love into this. I made it the way I wanted it to be, and what if no one liked it?? I was fully prepared to buy it back for twice the cost of the materials. I just really, really, REALLY didn't want to hear anybody say anything bad about it. I loved it and might take a comment like that to heart.

Luckily, I didn't have to hear any comments about it. People were bidding on it at the auction so I didn't have to (or get to) buy it back. I hope it went to a good home and they love it like I do.

Total cost: Around $25

Total time: Hours and hours and hours. This time increased because I redid a few things. In all I worked on this for weeks. I would do a little something and then let it sit out and stare at it for a few days. There is a lot of pressure when you are making something for someone else! It sat on an easel in a high traffic part of my house so that I could walk by and contemplate it. My family helped me contemplate and make judgement calls on a few things.

Final verdict: I was a little emotionally wrapped up in this project, but not in an unhealthy way. I love the way it turned out, but was okay parting with it. I received a lot of compliments on it and it did have a few bidders. I tried to stay away from the bidding sheet because I was so emotionally tied to it. Bottom line is, it sold to someone who I hope loves it like I do. If I wanted to make one for myself, I could. I still have half of Willie the Squowse left and an entire alphabet set. Selling personal art is hard! No wonder so many artists aren't discovered until they are dead. They probably hide their stuff from prying eyes to protect their egos!


Tuesday, March 26, 2013

Pin 195: Fun Fur Easter Wreath

Original pin:
P3091852 copy
The pin I had on my pinboard has an incorrect link but I liked this wreath so much I found what appears to be the original source and this is the link complete with a tutorial showing simply how easy this is: http://pattyschaffer.typepad.com/capture_the_details/2010/03/monday-make-it-spring-baby-grass-wreath.html

I pinned this a long time ago but had kept it in the back of my mind waiting for spring. After cleaning up the debris from Valentine's day, my mind went to this project. I sought out this yarn while at my favorite yarn store but was immediately turned off when I found it was $7.99 a skein. Because my original pin didn't have the correct source, I wasn't sure how many skeins I would need, but I was sure it would be at least three or four. This yarn is so skinny! Mission aborted!

I came home and started researching the original link. Turns out her wreath was only 8 inches but she only used one skein! Honestly, I was skeptical about this one. The next week, while at a different craft store I decided to check out their fun fur prices--just in case. I was pleasantly surprised to find it $2.99 a skein--and I had a coupon!! This project was back on.

I did want a larger wreath, so I purchased a 14" wreath. I bought a straw one because it was half the price of the foam. I left it in the plastic packaging to keep it neat. I also bought 2 skeins of the yarn. I started working on it that day. The more and more I wrapped, I just kept thinking, "There is no way that two skeins will be enough. NO way." I've been wrong before, and apparently I was wrong again. One skein covered almost 2/3 of the wreath!

See how small one skein is!! I can't believe it covered this much wreath.
Once I finished the first one and saw how much it covered, I squished it all in a little tighter before starting the second skein.

I had no trouble with the pins inserting or staying put in the straw wreath. Turned out to be a good swap. I used the entire roll of flower trim and then used scrap book paper, double sided tape, and a toothpick to make my little flag. I made it reversible and included a second phrase.


I just cut a long strip of white cardstock and folded it in half. I put a toothpick at the fold and secured it all with a strip of double sided tape.

I didn't think this would be a good outdoor wreath--especially with spring weather, so I hung it on the inside of the back door using a 3M release hook. I think it is super cute, and my kids like "petting" it. Lu-boy keeps asking if it is real grass.

Total cost: Okay, so overall it wasn't super cheap because I had to buy everything! Pink-head pins, ribbons, trim, wreath form, fun fur yarn. I spent about $22. But I love it so much I don't even care! And I can justify the bargain of the yarn not being $7.99 and using a coupon!

Total time: 2 1/2 hours

Final verdict: I think it is very spring-y. It was ridiculously easy. Once I realized that one skein really would cover an 8 inch wreath I started thinking about who I could make one for. I love it!

Tuesday, March 12, 2013

Pin 193: Amigurumi Crochet Giraffe

Original pin:

http://ilovebuttonsbyemma.blogspot.com.au/2013/01/crochet-giraffe-pattern.html

I just spent a recent ten days nursing sick children back to health. Confined to the house, I had to find a creative outlet that did not require me to drag any child with unpredictable behavior and unpredictable health out in public to pick up supplies. My little bird saw me flipping through my pinboards and picked this out for himself. While I still consider myself fairly new to crochet, I am really new to amigurumi. This is really only my second amigurumi project.

I was not interested in changing my yarn color quite that often (nor did I have all those colors on hand). I decided to just get started using what I already had in my stash and see where it takes me.

A while back, a certain craft store was running a special on 100% cotton skeins for $1 and I had picked up 10 or so with no real project in mind. I also did not have a small enough hook as called for in the project, so I just used the size recommended for the yarn I used. I ended up using two full skeins of the 100% cotton and then a leftover scrap from another project.

The original author mentions that a stitch difference here or there shouldn't make a difference and that she, too, is guilty of dropped stitches. I pretty much took this as permission to not count stitches too closely or bother ripping out mistakes. So some parts were a teensy lopsided, but it just adds charm. I worked on an off this for a week while the little bird stood close watch. He loves "giraffe-eeeeeeees" and already has a pretty tight attachment to two.

The pattern is simple and with the creative mistake license granted, it was just one of those projects that you fix and alter as you go along based on your experience with previous projects. (And as I stated before, this is only my second of this type, it didn't need just a whole lot of experience because it was not complicated).

So, in summary, I didn't use the right yarn, the right hook, follow the pattern too closely, or fix mistakes. Did I really even end up with the same project? Can I really judge this pin??


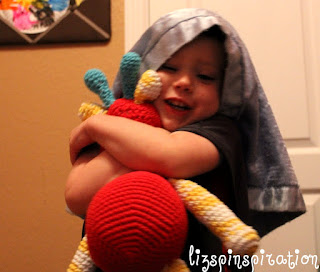
It is a giraffe, after all. My neck seems shorter, but I just kept making it longer until I ran out of that color of yarn. My arms and legs look fatter, but that could be stitch gauge (due to my larger yarn & hook) or because I used more stuffing. I think it looks pretty good for my second project. But really, the only judge who matters is this guy. Here is what he thinks of his new giraffe-eeeeeee.
Total cost: Zero out of pocket. Otherwise, $2 for the two cotton skeins I bought months ago plus scrap yarn and leftover stuffing from another project.

Total time: I worked off and on for seven days to finish this up. I did have a little extra time on my hands being stuck at home with the sickys.

Final verdict: Not quite like the original, but it was relatively frustration-free and the little guy loves it with all his heart. That makes it priceless!

Thursday, February 14, 2013

Pin 183

Original pin:

No source available. If this is your sweet creation, let me know so I can give you credit!!

Happy Valentine's Day! I caved at the last minute and decided to craft up some Valentines for the kids. I had already even spent my $1 for the easy boxed kind. I'm not against those, I have used them plenty. It was just when you pair my crafty heart with my new camera obsession and mix in a little holiday spirit, I couldn't resist the urge to create.

I pinned this image a loooooonnnnggg time ago. Possibly over a year ago. I think it is a cute and clever idea.

Getting the picture was a bit more difficult than I anticipated. I showed the kids what we were looking for and they were so excited to create and shoot that they were wiggling around like they had ants in their pants. There was much jumping and twirling and superhero-style posing. I had trouble with them getting the fist rotation and placement (i.e., not directly in front of their face) just right. As I was editing I was thinking about a way to make this easier. They need something that they would normally hold upright. I thought about maybe a clear juice glass. They would naturally be inclined to hold this upright, create the right shape with their hand, and have more of a natural "handing-off" pose. It could be easily edited out, cut out after printing for the lollipop, or just obscured when the lollipop was in place. I have these small glasses I found in the dollar spot that would have been absolutely perfect--had I thought of it before hand.

It took me three separate sessions (I don't get much time with these crazy boys) to end up with two mostly workable shots. Here is what I started with:

Hmm. One of those superhero poses. He was alternating between superheroes and rock star.

I finally got his placement right after I pinned him down on the floor. It slowed him down just long enough and kept his fist forward. His eyes are a little diverted, but maybe he's looking at the lollipop?
After a little editing magic I had these ready (minus the pinspiration marks, of course):

names obscured to protect their superhero identities
I printed these out at one of those store kiosks that print them while you wait. I don't have a good photo printer so I just loaded them on a thumb drive and ran to the store.

I made the mistake of stepping into a craft store while I was out and I stumbled across the most perfect cardstock. I had to buy it to mount the photos. I cut the cardstock a little bigger than the picture, used an exacto knife to cut some holes in the appropriate places, and started assembling.  When L got home from school, I sat him down with a sacred adults-only sharpie marker to write in his classmates names. W's school specifically asks for generalized cards to make it easier for the kids to pass their own.  In the middle of assembly we had to make an impromptu trip to urgent care for the world's worst nosebleed--ugh.

Sometime around midnight, I finished them up. They were not difficult, nor really time consuming to assemble, it was just so late thanks to our 4 hour urgent situation. Here are the final results!

We just couldn't get the cute face and the right fist on this wild man. This will do.


Total cost: $14 without the cardstock, I bought a big pack for $10 and used 20 sheets of it. Somewhere less than $20 for 40 Valentines.

Total time: Really the actual photo taking was the hardest part. Assembly took maybe two hours because I had to cut all the cardstock to size. These would have been perfectly fine without the cardstock, but I like the look and it made them a little more sturdy.

Final verdict: I think they turned out pretty cute. Minus the funky hand position on L, but his friends will never notice that. They are going to notice the lollipop. I spent a little more than I planned, and way more than in years past where I use the dollar store box split between them both. I am happy with them. The boys had an absolute blast shooting them and getting them ready. I have honestly never seen my boys so excited to pass out their Valentines. We just may get in a tradition of photo Valentines. Also, while editing, I googled something about photo Valentines, and there are a ton of versions of this. Check out the image search for more ideas on posing and staging the shots. Another note, when you buy your lollipops, consider the wrapping. These had a lot of wrapping which limited areas of the photo that were visible when the lollipop in place so I had to account a large empty area in the picture.

And Happy Valentine's Day from Pinspiration!!

Tuesday, February 12, 2013

Pin 182

Original pin:
Pinned Image
http://dollarstoremom.com/2012/02/our-valentine-tradition-14-days-of-little-love-surprises/

I love this cute idea to help get in the holiday spirit. I pinned this a long before Valentine's Day and have been keeping my eyes out for some cheap Valentine-themed towels. Did I mention that this pillow is made out of towels? Like dollar-store-kitchen-two-per-pack towels? That is so my style. The idea behind the pillow is that there is a pocket on the front, and for the fourteen days of February leading up to Valentine's Day you leave sweet little notes and surprises for each other.

Unfortunately, I never came across said Valentine's day towels at the many dollar stores I frequent. I did, however, come across some St. Patrick's day towels. Put that together with a little red and voila! The "Lucky in Love" pillow is born.

Since I am making these for my two little boys who are notorious for sticky hands and snotty noses, I wanted to make sure these were washable. Pillow forms were on sale for half-price last weekend, so I picked up a couple of 12 x 12 pillows so that I could make these covers to slip on and off for washing.

I cut one 14 x 14 inch square and two 14 x 8 inch rectangles out of the shamrock towels.
Next I needed a pocket. I wanted to make my pocket out of the red and I wanted it to be heart-shaped. I needed to make a sturdy heart-shaped template. I keep a few empty cereal boxes in my craft stash because the thin cardboard is always coming in handy. I went to grab one off the shelf and found a Cheerios box in my hand. Looking down at it, I realized exactly how perfect it was.
It already had a giant heart on the box! What luck! It was the perfect size and now I didn't have to fuss with trying to get a perfectly shaped heart template. I cut out the heart and used it to trace two hearts out of the red towel.

I made a few attempts at getting this heart just right. One of the consequences of sewing on the fly is that you don't always do it the right way the first time. I'm going to try to show you the way I liked best but I didn't take many pictures of it.

I cut the two hearts out of the red towel. I stitched them right sides together almost completely around. Trim the excess, clip the corners, turn right sides out, press and topstitch around the whole thing, closing the open portion. I ended up with a nicely shaped lined heart pocket.
I pinned this to the center of the 14 x 14 square and stitched in place 3/4 of the way around, leaving the top open to make the pocket. Backstitch at the start and end to reinforce the pocket.
Yellow dotted line is the stitch line
Next I prepared the back. I serged one long edge of each rectangle to neaten it up a little. I sewed a 1/2 inch hem on one of the rectangles and topstitched close to the edge.
I pinned two pieces of Velcro in place on the hem and matched up the Velcro pieces on the serged edge of the other rectangle. I stitched the Velcro in place.

I laid the top piece down, right side up. I placed the back pieces on top, right sides together, lining up the Velcro strips and edges.
I pinned through all layers all the way around and stitched in place. Press, trim the excess, clip the corners and turn right side out. Press again and now it was ready for the pillow!
This was full version one, featuring heart version two. The heart is not exactly evenly shaped so I had to try it again.

Full version two, featuring heart version three--which I am completely happy with.

For comparison, version one on the left, version two on the right. Next to each other the lopsided-ness is much more obvious.

Total cost: $12 for two pillows--three shamrock towels, one red towel, two pillow forms

Total time: The first version took 1 & 1/2 hours, but since I had worked out a few kinks the second one was done in about 45 minutes.

Final verdict: I am going to give these to my boys on Valentine's day but I think I am going to have to replace the heart pocket on version one. My OCD-ness just will not allow that to stay when its twin is so much better looking. I know that my boys won't care in the least. The little lovebugs just adore anything I make for them.  I like her idea of sharing little messages but clearly missed the date on that one. These will be in season for at least another month, so maybe we will share messages from Valentine's day until St. Patrick's Day?  And now that I know how many dollar store towels it takes to make a cover, maybe I'll just whip a new one up for each season.