Friday, November 30, 2012

Pin 162

Whew, blogging during the holidays is HARD!! Between party planning and holiday shopping and going to work to pay for it all. . .

Original pin:
Pinned Image
http://tastykitchen.com/recipes/salads/crunchy-apple-grape-salad/

The next Thanksgiving installment: As previously promised. . .

 Crunchy apple grape salad.  This was easy enough to prepare--the most labor intensive part was peeling and cutting everything. I actually put this one together the night before as well. I just put all the cut fruit in a storage bag and poured the dressing in. Then I sealed it and gently turned it around to coat everything and popped it into the fridge. There is just enough lemon juice in it to prevent the apples and pears from browning on the edges.  Just before serving I stirred in the almonds and walnuts.


It was soooo good! I loved it. The kids ate it. It was a nice, cool, refreshing side dish. I was so hot from all the cooking (and cooks) in the kitchen by the time the Thanksgiving meal rolled around, I needed a dish like this. And it kept well too. Here it is two days after I made it:

Just a teensy bit brown on the edges but still crunchy and delicious. The nuts were still crunchy too so you don't need to wait to stir them in like I did.

Total cost:  Around $10. The recipe filled a gallon-sized storage bag.

Total time: How fast can you chop fruit? It took me around twenty minutes all together.

Final verdict: Delicious. I will be making this again. My mother is already planning when she is going to make it. It would be great as a brunch dish or at a shower. Yum yum. This one is for the books.

Tuesday, November 27, 2012

Pin 161

Here is the first of three Thanksgiving posts!

Original pin:
Pinned Image
http://www.marthastewart.com/314369/no-knead-dinner-rolls?autonomy_kw

Martha Stewart shared a recipe for some no-knead dinner rolls. I felt she was trustworthy enough to take this to Thanksgiving dinner without a test batch first.

I mixed these up the evening before Thanksgiving. We always "run" (or something not at all like running) the Fort Worth Turkey Trot on Thanksgiving morning. I didn't want to be rushing to put something together that day so I let these sit in the fridge overnight. When I was preparing them, they were rising so fast I thought they might be up and out of the pan by the morning. Luckily, they were not.

I took these out of the fridge about one hour or so before I was ready to bake them. They didn't need to cook quite as long as the recipe stated. I took them out a little early because they were getting too brown. Here they are straight out of the oven:
They were not smooth on top like I expected dinner rolls to be. They had a good flavor but they were very dense. Not dense in the way they would be if they had not risen, they rose and had lots of air pockets and such. I just think the lack of kneading contributed to their density.  They were more what I would describe as biscuits.  Because of their density they were very, very filling. I made two batches to feed 17 people. The second pan was not even touched until Thanksgiving round 2 hours later. 
Trying to show their density here. . .
 Total cost: These used a lot of flour and I had to send hubs out for more before it was too late since I was making two batches.  He doesn't report back on prices. I'm guessing it was a few bucks for some flour. Everything else I had on hand.

Total time: The prep on these wasn't bad at all. Since you don't knead it most of the time is spent in the rising. Hands on was probably around 30 minutes for the two batches together--mostly spent shaping the rolls.

Final verdict: Like I said before, these were pretty biscuit-y so I won't make them again when I am looking for a dinner roll. (When I think of a dinner yeast roll I think of soft and airy.) I already have a biscuit recipe that I am absolutely, positively, undeniably in love with so I wouldn't make these when I am wanting biscuits.  They did make pretty good leftover ham sandwiches.  They were sturdy enough to hold together for that. Easy enough to make for a crowd and made 18-22 per batch.  There is a good chance I won't make these again.
 
 
And here is a sneak peek at the next pin. . .


Tuesday, November 20, 2012

Pin 160

Original pin:
Pinned Image
http://www.howdoesshe.com/5-ideas-to-keep-kids-entertained-at-a-restaurant/

Tic-tac-toe with sugar packets while waiting on restaurant food.

I didn't plan on doing this one this week so I don't have pictures of my own to share. Guess that is a little what this pin was about anyway. There are actually a few ideas on keeping kids entertained at a restaurant.

My oldest is 5 and in the last six months or so finally figured out the whole tic-tac-toe thing. We tried this out this week as we waited on our food to arrive. It is a clever idea and he was really into it as I set it up. However, my sweet little five year-old does not have the delicate touch required to place the sugar packets without knocking over the balanced knives. We had to reset the game board after each of his moves. We only made it through one game before we both we ready for something else.

If you read the comments on the original post there are some pretty hot opinions about kid's behavior in restaurants and what you should and should not allow your kids to do. I try to teach my kids to be respectful in restaurants and in all honesty, we just don't go out much to restaurants that don't have a playground. A little sad, right??

In the spirit of the original post, here is what I have used to entertain my kids at restaurants:

1. If I am really planning ahead, I will grab our memory card game. (Which happens to be one of our favorite story characters: The Pigeon Wants a Match)


Its fairly easy to clear the table enough to set this one up. Sometimes we half the deck if there is not enough room.  We could just as easily grab any card game--Old Maid, Go Fish, but Pigeon Match is our favorite (and it's all packed in that cute little pigeon bag!).

2. I spy. Big Brother's favorite game. We play this everywhere when we are waiting. The doctor's office is an especially hot spot for this game but it works for a restaurant too.

3. Hot Wheels. I usually have a few roaming around in my purse somewhere. It comes with the territory of having two boys. These usually occupy but you run the risk of having to fish them out from under the table over and over again.

4.  After the tic-tac-toe game we moved on to this one: I had some fruit snacks in my purse but you could do this with anything. Sometimes I use TicTacs, Skittles, or any little reward you can think up. I don't necessarily want to give them a bunch of sugary treats right before a meal so the challenge for me is to see how long I can make a fun size pack last and keep them entertained. I ask them a question and if they get the answer right then they get one fruit snack (or TicTac, or Skittle, etc.) If they get it wrong then they get nothing. There is a fine line between hard questions to make the pack last and easy enough to keep them engaged. You can ask questions that take them time to figure out like, "How many sugar packets are in the dish" and "How many letter "a'"s are on the menu?" My five year-old gets lots of spelling words, math problems, history "Who is the President?", geography "What is the capital of Texas?", while my little one gets questions like, "What letter does purple start with?" and different color, shape, number, letter, relative ("Who is mommy's sister?") type questions.

5. Stacking Cheerios. When my youngest was little my oldest would play this one. Now that my baby is nearly three I don't usually have Cheerios stashed in my bag anymore.

6. If we are starting to fail, we order a bowl of chips and salsa--or whatever appetizer is on the menu that can be prepared in minutes.

Total cost: $0 unless you count the cost of food.

Total time: 30 seconds to set up. Entertained us for 2 minutes.

Final verdict: We'll try it again when he's older but constantly picking up the knives and rebuilding was just a little of a pain.

And since I have no tic-tac-toe picture I'll just share with you some thankful art that came home from preschool this week. I absolutely LOVELOVELOVE this piece. It is going in the safe.

Me too, buddy, me too.

Monday, November 19, 2012

Pin 159

Original pin:
Pinned Image
http://naptimedecorator.blogspot.com/2011/11/time-for-thanks.html

A little Thanksgiving decor to spiff the place up.

Okay, where to start on this on. . .

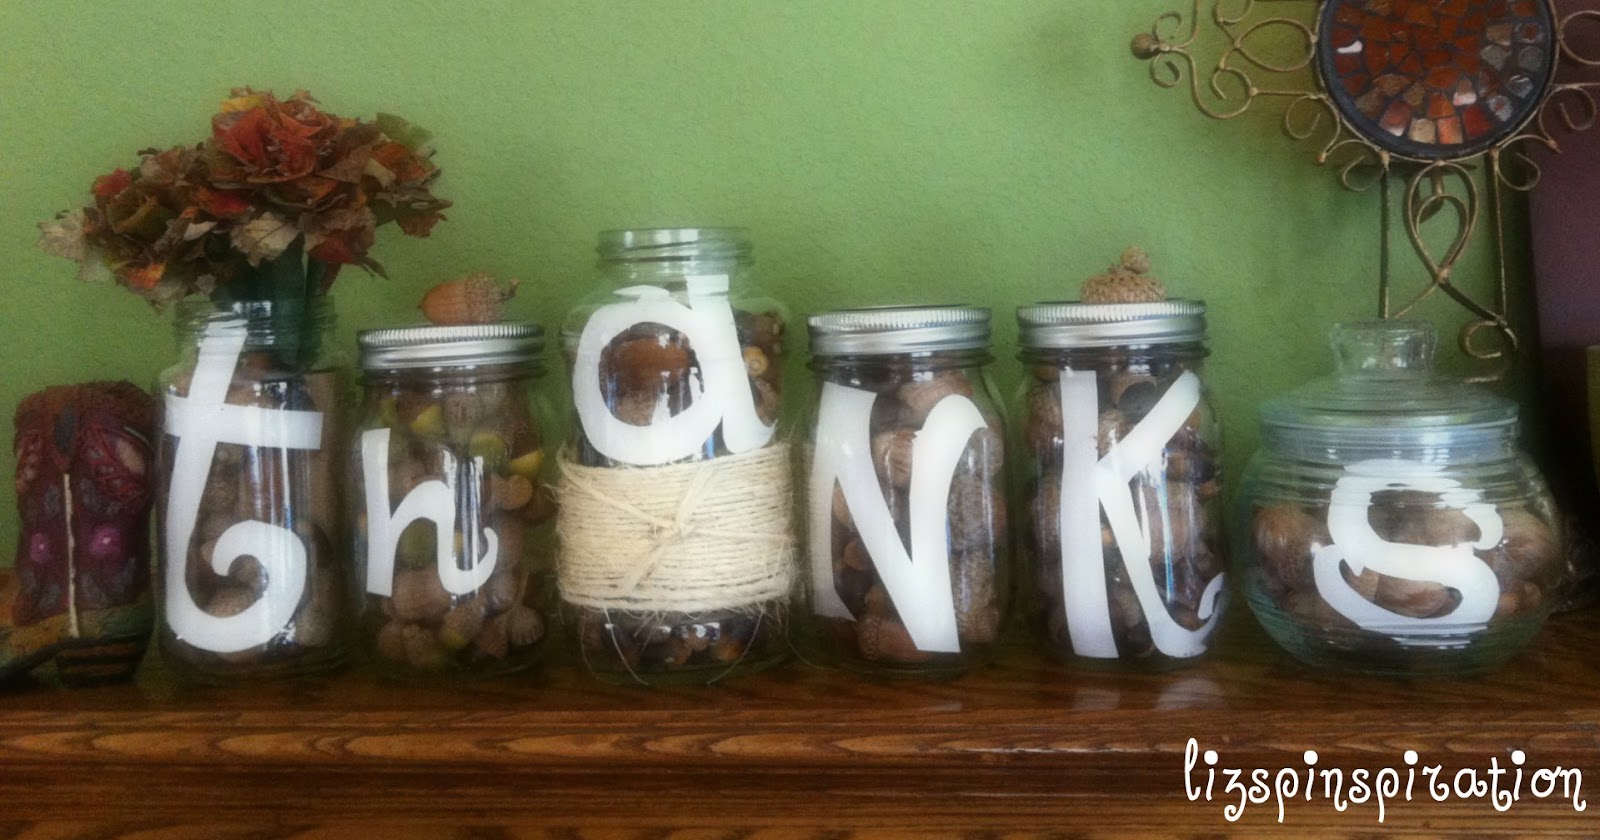
My vision for this project was a little different. I liked the "thanks" concept but I planned to use different sized filled jars. And instead of painting on them, I decided to cut out the letter and stick it down in the jar. That way I could reuse it for something else later.

I wanted to fill my jars with fall things of nature--pine cones, acorns, etc. My boys are always picking up acorns around the neighborhood so I we went on a scavenging walk. Do you know how many acorns it takes to fill 6 jars? A lot. A heaping lot. More than I found just taking a quick walk around our block.  So I had been keeping my eye out for some oak trees. A few weeks ago I decided to take little one to a park that had some big oaks. I spent a long time gathering while he played. I seriously gathered at least an hour. I was very indiscriminate in my gathering. I just scooped up anything and everything that seemed intact and uninfested.
The haul.

 I took them home and washed and dried them well. I sorted them into three piles: green acorns, brown acorns, and caps.

Later that night after the little kiddies were in bed I set about the task of gluing acorns to acorn caps. As I worked from my piles spread out on white paper towels, I started to notice something. Little piles of dirt? Turns out my acorns were infested because soon after I saw little white worms poke their ugly little heads out. Okay, that's my cue to wrap it up. I screwed the lids on the jars (very, very tightly) of already glued acorns. The rest of the acorns were quickly shuttled back outside to the patio. 

In the morning, the "t" jar had these little fellas waiting for me:
They make me gag.
Since this is a Thanksgiving project, here are a few things I am thankful for:

1. I started the project the same day I brought home the acorns. They didn't sit in my house releasing worms for days before I noticed.

2. I was working on it at night. Seems that these little buggers are more active at night. I may have never noticed this if I was working during the day.

3. Mason jars with very tight sealing lids.

I did a little googling research and found out that this is very common with acorns. Who knew? I sure didn't. I got a lot of mixed information on how they get in the acorn, what they do in there, how to tell if the acorn is infested, I don't really have any great advice to offer here on this one. I did learn this:
That's how you can tell a worm has come OUT of the acorn.
 Totally disgusted, I had to put this project down for a few days and rethink my methods. There were about five acorns in my stash that we had collected from the neighborhood. These never released any worms. They were bigger and their caps were still on. (One website suggested that acorns that fall before their caps do so because the weight of the worm causes it to release from the tree early. True? I don't know, but a nice theory.) Anyway, I decided I would go find more of these acorns.

After searching all the public neighborhood areas without luck, I found two different neighbor houses with nice big acorns. I tried ringing the doorbell first, but with no response, I went ahead and collected their acorns. Sorry if you wanted those. Blame it on a really hungry squirrel.

I thought back to middle school science lab when we had to stick these bugs into a diorama. We froze them to kill them. I took all my acorns home, sealed them up in a big ziplock bag and froze them for 72 hours. Again, I googled some more avoiding about acorn worms. Some suggested freezing, some suggested baking. I decided to do both. I looked over my first stash as well. The green ones had never hatched any worms, so I decided to try these as well. After a good long freeze, I popped these babies in the oven for a few hours. The green turned brown but I didn't burn anything.

After they cooled, I put them back into a ziplock and sealed it. I watched it for two days to make sure there were no super charged worms that survived the freezing and the baking. Looked good. Back to work.

I still didn't have enough to fill my jars completely. I used toilet paper rolls to fill the back half of the jar. Then I cut out a letter and used a piece of clear tape to hold it in place while I filled the jar with acorns. When full, I pulled the tape off and put the lid on.

Once all the jars were full, I lined them up on my mantel. I popped a few of my leaf flowers from Pin 154 into one of the toilet paper holders. Here it is:


Look! No worms!


Total cost: $0
 
Total time: Days and days and days.
 
Final verdict: My Lu loves it. He asked me to leave it up there forever so we can always remember Thanksgiving. It was a lot of work. But I learned some lessons about crafting with acorns. I may never get rid of my perfectly prepared stash of acorns either.

Friday, November 16, 2012

Pin 157 & Pin 158

Original pin:
Pinned Image
http://www.eventtrender.com/blog/2011/11/a-is-for-apple.html

I absolutely love this gift idea! An apple and a little jar of homemade apple dip. Her recipe for apple dip sounds delicious, but I was giving these to some teachers today and I didn't want them to have to refrigerate it immediately. So while I still want to try out her dip (cream cheese. . . Heath bits. . . mmmmmm. . .) I substituted this recipe from DirtyGourmet.

Original pin:
Caramel Apple Dip picnic
http://www.dirtygourmet.com/caramel-apple-dip

While I do cook a lot and am not usually intimidated by new recipes, candy making is not an area I have worked with a lot. I am terrified of burning the sugar! A few years ago I made an attempt at a few Christmas candies that just turned out a mess. I pretty much stay away from boiled sugar. But I was feeling brave so I jumped right it.

Then I jumped right out! Just as the sugar was starting to brown I pulled it off the heat and finished off the recipe and ended up with this:

Doesn't look much like caramel, huh? Let me tell you--it didn't smell much like caramel either. So I took a deep breath and started over. When I was making ice cream over the summer I stocked up on sweetened condensed milk, so I pulled out another can. Before I started to boil the sugar, I got on my frined Google and looked at some pictures of browned sugar. As I had suspected, it turns out it needed to be much, much, much browner. So with the bravery of Google pictures, I started back in. Second batch was a success!
And for comparison:
After it was cool enough to eat I sampled some. Then I let my husband taste some. He is not much of a participant when it comes time to lick the bowl clean, but after one taste of this he came into the kitchen and scraped every last bit off the wooden stirring spoon.

I filled 4 half-pint jars about 3/4 full and let them cool. The next day I packaged them up with a nice fresh green apple and sent them off to school for the boys' teachers. Luckily, I had only three teachers to gift, so I got to keep the last jar for myself. I sat down and had apples and caramel for lunch by myself yesterday! Today after school this is all Big Brother wanted to eat. I'm rationing it out! Looks like I am going to have to make another batch soon. Good thing I have a stock pile of sweetened condensed milk.


Total cost: The only item I had to purchase was the apples, and I actually sent my husband out for them. He didn't report back on the cost.

Total time: It took me about an hour but that was for two batches and a little google searching. Plus I washed and dried all the jars before I started cooking. 15 minutes to package them up.

Final verdict: Dip was very, very good. Better than the store bought stuff. I actually have some in my fridge and taste tested side-by-side. Makes a cute and easy gift as well. L asked if we could make some for the principal, his secretary, the school bus driver, his Sunday school teacher, . . . looks like I'm in the boiling sugar business now.


Tuesday, November 13, 2012

Pin 156

Original pin:

http://iwashyoudry.com/2012/05/02/how-to-wednesday-baking-a-potato/

Outback-style baked potato.

I love a good baked potato. I have been craving them lately. Have I mentioned on here that I have been training for a half-marathon lately? I guess my body is needing some carbohydrates because I can't seem to get enough baked potatoes lately.

Like a few other foods (tomato sauce, pizza crust, buttermilk biscuits, etc.) I am a little snobby about their preparation. I do not like baked potatoes made in the microwave.  They must be slow baked. They have to be the perfect done-ness, with the perfect distribution of toppings, and the perfect texture.

In the time since I first tried these and this post I have made this potato three times now. It is simple--really, how complicated can a baked potato get? I followed the directions, and one hour later pulled this puppy out of the oven:

Sliced it open and squeezed it up a little to prepare it for the barrage of toppings headed its way.
It was perfect and delicious. I actually forgot I was posting this and ate it up without taking photos of the finished potato with all the toppings so I dreamed up this one for you:
The brown is bacon pieces. I couldn't draw bacon pieces.
I am not usually a potato skin eater when it is a baked potato but for the sake of the pin I did eat some of it. It definitely had much more flavor than if I hadn't put anything on it at all but it didn't convert me to a skin eater. Yet I have continued to prepare my potatoes this way. I can't put my finger on it. What is different? Not sure, but it is delicious. I don't really make potatoes that often because my husband doesn't love them (when you only put butter on them it just isn't the same...) and sometimes I get impatient waiting for them to finish. I have found myself making these during the week when I am home alone for lunch. Mmmmm. This post is making me hungry. I think I'll go make a potato now.

Total cost: $3 for two weeks worth of potatoes

Total time: Minutes to prep, baking about 1 hour

Final verdict: I love it. I will not go back to making my potatoes plain. If I ever figure out what it is that makes these so irresistible even without eating the skin, I'll let you know. Try them! I'll bet you have oil and salt in the pantry now. GO!

Thursday, November 8, 2012

Pin 155

Original pin:
Pinned Image
http://www.sixsistersstuff.com/2012/03/slow-cooker-7up-chicken-rice.html

7Up Chicken & Rice from the slow cooker. Sounds great, and easy.

It was so simple there isn't really much to say about it.  I mixed it up in the morning quickly and let it cook as directed. I used regular rice instead of minute rice because that is what I buy. I cooked it a little too long and the rice on the edges burned a little.
The chicken was so tender that all I had to do was stir and it just fell apart.  As I expected, this didn't have a ton of flavor--but that is not necessarily a bad thing because, number one--it is an easy problem to fix. Flavor it up with whatever you want. I would probably use salt, pepper, garlic, and some paprika, maybe some rosemary. Number two--this falls perfectly into a category of food I lovingly refer to as "toddler food." It is soft and easy to chew. Doesn't require me cutting it into teensy tiny bites, and is not full of flavors a kid would immediately spit out.

Total cost: $5 for chicken breast. Everything else was already stashed in the pantry.

Total time: Hands on--5-7 minutes.

Final verdict: It was good. The kids liked it, I liked it, the hubs liked it. There was nothing crazy special about it--except that everyone liked it and ate it. When you factor in that (1) everyone ate (2) I made it for $5 + pantry staples and (3) I barely had to do any work, I think that makes it a winner. Who isn't looking for easy to throw together dinners that everyone will eat? Will we make it again? I haven't ruled it out. It may be one of those recipes that I keep stashed in my back pocket for when we are busy and the pantry is getting bare. A good staples dish.

Wednesday, November 7, 2012

Pin 154

Original pin:

http://www.designsponge.com/2011/10/diy-project-autumn-leaf-bouquet.html

Aren't these beautiful? Roses made from fall's leaves.

I thought this would be a cute, easy, and free little decor item to get us in the fall spirit. We need that since this weekend it was 88 degrees!! Really? The first week in November?

I decided this would be an easy project to solicit the boys help on with gathering leaves and sticks so we took a little "nature walk." Look at our colorful collection:


These should turn out beautiful, right?

It took a few tries to get the feel for how to fold it and how to hold it. The browned edges of the leaves were a little crumbly. I did have to make a second trip outside for more leaves. I had suspected that the brown leaves would be too dry to fold and manipulate, but I had thought that the fallen leaves that weren't yet brown would be okay. Turns out, if they were on the ground they were too dry. I went back out and harvested some leaves off the tree. I chose ones that were changing color and came off without having to tug. Literally I would touch them and they would fall off in my hand. Most of my leaves came from my Autumn Blaze Maple tree (appropriate for the project, right?), but I did manage with some leaves from my Bradford Pear tree also.

I had trouble finding a good place to photo these for you, but here are my best shots:

 Mine are not even comparable to the original. I don't know if it is because her technique is spot on or if she had different kinds or sizes of leaves. My overall presentation was underwhelming and just feels a little sloppy.

 Like I said, these pictures are not great. I couldn't get the right lighting and the right background color to show them off well. But maybe because they just aren't that pretty?

I highlighted my different one here:
 With the Bradford Pear leaves, I didn't fold them like the maple leaves in the tutorial. I just wrapped them around and around each other.

I made a few little buds too. Once the flower started getting full is when leaves started tearing and it started looking sloppy so I tried a few flowers with just three or so leaves.

Total time: 2 hours in collection and manipulation

Total cost: $2.99 for two rolls of floral tape. I probably used 1/2 of one roll.

Final verdict: Mine are rather ugly. I won't be heartbroken to toss them in the trash. I still think it is a neat concept and that the original ones are beautiful. I thought they would be brown and crumbly by the next day but they are actually still the same colors as they were when I made them and that was a week ago now.

Thursday, November 1, 2012

Pin 153

The last of my Halloween posts. . .

Original pin:
Pinned Image
http://www.moredesignplease.com/moredesignplease/2010/6/6/diy-recycled-t-shirt-tote-bag.html

I'm not going to lie to my faithful Pinspiration followers. Here is the truth. I did make these. I did not make these this year. In fact, I made them for last Halloween. When I was pulling out all the holiday decor I came across them and decided to share them with you now. So here they are: Recycled t-shirt tote bags.

This was one of the first projects I ever did from Pinterest. It is really, really easy. Last year I thought I could make some really cute upcycled trick-or-treating for the boys. Daddy had this bright orange Halloween shirt that was just begging to be turned into a candy sack. I dug another orange shirt out of his drawer and went to work. In no time at all I had two trick-or-treat sacks ready to go.

The jack-o-lantern shirt was a men's XL and the elephant was a men's L. These made really, really large bags. The boys, then 4 and 22 months, were too small to carry them without dragging. Older brother carried the jack-o-lantern bag trick-or-treating, but it wasn't easy. The bag stretched with the weight of the candy and made it harder for him to keep from dragging. The main difficulty with using these as trick-or-treat sacks was that it was hard for little hands to manipulate the handles to open the bags.


On the flip side, their stretchiness makes them perfect for when you are at the market and need to cram just one more thing in. They are fairly sturdy. Since the armholes are the handles, it is easy to slide the bag all the way up on my shoulder to carry multiple at a time.

Total cost: $0

Total time: I think I made both of these in less than 30 minutes.

Final verdict: Great for shopping, poor for trick-or-treating with little ones. I just may start using them to give gifts in though. It would be really easy to make a bunch in lots of colors or thrifted shirts. Also, you could make them in all sizes based upon what size shirt you buy. Hmmm. . . I have an idea growing. . .