Showing posts with label bread. Show all posts

Sunday, April 21, 2013

Pinprovement! French Bread Recipe

I may have said this ad nauseum, but I just love making bread. You'll probably think I'm a total dork now, but I am going to admit something to you--sometimes, when I'm making bread and it is baking and making my whole house smell delicious, it makes me cry. Absolute tears of joy. I could never go carb-free.

In October I posted Pin 144, a recipe for one hour French bread. My family liked it in its original form but it was very dense and something was just not quite right for me. I tinkered around with the recipe a little bit and found a combination that I like a little better. It is no longer one-hour, but more like 1 and 1/2 to 2 hours. Still much faster than some other recipes I have tried. I make this recipe regularly and freeze the extra loaves. When I want one, I simply pop it in the oven and soon I have fresh, hot, homemade bread again.


As I mentioned in the original post, there were a few steps that I was just itching to change up. The first one of those was the yeast.

I swapped out the regular yeast for fast rising yeast. I was looking for a fluffier bread so I wanted to use maximize my yeast activity and rise time.

My recipe looks like this:

2 1/2 c warm water
2 packages of Fast Rise yeast
2 T sugar
1 tsp salt
3 T extra virgin olive oil
7 c flour

Add yeast and sugar to warm water and let sit for 5 minutes until you see lots of bubbles. When I first started making bread, my number one mistake was not getting my water warm enough or getting it too hot. It should be 105-110 degrees or as indicated on your yeast package. My advice to new bread makers is to actually measure the temperature of your water.
After 5 minutes--I have bubbles completely across the surface.  All the white is bubbles, you can see a bit of clear water at the edges. 
Add salt and oil. Stir to combine. I make this bread using my stand mixer with the dough hooks. If you don't have one, you can stir by hand until it is too thick and then knead by hand to combine all the flour.

Time to add the flour. I increased the recipe to 7 cups. I add flour 1/2 cup at a time and allow it to mix.  The original dough was really sticky and difficult to handle. Depending on your dough and your environment, you may need a little more or a little less flour. Here is my very scientific, expert method of how I determine when I have enough flour.

The poke test:

Gently poke a clean, dry finger into the dough:


Pull finger out. If it is covered in sticky dough, it is still too wet. Keep adding flour.


When you have enough flour, the dough is pulling away from the side of the bowl more and your poke test will look more like this:

Now it is time to let it rise. My poor husband usually gets dish duty. I try to keep the dishes down to a minimum so here is a little cheat step. Doing this cheat step saves me one large bowl from dish duty.

The right way to do it: Coat a large bowl in olive oil. Place the dough ball inside, turning over once to coat all sides.

The cheater's way: LIGHTLY spray the sides of your current bowl and the top of the dough with non-stick cooking spray (like canola spray).

I also spray the side of the plastic wrap that will come in contact with the dough.

Then I put the bowl in my warming cabinet. (heehee) If you didn't read Pin 144 about my warming cabinet I like to rise in, let me sum it here. Preheat the oven to 350 for 1 minute, then turn it off. Place your bowl of dough inside and let it rise. It is perfect! My dough always rises perfectly in there, it is undisturbed and warm no matter what the actual temperature of my kitchen is.

Allow the dough to rise 30 minutes to 1 hour. The longer you let it rise, the more air pockets you create for fluffier bread. However, keep your eye on it. After 30 minutes in the warming cabinet this is how tall my dough is:

Which is also why I spray every surface with cooking spray.

Next, I spray my working surface with cooking spray and dust with flour. Punch down the dough and divide the dough into four parts. You will see in the pictures that I can not divide evenly. My loaves are always a bit differently sized so do not stress if your loaves are not even.

Place one dough ball in the center of your workspace. Cover the remaining parts with your plastic.

Pat the dough ball into a flat, long oval. Do not overwork the dough. You will know you are overworking it if you can not get it to cooperate with you. If it won't pat out to an oval and keeps bouncing back, cover it with plastic and walk away for 10 minutes or so. Then come back and try again. Starting with the edge nearest you, roll in a jelly-roll fashion to create the loaf shape. I kind of roll with a little, teensy, stretch along the way.
This may be a good time to mention herbed breads. If you want four loaves of herbed breads, you can knead in your herbs after your flour, before your rise. If you don't want to knead them in, or if you want different kinds of loaves, you can do it here. I don't like to knead them in in this step--the bread seems to get too overworked. I sprinkle the herbs on top of my oval before I roll it and it bakes out pretty evenly.

Place on prepared baking sheet.

How I like to prepare my baking sheet for bread:
Spray sheet with cooking spray. Place parchment or wax paper on sheet. Spray parchment/wax paper with cooking spray. You can also dust with cornmeal, but I don't find that this recipe needs it.

Once you have all four loaves on the sheet, cut slits in the top of each loaf. I use kitchen scissors to snip the cuts or you can use a sharp knife. Cover with plastic until ready to bake. A second rise is not necessary. I usually just let it rest while the oven preheats.

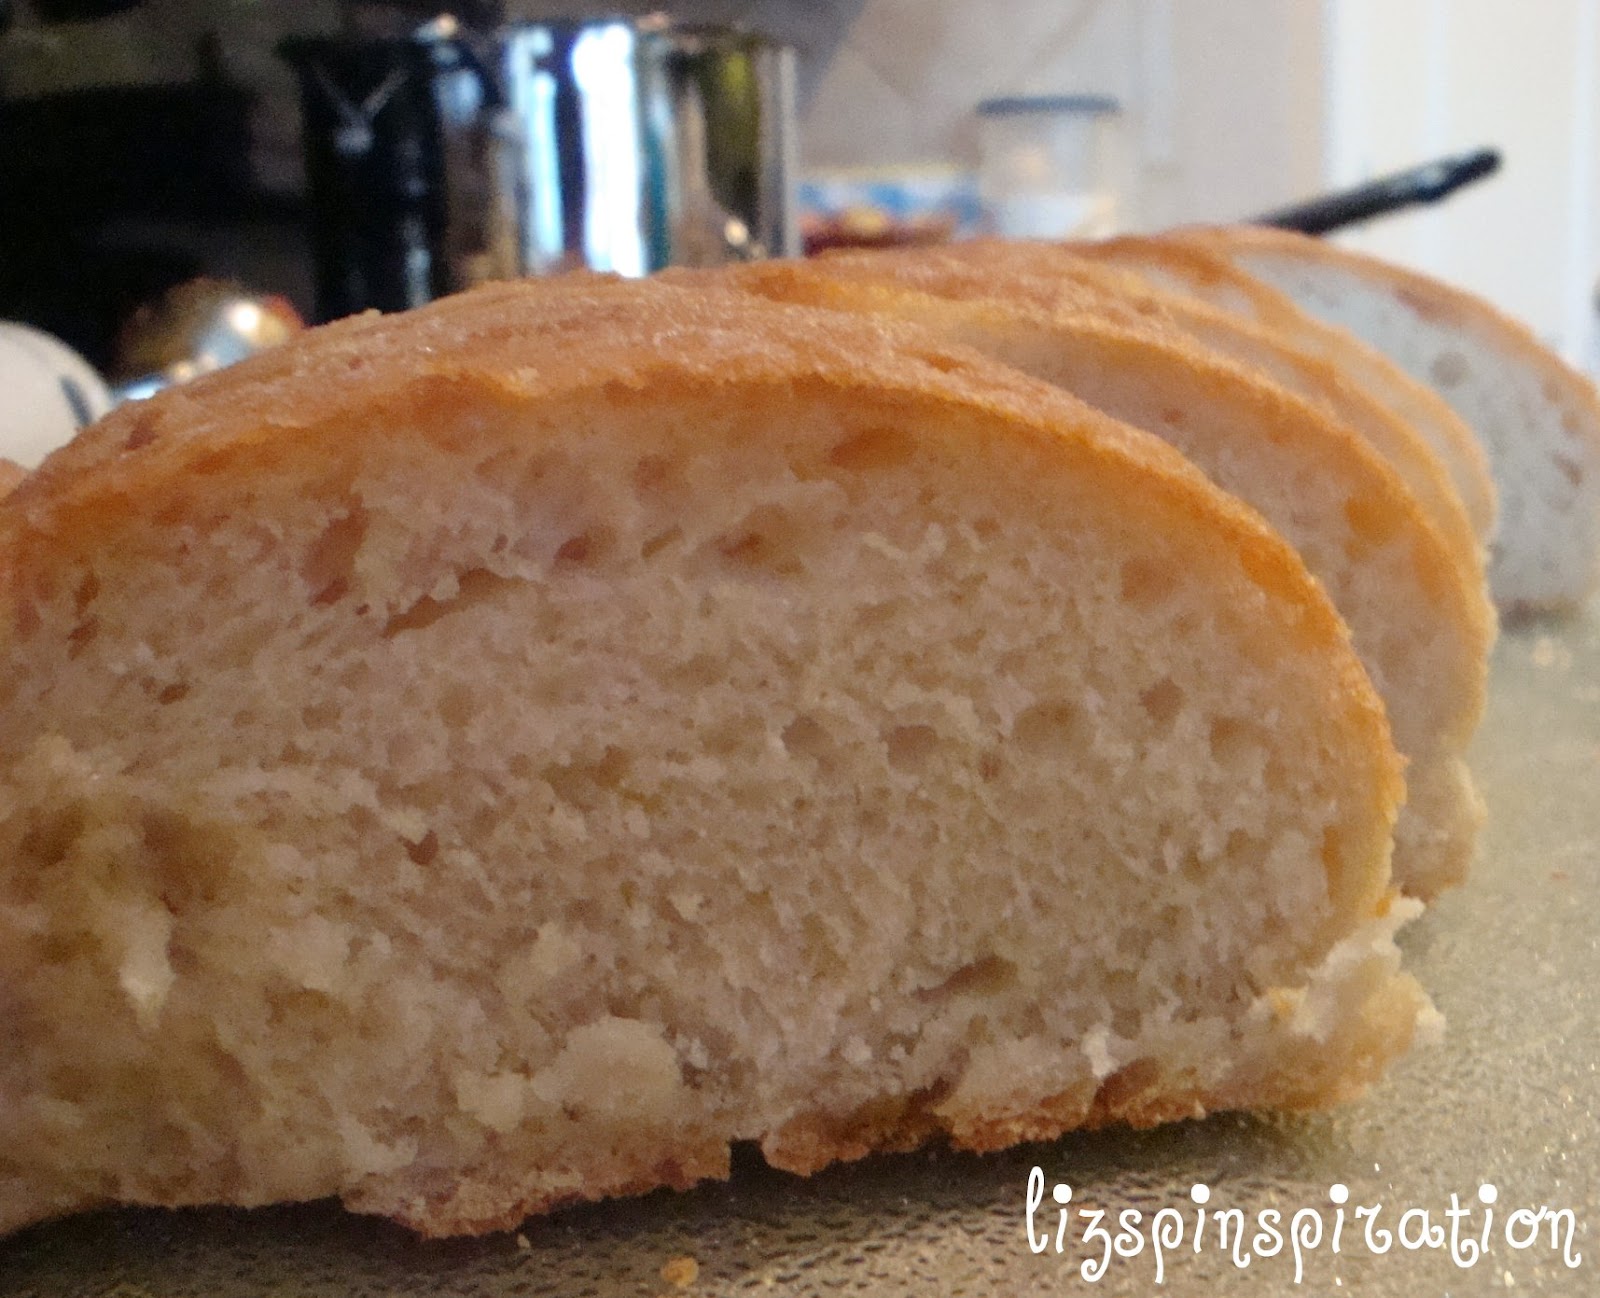
Place in a oven, preheated to 375 degrees. Bake 30-35 minutes or until your desired brownness. I like to brush melted butter on the tops as it comes out of the oven.

For a crisper crust, place a dish of hot, steaming water in the oven below the bread pan during baking.

Thirty minutes later I had these beauties (see my little runt loaf? Nothing wrong with a runt.)


The final result is beautiful, isn't it? Here is the fluffier inside:
I hope you like my adjustments! If you want a denser bread, or if you want to try out the original, go check out the link from Pin 144

As I mentioned in the beginning, I freeze these loaves. Wrap in aluminum foil and pop in the freezer. When you are ready to eat it, pop it into the oven, still wrapped in the foil, at 350 degrees for 30 minutes or until heated through. I'm not sure how long these would keep in the freezer because we usually go through ours at about a 1 loaf/week rate. 

Good luck and Happy Bread Making!!

Tuesday, March 5, 2013

Pin 192: Pioneer Woman Bread

Original pin:
Pinned Image
http://thepioneerwoman.com/cooking/2010/09/the-bread/

I was making some homemade tomato rice soup tonight for a couple of hungry boys and thought this bread from the Pioneer Woman would complement it nicely. As you may already know, I am a little obsessed with bread and bread making. I made a couple of loaves of my favorite bread last week and had stashed the leftovers in the freezer. (By the way, my current favorite bread recipe is a tweaked version of the one I featured in Pin 144. It was good in the original recipe, but I changed a few things and my family is obsessed with it now. We eat this bread at least once a week, if not more often.) 

I cut back on the butter called for in the original recipe because I was using a rather small loaf--probably the perfect size for a footlong sandwich.
I used only 1/2 stick per loaf of butter but made sure it was adequately covered. It doesn't look like it in this picture because some of the butter was already melting. I had thawed the bread out in the oven while the rice and soup were cooking so the inside was already a little warm. I guarantee you, there was liberal amounts of butter spreading going on.
I couldn't help but think, "Bread spreaders spread butter on bread. . .  that bed spreader better watch out how he's spreading or that bread spreader's sure going to butter his bedding." Happy Birthday Dr Seuss!

And into the oven it went. Waiting was the hard part. The Pioneer Woman said I must watch it every second once the broiler was on so I was a little tense that I would miss this perfect cooking time and my precious bread would be burned and wasted.
A little peek under the broiler
Approximately 7 minutes under the broiler gave me this deliciousness:
I did have Pioneer Woman's pictures handy to refer to when it came time to pull it out (or not pull it out). I could barely wait to cut off a piece and try it. It did not disappoint, it was tasty. Browned butter was a popular ingredient in one of my cooking magazines a while back, and this (not too surprisingly) tasted like browned butter--which is a good thing!  I love this bread plain, I love butter, what is not to love about this? It was a simple and quick alternative to plain bread. The toasting gave it a little stability which was absolutely perfect for scooping up my chunky tomato rice soup. The soft inside of the bread was still able to sop up the liquid part of the soup as well. I'm not going to admit to exactly how much I ate because then I'll have to deal with the reality of how much butter was consumed.

Total cost: $0--I always have butter on hand and the bread was in the freezer

Total time: 5 minutes prep, 12 minutes cooking.

Final verdict: Delicious! I will totally make this again. I could also see myself adding some flavors to it, maybe some garlic, rosemary, thyme. Although it is tasty enough on its own as well.

Wednesday, January 9, 2013

Pin 173

Where are all those "unfinished projects" I promised? Well I guess I got hungry and snuck in a bunch of food posting while I finished them.

There are reasons they are unfinished.

Number One was blatantly obvious this week--MONEY!! I spent my extra cash during the holidays and don't have a whole lot to spend supplies.

Number Two: Weather. It has been raining cats and dogs the last few days and I just can't bear to get out of the house more often than that. Besides, it is ridiculously cold and I just can't stand the cold. Anything lower than, say, 45 degrees and I'm bundled up in my fleece and uggs sitting by the fire moaning about the cold. Sorry. I am a life-long Texan. Give me days and days of 110 degree weather but keep your snow.

Number Three: Work. I mentioned a job change a few weeks ago. I am in the process of tying up all my loose ends at my current job and training my replacement so I've put in a little extra time and energy towards that lately.

Number Four: Holiday hangover. Not of the alcoholic type, unfortunately. Just the general exhaustion paired with the extra chores that need to be done. Packing up all the decorations, sorting through all the holiday rubble of paper, toy packaging, and sorting. Clearing out old toys and clothes to make room for the new ones. Catching up the household chores of cleaning and laundry. Getting everyone back in the rhythm of school and chores.

Blah, blah, blah. On with the food.

Original pin:
Pinned Image
http://allrecipes.com/recipe/golden-crescent-rolls/

I have been a bread making fool lately. You readers may already know just how much I love making bread. I have an extra fondness for yeast breads. I think the week of Christmas I made some sort of yeast bread nearly everyday.

This pin worked a little backwards. I had in my head that I wanted to make some pigs-in-a-blanket (aka, PIBs) but I wanted a different option for the bread other than the canned crescent dough. After a little online research I found this recipe that looked delish and pinned it right on to my cooking board. I started the dough that night. I followed the directions mostly. They were simple and the dough was very easy to handle. I rolled it and cut it into triangles as directed, but as I was rolling them with the little piggies inside I decided that next time it would be better to make rectangles for my pigs. As crescent rolls alone, triangles would be fine. Also, I halved the triangles since I was using cocktail sized pigs.

Not included in the original directions--I lined my pan with wax paper sprayed with cooking spray. I will not have my bread ruined by sticky dough ever, ever again.

I got a little lazy with the next step, which turns out later to be not a super-duper idea. As I was rolling them up and putting them in a dish, I found that all but maybe six or seven would fit comfortably. Well it was well past midnight at this point and I wasn't feeling like preparing a second dish for six measly PIBs. I also wasn't going to waste this (what I hoped was) fabulous dough either. So I worked very hard to squeeze these last ones in. I ended up with two left over that I just wrapped in tin foil. The original recipe called for an hour rise, but I just covered the dish with plastic wrap and put it in the fridge overnight. In the morning I pulled them out about an hour before I was going to bake them. Just before popping them in the oven they were perfectly risen, however the rising made them even closer together.
eek. look how tightly crammed the are.
A short, short 10 minutes later they were all done and golden.
Guess I should have rotated these halfway through. My oven baked them a little unevenly.
Well, mostly at least. They were all golden on top and the crust felt set. I was a teensy weensy bit worried about the middles since the cooking time was so short. I had baked the two loners just on the tinfoil along side so I sampled those. They were perfect. Deliciously buttery. The dough was light in texture and proportioned perfectly with the little piggie. These tasted exactly like the ones I get from my favorite donut shop and pay $1.50 each for (but only mine were smaller. Maybe half sized of theirs.)  As we dug into them my fears about the middle were confirmed. The rolls towards the middle were not fully baked on the sides where they touched. While it was far from raw, it wasn't quite done so it made it a little doughy. I ate them anyway. Lesson learned--don't pack them in so tightly. I didn't take a picture of them before they had risen, but before rising they were placed in the pan just close enough to not be touching. Next time I will place them maybe 1/2-1 inch apart. They did a lot of rising before and during baking.

Total cost: I only had to buy the cocktail weenies for around $3.29

Total time: About 25 minutes to make the dough, 20 minutes to roll the PIBs plus baking and rising time.

Final verdict: This was a really good dough! With or without the piggies it would still be delicious. They even taste better than the canned rolls. I can't wait to try this again--and do it a little better. But I am also imagining the possibilities with them. This could be substituted for all the million recipes out there that call for crescent rolls. The recipe says it makes 20-30 rolls so that would be the equivalent of almost three-four cans of the premade stuff. How much do you pay for a can of those? A couple bucks for 8? Is that right? My total unofficial, uncalculated, and unconfirmed mathematics says that you could probably make this whole batch for at least what you pay for one can--probably less. While I can't say that they are technically "better" for you health-wise than the canned stuff you do at least have the control over what you put in them. Now if I could just stop making bread maybe I could lose some of these holiday pounds. . .

Tuesday, November 27, 2012

Pin 161

Here is the first of three Thanksgiving posts!

Original pin:
Pinned Image
http://www.marthastewart.com/314369/no-knead-dinner-rolls?autonomy_kw

Martha Stewart shared a recipe for some no-knead dinner rolls. I felt she was trustworthy enough to take this to Thanksgiving dinner without a test batch first.

I mixed these up the evening before Thanksgiving. We always "run" (or something not at all like running) the Fort Worth Turkey Trot on Thanksgiving morning. I didn't want to be rushing to put something together that day so I let these sit in the fridge overnight. When I was preparing them, they were rising so fast I thought they might be up and out of the pan by the morning. Luckily, they were not.

I took these out of the fridge about one hour or so before I was ready to bake them. They didn't need to cook quite as long as the recipe stated. I took them out a little early because they were getting too brown. Here they are straight out of the oven:
They were not smooth on top like I expected dinner rolls to be. They had a good flavor but they were very dense. Not dense in the way they would be if they had not risen, they rose and had lots of air pockets and such. I just think the lack of kneading contributed to their density.  They were more what I would describe as biscuits.  Because of their density they were very, very filling. I made two batches to feed 17 people. The second pan was not even touched until Thanksgiving round 2 hours later. 
Trying to show their density here. . .
 Total cost: These used a lot of flour and I had to send hubs out for more before it was too late since I was making two batches.  He doesn't report back on prices. I'm guessing it was a few bucks for some flour. Everything else I had on hand.

Total time: The prep on these wasn't bad at all. Since you don't knead it most of the time is spent in the rising. Hands on was probably around 30 minutes for the two batches together--mostly spent shaping the rolls.

Final verdict: Like I said before, these were pretty biscuit-y so I won't make them again when I am looking for a dinner roll. (When I think of a dinner yeast roll I think of soft and airy.) I already have a biscuit recipe that I am absolutely, positively, undeniably in love with so I wouldn't make these when I am wanting biscuits.  They did make pretty good leftover ham sandwiches.  They were sturdy enough to hold together for that. Easy enough to make for a crowd and made 18-22 per batch.  There is a good chance I won't make these again.
 
 
And here is a sneak peek at the next pin. . .


Thursday, October 11, 2012

Pin 144

Original pin:
Pinned Image
http://keephomesimple.blogspot.com/2010/05/quick-french-bread.html

Quick french bread. The Pinterest comment said one hour.

I know I have mentioned this a lot, but I like bread. I like homemade bread. I like to make homemade bread. Tonight I wanted to make some fresh french bread to go with our spaghetti dinner but I was running around this afternoon and didn't get my usual recipe started early enough. It takes about 4 hours all together with boiling milk, kneading, two risings, etc. I decided to try this one out.

I'll be honest here. I was real skeptical. I just wanted to keep changing little things up here and there. For instance, I wanted to use quick rise yeast instead of regular yeast. Really, would it rise enough in one hour?? I wanted to knead it longer. I wanted to let it rise longer. I wanted to add more flour. But I didn't. I usually try recipes as written once before I start making changes or substitutions. As much as it pained me, I did it almost exactly. Here are the changes I made:

1. I made the whole dough in the stand mixer with the bread attachment.
Proofing in the mixer bowl

2. I did NOT create a warming cabinet in the microwave. The author doesn't go into much detail except stating to run the microwave for 2 minutes before you put the dough in to rise. Um, I was always taught to NEVER run a microwave empty. I do often, almost always when making bread, create a warming cabinet in my oven. I run the oven at 350 for 1-2 minutes then shut it off. Then I put the bowl in the turned-off oven for rising.
My warming cabinet

3. The dough was so sticky it was almost impossible to handle to shape. I gave it a good dusting with flour before tossing it on the counter. Patted it to a flat rectangle, then rolled it--jelly roll style, to put on the pan. My second loaf was prettier than my first because of the stickiness.

4. I lined my pan with a piece of parchment paper, sprayed with cooking spray. Sticky dough has burned me before.
Two loaves, ready to go in the oven. See that little ball on the left end of the bottom loaf? That's my tasting biscuit. So that when its fresh out of the oven I can pull that little ball off and taste it without cutting into the whole thing. Can't let the scraps go to waste. :)
So no real ingredient changes or huge method changes.  Meanwhile, as the bread was cooking I was tending to a couple busted lips with Popsicles. I was trying to assess the damage and determine if I could let the bread cook or needed to turn it off and head into the ER. Luckily, the Popsicle fixed him up enough. It's a little ugly though.

Ding! It's ready!
My major dusting of flour really shows here. How to fix this? Butter. Butter fixes everything, right? I just brushed on some melted butter and lookee here:
Gorgeous. Paula Deen would be so proud. And now my little tasting biscuit is in my belly. Here are some other pretty shots of the bread.

The golden crust was just beautiful. The bread inside was very soft. As was mentioned in the comments on the author's post, it is a dense bread. It is very soft and the crust has a slightly sweet taste to it. I wouldn't immediately classify it as "french bread" though. It is not the same texture and doesn't have as much of the thick chewy crust as French bread usually does. I think allowing more time to rise would create more air pockets and move it closer to what I think of as French bread. (Although when I looked it up the definition said "white bread in a long thin loaf" so I guess technically it is.) My husband loved it. We ate the whole loaf tonight. I sent the other home with my sister.

Total cost: $0. I had everything already on hand.

Total time: It's called one-hour French bread. It took about 35 minutes to prepare and then 35 minutes to cook. Just over one-hour. Maybe I'll get it under an hour next time.

Final verdict: Next time. There is a next time. It might be tomorrow. So good. I will definitely use this one again. With the sweetness to the crust, I think it could truly make some excellent French toast in the morning--if there were any left.