Showing posts with label teacher gifts. Show all posts

Tuesday, May 21, 2013

Pin 206: Whipped Body Butter

Before we get down to business I have a very important announcement for you! For months now, I have been talking about this certification test I am supposed to be preparing to take for work. This extensive studying (cough! cough!) has been keeping me from pinning as much as I would like. Well, my friends, I have booked a date to get this test over with!! Mid-June this nonsense will be over and I can get back to my pinning and blogging more regularly. WooHoo!!

Now on to business. . .

Original pin:

http://www.livingthenourishedlife.com/2012/02/homemade-whipped-coconut-oil-body

Whipped coconut body butter. Coconut oil seems to be the hottest ingredient lately. I see it in everything! I actually have four coconut body butter recipes pinned. I wanted to make some of this because I keep hearing about all the wonderful things it can do for your skin so I closed my eyes and just picked one of the pins. I ended up over at the Living the Nourished Life blog which has a super simple recipe. I had some coconut oil in the pantry but I wanted to give some of this as teacher gifts as well so I sent Mr. Pinspiration out to the market to pick up some more.

When I started this I noticed two different consistencies with my coconut oil. (I am going to stop here for a minute to clarify something--I am NOT a coconut oil expert. The extent of my coconut oil knowledge is as follows: Coconut oil comes from coconuts. When it is solid it can be very hard. Coconut oil has many different uses. The end.) Not sure if this was due to my different brands, one being fresher, or something totally unrelated.
The one on the left was my new jar, the right was the jar I already had.
The old jar was hardened and a little separated (as I expected) but the new one was so velvety soft and coconutty looking I almost wanted to put a spoonful in my mouth! It looked like the inside of some wonderful coconut dessert!
Extreme close up!!! See the difference in the textures?? The left was the new jar and the right I dug out of the older jar after chopping up the hardened part and stirring back with the oily part. 
I started with the more delicious looking fresher jar. I set my stand mixer to work and danced around singing the "Whip It" song because I couldn't resist.

My singing must have sent off some bad vibes because my body butter was looking nothing like I expected.
It was totally liquefied. I figured this had something to do with being here in sunny Fort Worth and in my comfy 78 degree house. (I can't afford to keep it any cooler here in Texas so my body has adjusted to this 78 degrees and I now find it perfectly comfortable. Except for in the winter when my husband insists we keep it more like a chilly 68. Brrrr. I am a Texas girl and the heat doesn't bother me.)

I poured this in a small jar and popped it into the fridge. Next I whipped up some from the older jar with similar results. I even packed ice packs around the bowl to keep it chilled while it whipped. Into a jar and into the fridge it went. Before I whipped the third, and last, batch, I chilled the coconut oil itself, just to see if I could get any different results. The chilled coconut oil initially whipped up like it was going to get that fluffy appearance as in the original pin, but even packed in ice, started to melt quite a bit after two minutes.

Just as an experiment, I re-whipped one of the original jars after it had chilled. Still not airy and fluffy, but it didn't quite liquefy as much.

After much experimentation, I ended up with three jars of similar consistency.  I tried fragrance with one of the batches, but the coconut scent was delicious and I didn't feel the need to overpower it with a different smell so I didn't add it to subsequent batches. Refrigerated, the mixture hardened to a consistency that was like cold real butter--hard but manageable.
A freshly chilled jar
Once allowed to reach room temperature, the body butter is very soft with a consistent texture. I haven't had any separation of ingredients or re-hardening of the oil. It isn't the fluffy, airy texture I expected, but it isn't unpleasant either. It melts really fast in my hand so I have to move quickly transferring it to wherever it is headed. There are tiny bits of coconut oil that I can feel when I smooth it over my skin, but they melt quickly. I compare it to those little beads that are sometimes in face wash that dissolve quickly.
Two of these jars were for gifts, so I stamped up the tops to get them ready for the teachers. 


I wrapped them up in a 16x16 square of fabric with a little note and a quick bow and they were ready to gift! 

Total cost: I can't say, because these were gifts. I used about 1/2 jar of coconut oil for each jar and made three jars. 

Total time: After much experimentation, I would estimate you could make this in 10 minutes. I spent about 1 & 1/2 hours playing around. 

Final verdict: It is very indulgent to use! I love this and will be using it frequently. I hope the teachers liked it as much as I do. The recipe was surprisingly simple and uncomplicated. If your house is cooler than mine, you can probably achieve a less melt-y texture than I did. I have been keeping it in my bathroom and the consistency has stayed the same as it was originally in the butter rewarmed to room temperature. In the summer, it may be more enjoyable to have the butter chilled to apply. This pin was a winner for me, but next time I just may have to try out some of those other recipes. 


Monday, May 13, 2013

Pin 204 & Pin 205: Wristlet Key Chain with Hand-stamped Charm

Original pin:

http://prudentbaby.com/2010/11/hot-mess/accessories-hot-mess/how-to-make-a-wristlet-key-fob-2/

A wristlet keychain tutorial from the ladies over at Prudent Baby.

As I mentioned a  few weeks ago, I was putting last minute details together on Teacher Appreciation week. Like last year, I was in charge of putting together gifts for the whole preschool. Since I am on a super tight budget, I am always looking for inexpensive gifts to make for the teachers. Since I have to put together so many, they have to be quick and inexpensive. These keychains seemed to be perfect. I also was able to tie the whole luncheon theme together with the keychains. As I am sure many schools experienced this year, our preschool was entirely rekeyed with strict implementation of renewed security measures. All the teachers are having to carry their keys everywhere. We made keys the theme of our lunch.

I found a super deal on the webbing and picked up some matching ribbon. I had to order the key fob sets from Amazon because I could not find them anywhere locally. Click the picture to see the kit I am referring to:


I used the one inch width.

I brought all these supplies along on my girl's crafting weekend last weekend and went to work.
I actually skipped the step on fusing the ribbon to the webbing. I was feeling a little lazy. Instead I just held it in place and sewed along. Not much later I had this big pile of ribbons and webbing.
Time to start trimming!
I discovered a severe miscalculation at this moment. I needed 21 keychains and had somehow purchased and sewn enough ribbon and webbing to make nearly 80!! I only had hardware for 25 at my retreat so I packed the excess up. Guess I'll be giving a lot of keychain gifts in the near future!! I clamped up the 25 sets I did have and went to work on step two of my project.

Original pin:

http://happyhourprojects.com/jewelry-stamping/

Metal stamping is something I have taken up fairly recently (I asked for my first alphabet set for Christmas last year) and I kind of jumped into it blindly. I need all the help and tips I can get and this tutorial had some good advice. I picked up a few new tricks and learned that some of what I was already doing was on the right track.

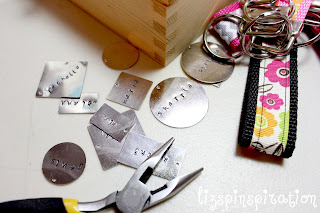
I wanted to do some hand-stamped metal name charms to add to my wristlets. Lucky me! My friend across the crafting table at our retreat had some cuter stamping letters than mine so I borrowed hers and went to work.

In metal stamping, it always takes me a few tries to warm up to good stamping. Here was my first attempt at a charm that night:

I was talking and twirled the L without thinking! oops.
Just like with exercising, I must always warm up my stamping fingers before getting down to the serious stuff!

The rest went much more smoothly.


After my names were all stamped up and stained, I used a jump ring to attach them to the key fob hardware.

My busy, busy work station:
All the important supplies: stamping bench, pliers, nylon hammer, glass of wine. . . 
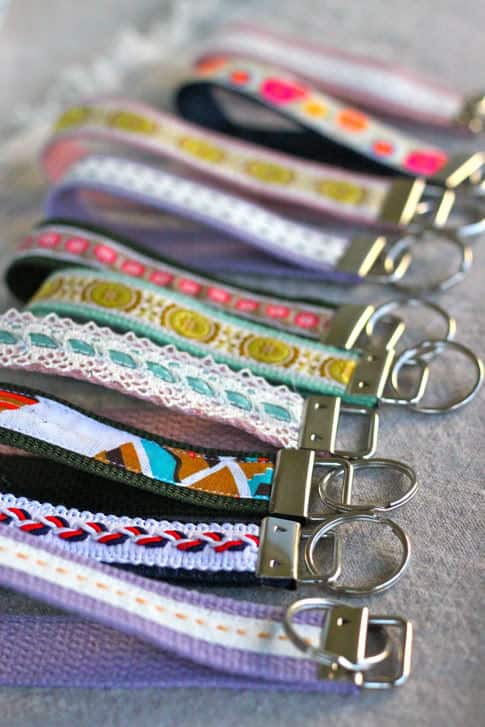
Once they were all put together I had these little beauties ready for all the teachers!


So cute! And fit right in my budget. 

Total cost: Prudent Baby put hers together for less than $1 each, but since I added the charm, mine were closer to $1.50. Still a pretty good price. I found a comparable wristlet selling for $9.99 without the personalized charm!

Total time: These were much faster to put together than I anticipated. Again, however, due to my sweet, sweet crafting scene, I wasn't much paying attention to time. It probably took around one hour to sew all 24 yards of webbing and ribbon together. With clamping and stamping, I would estimate another 2 1/2 hours or so. . . its fuzzy--there was pineapple lush cake involved in there somewhere. . . 

Final verdict: I love the way they turned out. They were so easy! I ordered some additional hardware when I got home from my trip to put together the rest of the wristlets. Hate to ruin the surprise, but if its your birthday. . . or anniversary. . . or if you are graduating. . . . or lonely. . . you may be getting one of these!

Monday, April 8, 2013

Get-Well Gift Bundle

My sweet, tender-hearted six-year old said good-bye to his Kindergarten teacher today as she left school to have knee-replacement surgery. She will not be back before the end of the year so we wanted to get her a nice get-well/thank you for the year/going away gift. I solicited donations from other parents and suggestions from recently hospitalized friends and was able to put together this bundle of gifts.

Initially I had planned on packing this all in a nice little basket, but as the gift grew and grew I found I didn't have a basket this size! I tied a cute tag to each item and packed them inside a gift bag tied with a big colorful bow.  Here is what I included:

1. Facial cleansing wipes. Even when I am at home there are times it is a chore for me to make it up to go wash off my face at the end of the day. Lay me up with a post-operative, major leg surgery condition and I may never wash my face at all! Now she can just stash this nearby the bed and freshen up as needed.

"Because sometimes you just don't want to get up to wash your face."
 2.  Hard candy. Eating and drinking restrictions, anesthesia, and a slew of medications are going to bring on some wicked dry mouth. I threw in some hard candy to help combat the dry mouth.
"Because surgery sucks."
 3. Interesting magazine. Reading material is a necessity. Sometimes anesthesia and pain medications can severely limit your attention span. Books can be a bit hard to read under that influence. A magazine with short articles can be better. His teacher makes some amazing cakes so this magazine should be interesting to her. I know she won't be up making too many cakes, but maybe she can fantasize up some good ideas while she heals.
"For inspiration during recuperation"
 4.  Tissues. Hospitals make me sneeze. I've been working in hospitals for over 12 years. Something about the dry air and hospital linen make my nose go crazy. And if I had surgery, I just might cry afterwards. Have you ever used those hospital tissues? Not fun. A little like wiping your nose with a piece of notebook paper.

"A tissue because we will miss you"
 5.  Lavender and chamomile lotion. That dry air also makes dry skin. On the bottle it says "helps you. . . feel at ease." Yes! That is what I want for her!

"Take a moment everyday to relax"
 6.  Lip balm. Should I say it again? Dry air, dry skin, dry lips.

"So your lips my shine as you smile through pain"
 7.  "Diamond Strength" Nail polish. I'm not sure I have ever seen her without her nails painted so this one seemed natural. It will serve multiple purposes--something to do while resting with her leg up and keep her looking good.
"May you have strength from tip to toe"
 8. Non-skid slippers. From a nursing point of view--it's got to be non-skid. These were cute, soft, and non-skid.
"To get you back on your feet"
 9. Chenille throw. This was so super-soft I wanted to keep it for myself. I know it isn't cold weather around here right now, but hospitals are cold. I, personally, would want to be cozy in my house also. I love a nice throw.
"A warm hug from your Kindergarten angels"
 10. Chocolate. What get-well gift is complete without chocolate?? I steel stamped the lid "FEEL BETTER" and filled the sucker up with M&M's. Putting bulk candy into a mason jar is such an easy way to pretty-up the presentation instead of the big bag it comes in.


"Because chocolate makes everything better"
Total cost: Not saying since it is a gift. But if I had more money, I would have purchased a big basket to pack it all in. I may have added a small bag of toiletries, wet hand wipes, a nice water bottle or big cup (like a Tervis), single serving drink mixes or water flavorings, teas, hair ties or soft headbands, gift cards for restaurants where her family can pick up food to bring home to her.

Total time: It took a little more than an hour to make the tags and pack up the items.

Final verdict: I think it looks like a gift I would want! Hopefully the items are helpful to her and she has a swift recovery.

Wednesday, December 19, 2012

Pin 165

Original pin:
Pinned Image
http://www.katyelliott.com/blog/2011/12/cinnamon-applesauce-heart-ornaments.html

Cinnamon heart applesauce ornaments.

These were very simple to make. I bought some large jars of ground cinnamon at the discount grocer for less than $2 each. One batch used about 1 1/2 of the large jars. It was easiest to incorporate by hand rather than try to stir together. They really need to be mixed well and this was the easiest way I found. Towards the end it was more like kneading a dough and incorporating the last part of the cinnamon in with the kneading.

I started these during a free minute while cooking dinner. Just after I finished mixing them I had to return my attention to dinner so I wrapped the dough in plastic and let it sit on the counter a while. After dinner was over and cleaned up I pulled the dough back out.  Lately I have been rolling out things between wax paper rather than fight the fight of sticky dough. I sprinkled the bottom layer of wax paper with the cinnamon as directed but once the dough was rolled out the sprinkled cinnamon left some noticeable color variations on the surface of the dough that remained there after cooking. At the last minute, I decided to flip my hole-making skewer around and use the pointed end to make some decorations on the shapes.
You could make some really cute designs with some stamps! I didn't dig mine out ahead of time.


These had to bake a lot longer than the original poster suggested. Maybe it is the humid air here but one hour in they were still visibly wet. I just let them sit and came back periodically to check on them. After two hours, I flipped them to encourage the other side to dry out a little. In all I think they baked around 4-4 1/2 hours. The baking made my house smell so good!  My husband kept asking if he could eat them. No, seriously, he really really wanted to eat them! Yuck.


Remember that color variation I was talking about before? Can you see them on the edges of the cutouts in the photo below? That is not just the exposure of the photo.
Once they were all baked up and dried out it was time to start decorating with them.  I had one item in mind from the beginning of how I wanted to use these. First was for L's teacher's gift. I got so many compliments on the jars from Pin 72 that I wanted to make a variation on those as a teacher gift. I was just trying to find something different from candy/coffee mug/candle teacher gift rut. Everyone always likes getting flowers, right? I wrapped it in some twine and then a second layer of some festive holiday yarn.  I have a favorite crafting jar that is supplied with purchase of a particular pasta sauce. I have been stockpiling these jars. I like to make my own tomato sauce most of the time but I have found myself buying this pasta sauce just for the jar!

This morning W and I went to my absolute favorite Flower Market on 7th street this morning to pick up some fresh flowers. I didn't have anything specific in mind so when I saw these hydrangeas for a great price I bought three.

I absolutely love hydrangeas. Three may have been overkill. Considering these are going to continue to open up for at least a few more days, they may just overtake the jar! It probably would have looked good even with just one. I just couldn't resist.
I hope teacher loves them as much as I do. I was sad to see them go.

I strung up a bunch individually and in pairs to use for gift wrap decorating. I had also carved our names into a few and stung them up together to hang on the tree.
Names obscured to protect the innocent.
These are easy and cheap to make.  If I was smarter, I would have dug out my letter stamps prior to baking and you could make these to use as name tags. I made over 30 of them with one batch. These would be just as inexpensive as those stick-on tags and so much cuter!

I tied some up with the festive yarn and some with the twine. The twine-tied ones look very rustic if that is a look you are going for.

Total cost: Less than $3

Total time: Prep time was about 45 minutes. Bake time was 4-4 1/2 hours. Play time... indefinite.

Final verdict: These were surprisingly easy and make a nice presentation. I have so many I don't foresee myself making them again this year. But I have got all sorts of ideas for next year. These would be fun ornaments for kids to gift their classmates, gift tags, garland-style decorations, all kinds of embellishments.

Friday, November 16, 2012

Pin 157 & Pin 158

Original pin:
Pinned Image
http://www.eventtrender.com/blog/2011/11/a-is-for-apple.html

I absolutely love this gift idea! An apple and a little jar of homemade apple dip. Her recipe for apple dip sounds delicious, but I was giving these to some teachers today and I didn't want them to have to refrigerate it immediately. So while I still want to try out her dip (cream cheese. . . Heath bits. . . mmmmmm. . .) I substituted this recipe from DirtyGourmet.

Original pin:
Caramel Apple Dip picnic
http://www.dirtygourmet.com/caramel-apple-dip

While I do cook a lot and am not usually intimidated by new recipes, candy making is not an area I have worked with a lot. I am terrified of burning the sugar! A few years ago I made an attempt at a few Christmas candies that just turned out a mess. I pretty much stay away from boiled sugar. But I was feeling brave so I jumped right it.

Then I jumped right out! Just as the sugar was starting to brown I pulled it off the heat and finished off the recipe and ended up with this:

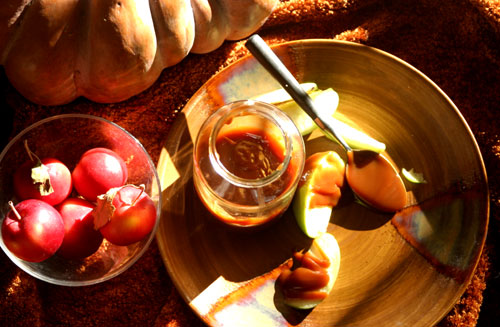
Doesn't look much like caramel, huh? Let me tell you--it didn't smell much like caramel either. So I took a deep breath and started over. When I was making ice cream over the summer I stocked up on sweetened condensed milk, so I pulled out another can. Before I started to boil the sugar, I got on my frined Google and looked at some pictures of browned sugar. As I had suspected, it turns out it needed to be much, much, much browner. So with the bravery of Google pictures, I started back in. Second batch was a success!
And for comparison:
After it was cool enough to eat I sampled some. Then I let my husband taste some. He is not much of a participant when it comes time to lick the bowl clean, but after one taste of this he came into the kitchen and scraped every last bit off the wooden stirring spoon.

I filled 4 half-pint jars about 3/4 full and let them cool. The next day I packaged them up with a nice fresh green apple and sent them off to school for the boys' teachers. Luckily, I had only three teachers to gift, so I got to keep the last jar for myself. I sat down and had apples and caramel for lunch by myself yesterday! Today after school this is all Big Brother wanted to eat. I'm rationing it out! Looks like I am going to have to make another batch soon. Good thing I have a stock pile of sweetened condensed milk.


Total cost: The only item I had to purchase was the apples, and I actually sent my husband out for them. He didn't report back on the cost.

Total time: It took me about an hour but that was for two batches and a little google searching. Plus I washed and dried all the jars before I started cooking. 15 minutes to package them up.

Final verdict: Dip was very, very good. Better than the store bought stuff. I actually have some in my fridge and taste tested side-by-side. Makes a cute and easy gift as well. L asked if we could make some for the principal, his secretary, the school bus driver, his Sunday school teacher, . . . looks like I'm in the boiling sugar business now.