Wednesday, May 22, 2013

Pin 207: White Chicken Enchiladas

Original pin:

http://joyful-mommas-kitchen.blogspot.com/2011/09/white-chicken-enchiladas.html

I pinned this recipe for the Pinterest described "BEST enchilada recipe ever!!" over one year ago. I love me some enchiladas and some Tex-Mex so just the thought of these made me drool. Why, then, did it take me so long to make them?? I'll tell you why.

Mr. Pinspiration has a food issue. He absolutely refuses to eat anything in the "creamy" category, specifically if it is white (think yogurt, mayonnaise, sour cream, cream cheese)--unless it is dessert (i.e., frozen yogurt, ice cream, frosting, pudding, etc.), soup, or gravy. Mr. Pinspiration went on a little trip a few days ago so I went to the store and stocked up with plans to make a few of my favorite recipes with said ingredients.
There is cream cheese hiding behind there too.
Do you know anyone with any of this sort of affliction?? Apparently they are out there. I have met one other person who excludes this category of food based strictly on appearance. IMPORTANT note to my sweet, loyal, dedicated readers:  If I have ever served my husband a recipe with one of these said ingredients--DON'T CLUE HIM IN!!! He probably loved it and it could be the end of Pinspiration! Or the end of me! Its like pushing the self destruct button on the whole ship!
Not that I would ever try to sneak something in. Just in case I overlooked it in the ingredients. (And I do make substitutions sometimes.)

Back to enchilada talk. I used canned chicken to pull this together and it was ridiculously easy. Baked it up until it was bubbly and browning and served it up to two hungry boys.
Fresh from the oven.
It was indulgently yummy. I say indulgent because it really does not have a ton of nutritional value to it so it needs to be served alongside some nutrition rich foods. I served the boys some vegetable heavy Tex-Mex rice and a salad. How can you really go wrong with this much cheese? The boys loved it. They both ate their entire serving (even non-eating child.) Non-eater has actually been saying for days how much he loves enchiladas. I didn't have quite enough filling for the full ten tortillas the recipe called for, but I think I filled eight. There was more than enough sauce to spoon some over the top of the enchiladas after plating. 


Total cost: Around $6

Total time: Pulled together in 15 minutes plus baking time.

Final verdict: They won us over, but we won't be putting these in the regular rotation--mostly due to the forbidden ingredients. They were good, but a bit on the bland side. Perhaps that is because I used canned chicken. Maybe if I prepared the chicken with some Tex-Mex flair or stirred in some seasonings to the filling. They were a tad indulgent for me but were a delicious treat and am not letting the leftovers spoil! 


Tuesday, May 21, 2013

Pin 206: Whipped Body Butter

Before we get down to business I have a very important announcement for you! For months now, I have been talking about this certification test I am supposed to be preparing to take for work. This extensive studying (cough! cough!) has been keeping me from pinning as much as I would like. Well, my friends, I have booked a date to get this test over with!! Mid-June this nonsense will be over and I can get back to my pinning and blogging more regularly. WooHoo!!

Now on to business. . .

Original pin:

http://www.livingthenourishedlife.com/2012/02/homemade-whipped-coconut-oil-body

Whipped coconut body butter. Coconut oil seems to be the hottest ingredient lately. I see it in everything! I actually have four coconut body butter recipes pinned. I wanted to make some of this because I keep hearing about all the wonderful things it can do for your skin so I closed my eyes and just picked one of the pins. I ended up over at the Living the Nourished Life blog which has a super simple recipe. I had some coconut oil in the pantry but I wanted to give some of this as teacher gifts as well so I sent Mr. Pinspiration out to the market to pick up some more.

When I started this I noticed two different consistencies with my coconut oil. (I am going to stop here for a minute to clarify something--I am NOT a coconut oil expert. The extent of my coconut oil knowledge is as follows: Coconut oil comes from coconuts. When it is solid it can be very hard. Coconut oil has many different uses. The end.) Not sure if this was due to my different brands, one being fresher, or something totally unrelated.
The one on the left was my new jar, the right was the jar I already had.
The old jar was hardened and a little separated (as I expected) but the new one was so velvety soft and coconutty looking I almost wanted to put a spoonful in my mouth! It looked like the inside of some wonderful coconut dessert!
Extreme close up!!! See the difference in the textures?? The left was the new jar and the right I dug out of the older jar after chopping up the hardened part and stirring back with the oily part. 
I started with the more delicious looking fresher jar. I set my stand mixer to work and danced around singing the "Whip It" song because I couldn't resist.

My singing must have sent off some bad vibes because my body butter was looking nothing like I expected.
It was totally liquefied. I figured this had something to do with being here in sunny Fort Worth and in my comfy 78 degree house. (I can't afford to keep it any cooler here in Texas so my body has adjusted to this 78 degrees and I now find it perfectly comfortable. Except for in the winter when my husband insists we keep it more like a chilly 68. Brrrr. I am a Texas girl and the heat doesn't bother me.)

I poured this in a small jar and popped it into the fridge. Next I whipped up some from the older jar with similar results. I even packed ice packs around the bowl to keep it chilled while it whipped. Into a jar and into the fridge it went. Before I whipped the third, and last, batch, I chilled the coconut oil itself, just to see if I could get any different results. The chilled coconut oil initially whipped up like it was going to get that fluffy appearance as in the original pin, but even packed in ice, started to melt quite a bit after two minutes.

Just as an experiment, I re-whipped one of the original jars after it had chilled. Still not airy and fluffy, but it didn't quite liquefy as much.

After much experimentation, I ended up with three jars of similar consistency.  I tried fragrance with one of the batches, but the coconut scent was delicious and I didn't feel the need to overpower it with a different smell so I didn't add it to subsequent batches. Refrigerated, the mixture hardened to a consistency that was like cold real butter--hard but manageable.
A freshly chilled jar
Once allowed to reach room temperature, the body butter is very soft with a consistent texture. I haven't had any separation of ingredients or re-hardening of the oil. It isn't the fluffy, airy texture I expected, but it isn't unpleasant either. It melts really fast in my hand so I have to move quickly transferring it to wherever it is headed. There are tiny bits of coconut oil that I can feel when I smooth it over my skin, but they melt quickly. I compare it to those little beads that are sometimes in face wash that dissolve quickly.
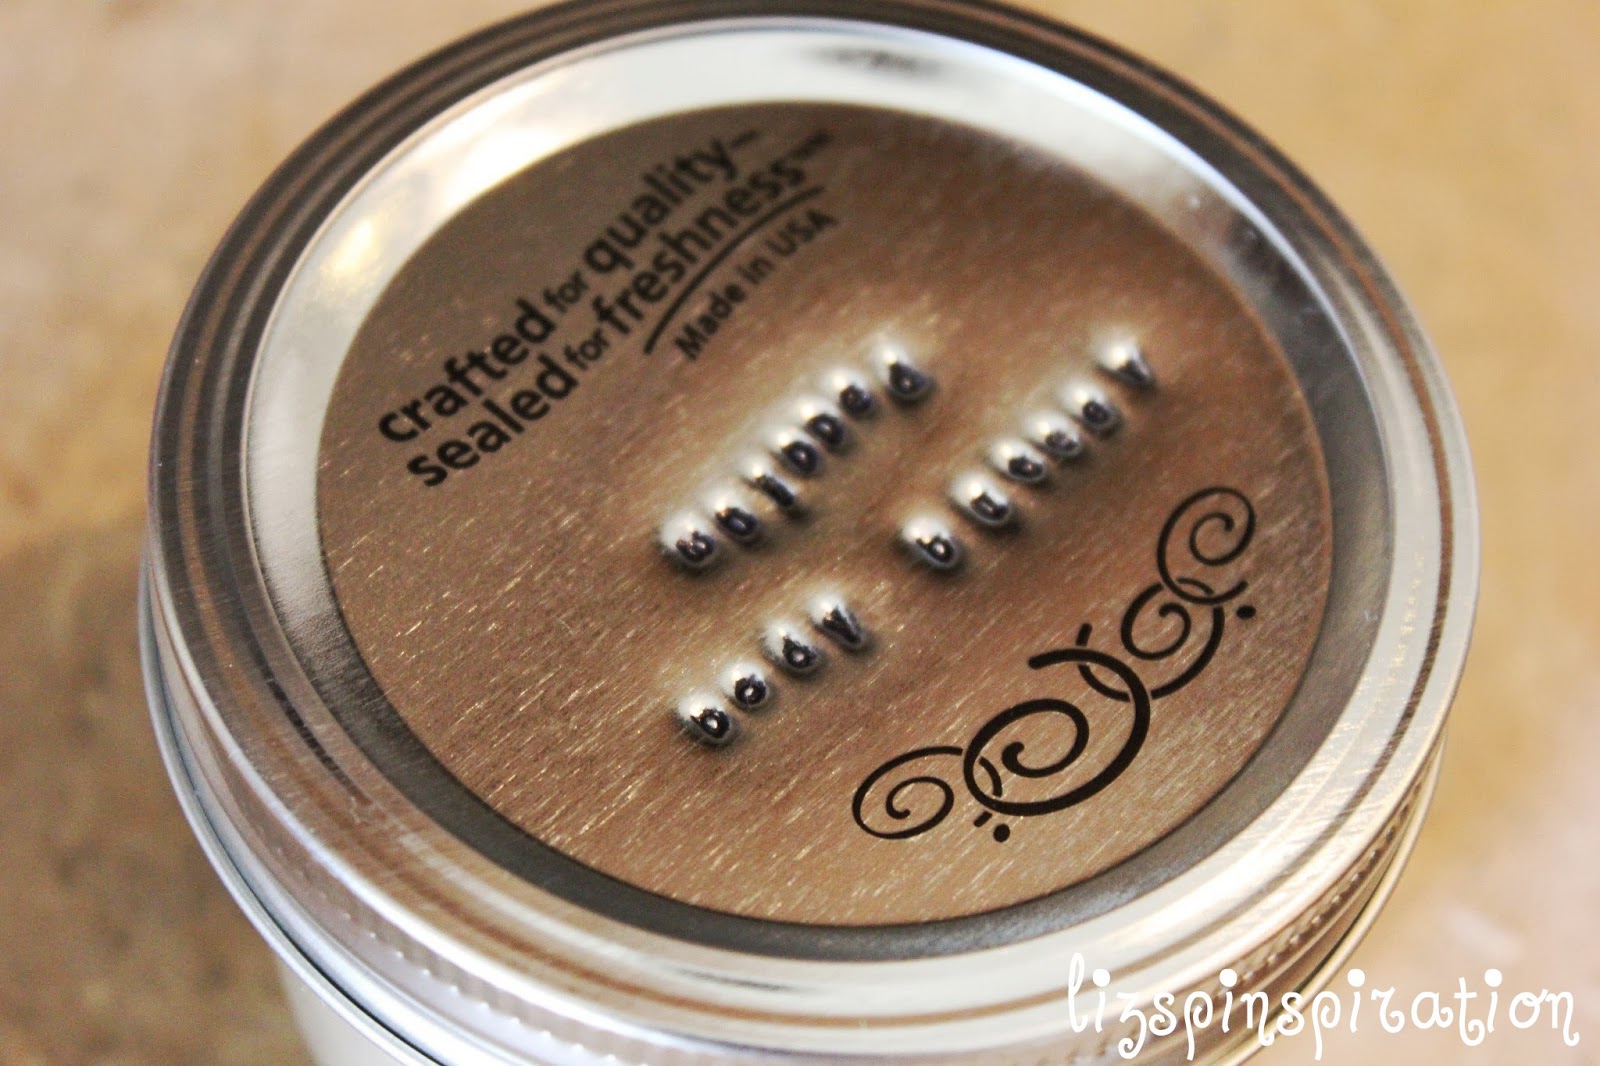
Two of these jars were for gifts, so I stamped up the tops to get them ready for the teachers. 


I wrapped them up in a 16x16 square of fabric with a little note and a quick bow and they were ready to gift! 

Total cost: I can't say, because these were gifts. I used about 1/2 jar of coconut oil for each jar and made three jars. 

Total time: After much experimentation, I would estimate you could make this in 10 minutes. I spent about 1 & 1/2 hours playing around. 

Final verdict: It is very indulgent to use! I love this and will be using it frequently. I hope the teachers liked it as much as I do. The recipe was surprisingly simple and uncomplicated. If your house is cooler than mine, you can probably achieve a less melt-y texture than I did. I have been keeping it in my bathroom and the consistency has stayed the same as it was originally in the butter rewarmed to room temperature. In the summer, it may be more enjoyable to have the butter chilled to apply. This pin was a winner for me, but next time I just may have to try out some of those other recipes. 


Monday, May 13, 2013

Pin 204 & Pin 205: Wristlet Key Chain with Hand-stamped Charm

Original pin:

http://prudentbaby.com/2010/11/hot-mess/accessories-hot-mess/how-to-make-a-wristlet-key-fob-2/

A wristlet keychain tutorial from the ladies over at Prudent Baby.

As I mentioned a  few weeks ago, I was putting last minute details together on Teacher Appreciation week. Like last year, I was in charge of putting together gifts for the whole preschool. Since I am on a super tight budget, I am always looking for inexpensive gifts to make for the teachers. Since I have to put together so many, they have to be quick and inexpensive. These keychains seemed to be perfect. I also was able to tie the whole luncheon theme together with the keychains. As I am sure many schools experienced this year, our preschool was entirely rekeyed with strict implementation of renewed security measures. All the teachers are having to carry their keys everywhere. We made keys the theme of our lunch.

I found a super deal on the webbing and picked up some matching ribbon. I had to order the key fob sets from Amazon because I could not find them anywhere locally. Click the picture to see the kit I am referring to:


I used the one inch width.

I brought all these supplies along on my girl's crafting weekend last weekend and went to work.
I actually skipped the step on fusing the ribbon to the webbing. I was feeling a little lazy. Instead I just held it in place and sewed along. Not much later I had this big pile of ribbons and webbing.
Time to start trimming!
I discovered a severe miscalculation at this moment. I needed 21 keychains and had somehow purchased and sewn enough ribbon and webbing to make nearly 80!! I only had hardware for 25 at my retreat so I packed the excess up. Guess I'll be giving a lot of keychain gifts in the near future!! I clamped up the 25 sets I did have and went to work on step two of my project.

Original pin:

http://happyhourprojects.com/jewelry-stamping/

Metal stamping is something I have taken up fairly recently (I asked for my first alphabet set for Christmas last year) and I kind of jumped into it blindly. I need all the help and tips I can get and this tutorial had some good advice. I picked up a few new tricks and learned that some of what I was already doing was on the right track.

I wanted to do some hand-stamped metal name charms to add to my wristlets. Lucky me! My friend across the crafting table at our retreat had some cuter stamping letters than mine so I borrowed hers and went to work.

In metal stamping, it always takes me a few tries to warm up to good stamping. Here was my first attempt at a charm that night:

I was talking and twirled the L without thinking! oops.
Just like with exercising, I must always warm up my stamping fingers before getting down to the serious stuff!

The rest went much more smoothly.


After my names were all stamped up and stained, I used a jump ring to attach them to the key fob hardware.

My busy, busy work station:
All the important supplies: stamping bench, pliers, nylon hammer, glass of wine. . . 
Once they were all put together I had these little beauties ready for all the teachers!


So cute! And fit right in my budget. 

Total cost: Prudent Baby put hers together for less than $1 each, but since I added the charm, mine were closer to $1.50. Still a pretty good price. I found a comparable wristlet selling for $9.99 without the personalized charm!

Total time: These were much faster to put together than I anticipated. Again, however, due to my sweet, sweet crafting scene, I wasn't much paying attention to time. It probably took around one hour to sew all 24 yards of webbing and ribbon together. With clamping and stamping, I would estimate another 2 1/2 hours or so. . . its fuzzy--there was pineapple lush cake involved in there somewhere. . . 

Final verdict: I love the way they turned out. They were so easy! I ordered some additional hardware when I got home from my trip to put together the rest of the wristlets. Hate to ruin the surprise, but if its your birthday. . . or anniversary. . . or if you are graduating. . . . or lonely. . . you may be getting one of these!

Friday, May 10, 2013

Pin 203: Coin purse upcycle

Original pin:

No source available

What a clever way to reuse denim! Since there was no link available, there was no tutorial available either. I had to just wing it.

My friend gave me these shorts from her daughter that had been stained but had really cute pockets. She thought maybe I could find something to do with them. I had been holding on to them a long while when I saw this pin and knew it would be perfect.

I started by laying out the shorts flat and cutting outside the large seam around the pocket so I ended up with these two pieces:
I hemmed the top edge and then pinned right sides together. I stitched around the rounded edge. After trimming flipping right side out I stumbled across a small problem (like I tend to do when sewing without a pattern and/or plan. . . )  The hardware could not be attached in this way because I had sewed completely up the sides. I had to then rip out the side stitching an inch or so.
I had to rip back until the top of the flower patches.
Attaching the hardware was not easy. The type of hardware I had purchased required hand sewing. I had to borrow a thimble to hand stitch the hardware through the thick denim hem. No tears, but quite a few curse words later the hardware was attached. I had to re-sew the side seams by hand as best as I could. Phew, finally complete!  Thankfully, I was returning this to the original owner, a sweet little girl who will never notice a couple of flaws.


Don't look too closely at that hardware stitching on the end there. . . 
Total cost: A few dollars in hardware

Total time: Maybe two hours?? I did this during my crafting retreat last weekend and the time just drifted away. . . 

Final verdict: A cute idea. Next time I will try to find some hardware that isn't hand stitched on. And I will also know to leave the sides open until after the hardware is placed.

Saturday, May 4, 2013

Pin 202: Chocolate Peanut Butter Marshmallow Bars

Original pin:

http://dessert.food.com/recipe/chocolate-peanut-butter-and-marshmallows-287376

L picked out these delicious little bites a few weeks ago at a potluck and he picked well. These were so delicious we had to go back for seconds.  When the event was over I ran home and searched for the recipe. Luckily I found it quickly and I just had to make them this week for our mom's group.

These could not be easier. Even my "junk builder grade" microwave whipped these together fast. It actually took the exact time called for in the recipe to melt the chocolate chips and peanut butter together.  I didn't have quite the amount of chocolate chips called for but I did have semi-sweet baking chocolate. I used a combined amount of chips and squares to equal the weight called for.
I also did not have the called for size of pan so I improvised with my 9 inch round cake pan. Guess I wasn't too prepared for this one!
I whipped this together the night before and tossed it into the fridge to cool overnight. In the morning I pulled it out ready to cut. It was well hardened to the pan so I dipped the bottom of the pan in a sink of warm water to loosen them up a little bit. Next time I will line the pan with parchment paper sprayed with cooking spray for some easy release.

Because it was round, I cut it into nice little pie slices.

Due to my larger pan size, my chocolate was not layered up quite as thick as the one in the original pin's picture but they were still delicious! They are soft and creamy and oh, so yummy! I had this burst of inspiration after I tried the first slice and here I bestow the greatest gift on you: 

Grab something to write this down because you are going to want to remember this. 

Get close to the screen so you will be able to read this important information well. 

Ready??

Cut the bars into squares and put them on a graham cracker. Ahhhhh! (Chorus of angels singing!) Like a s'more with peanut butter!  Do it!

If you leave these out of the refrigerator they will start to soften a little. You can either re-chill them or just start eating them with a spoon. 

Total cost: $0   I had all these items in my pantry.

Total time: 2 minutes!! 

Final verdict: Delicious. This is one of the easiest, fastest recipes I have found on Pinterest yet. It is my new go-to recipe for work potluck nights. I will be squishing these between a couple of graham crackers though.