Showing posts with label crochet. Show all posts

Tuesday, March 12, 2013

Pin 193: Amigurumi Crochet Giraffe

Original pin:

http://ilovebuttonsbyemma.blogspot.com.au/2013/01/crochet-giraffe-pattern.html

I just spent a recent ten days nursing sick children back to health. Confined to the house, I had to find a creative outlet that did not require me to drag any child with unpredictable behavior and unpredictable health out in public to pick up supplies. My little bird saw me flipping through my pinboards and picked this out for himself. While I still consider myself fairly new to crochet, I am really new to amigurumi. This is really only my second amigurumi project.

I was not interested in changing my yarn color quite that often (nor did I have all those colors on hand). I decided to just get started using what I already had in my stash and see where it takes me.

A while back, a certain craft store was running a special on 100% cotton skeins for $1 and I had picked up 10 or so with no real project in mind. I also did not have a small enough hook as called for in the project, so I just used the size recommended for the yarn I used. I ended up using two full skeins of the 100% cotton and then a leftover scrap from another project.

The original author mentions that a stitch difference here or there shouldn't make a difference and that she, too, is guilty of dropped stitches. I pretty much took this as permission to not count stitches too closely or bother ripping out mistakes. So some parts were a teensy lopsided, but it just adds charm. I worked on an off this for a week while the little bird stood close watch. He loves "giraffe-eeeeeeees" and already has a pretty tight attachment to two.

The pattern is simple and with the creative mistake license granted, it was just one of those projects that you fix and alter as you go along based on your experience with previous projects. (And as I stated before, this is only my second of this type, it didn't need just a whole lot of experience because it was not complicated).

So, in summary, I didn't use the right yarn, the right hook, follow the pattern too closely, or fix mistakes. Did I really even end up with the same project? Can I really judge this pin??


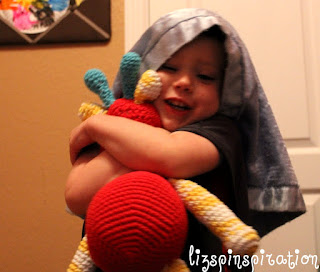
It is a giraffe, after all. My neck seems shorter, but I just kept making it longer until I ran out of that color of yarn. My arms and legs look fatter, but that could be stitch gauge (due to my larger yarn & hook) or because I used more stuffing. I think it looks pretty good for my second project. But really, the only judge who matters is this guy. Here is what he thinks of his new giraffe-eeeeeee.
Total cost: Zero out of pocket. Otherwise, $2 for the two cotton skeins I bought months ago plus scrap yarn and leftover stuffing from another project.

Total time: I worked off and on for seven days to finish this up. I did have a little extra time on my hands being stuck at home with the sickys.

Final verdict: Not quite like the original, but it was relatively frustration-free and the little guy loves it with all his heart. That makes it priceless!

Tuesday, January 29, 2013

Pin 179

Original pin:
Pinned Image
This pinned picture is linked to http://www.belleamour.co.uk/2011/03/crocheted-love/ but the actual tutorial lives over here: http://saltforthespirit.blogspot.com/2009/02/itty-bitty-crochet-heart-tutorial.html

One of the local craft stores was having a sale on yarn a few weeks ago. I was drawn to the colors in this yarn and picked up the whole skein for $1. I decided I needed to do something Valentine-y with it. I decided to crochet up a little Valentine decor. Using the little heart tutorial I started by making a bunch of little hearts. I played around a lot with the basic pattern and tried bigger and smaller hearts. Some of those worked out, but others didn't. I ended up with 13 finished hearts. I made some crochet lace on the fly. I first made a chain long enough to drape along my mantle. Then I did a (sc, ch2, skip 1 ch, sc) all the way down the length of the chain. When I got to the end, I turned and did (sc, ch3, sc) in each space made in the previous row.  I whipped up four little tassels to use to tack up my chain.

my little tassel
I tacked the chain and tassels up on the mantle and gathered all my hearts. They were a little spread out because I had been making them randomly throughout last week.

Most of them did not lay flat. I decided to iron them flat so that they would look like hearts as they hung from my garland.

The heart on the left is before ironing and the heart on the right is after ironing.

All the hearts after ironing

 
All that was left was to get them up on the garland. I tied them up there, each a little differently. No pattern or measuring done.


Total cost: $1
 
Total time: Once I had the hearts figured out, I could make them fairly quickly--ten minutes each, maybe. The garland lace took the longest. All together I probably spent around 6 hours crocheting and assembling the garland.
 
Final verdict: I like it. It feels festive and I just love the color combo of the yarn. I have never decorated for Valentine's Day in my house, but this may just be catching. 

Thursday, October 18, 2012

Pin 145

Original pin:
Pinned Image
http://www.u-createcrafts.com/2011/01/creative-guest-crocheted-headband-with.html

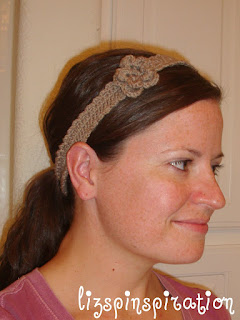
Also known as "The Austin-Fort Worth Headband" as this is what I did during the return trip. I know I said I wasn't pinning during our vacation, but I had to do something and I had limited supplies. I was flipping through my crochet board for inspiration when I realized I had everything (almost--we'll get to that) I needed to do this one.

The tutorial is fairly easy to follow with one exception. There is a mistake at the end of row two. If you scroll all the way down and read through the comments, you can figure out how to complete row two. Just a warning so you don't go crazy trying to figure out that step.

I didn't have a button with me so this is where I had to improvise. Instead of creating a button hole, I just slip stitched around the edge a few times to get to the other side to start the edging. When the band portion was finished, I made a chain a few inches long, threaded it through the hole at the end of each band, and then single-chained back down the foundation chain. I did this on each side to create ties. If you are going to do this without a button, shorten your foundation chain at the beginning of the band because you aren't going to need the overlap accounted for with the button.
The other thing I did a little differently was the edging. The original pattern calls for chain two, skip one stitch and slip stitch into the next. Repeat all the way around for the edging. I wasn't getting as much ruffly-looking edging as I wanted, so I chained three instead of two. Everything else was the same.
Not a great picture of the edging. Look at the top, the bottom edge is sitting crooked here.
All that is left is to wear it. It felt kind of hippie-vibe-ish so I tried to style it hippie-like:
 Not so sure I'm pulling it off. . . let's go to nature. Maybe I'll feel more hippie out there.
Umm. Not so much. I'm not much of a hippie.
This is how I am most comfortable wearing it but I feel like it makes me look a bit childish and less funky-cool like the original author.

What do you think? Can I pull of the relaxed hippie style or should I pass this one on to my niece?

Total cost: $0

Total time: Approximately 3 hours.

Final verdict: This one is going to take some getting used to. But it is so stinking cute on the original girl!

Wednesday, October 17, 2012

The Fort Worth-Austin Road Trip Hat

The hubs and I took off to Austin for a few days (and nights) to celebrate making it past the 7 year itch. On Monday we marked 8 years of marriage. Woohoo!

I took off Pinterest-ing for the trip as well. However, my hands are always itching to create something and I needed something to fill the time down. We had to fight through all that UT traffic going home from the TX-OU game and I knew we could be in for a looonnngg drive.


Lately I've been looking for a cute hat that was not necessarily a "team" hat to wear. I hadn't found anything I liked so I decided to just make one. I was strolling around JoAnns the other day when I came across a plain utility cap. I thought for sure I'd be able to find you a picture of it plain, but I was unlucky. You'll just have to use your imagination.

Saturday night before we left I worked on some crochet flowers at girl's craft night. I did a little more talking than crocheting, so these flowers took a bit longer, but I did use the same tutorial as I did back at Pin 113. Then when we hit the road, I worked on the edging piece and then sewed all the pieces on. By the time we hit Austin proper I was sporting this fine fashion:


Total cost: I had to buy some extra yarn because I didn't have that dark gray color I wanted so I spent around $10 total

Total time: 6-ish hours. Remember, I started the flowers while chatting and drinking wine, so time wasn't really important.

Final verdict: I am happy with my new hat. It is a bit more feminine than just a plain team-style ball cap. The bill is shorter and the hat has a different style shape to it. I used it a lot because we had wind, rain, and an early morning departure today.

Stay tuned for the Austin-Fort Worth return trip. . .

Sunday, August 5, 2012

Pin 113

Original pin:
Pinned Image
http://www.skiptomylou.org/2011/02/15/10-beautiful-ways-to-crochet-a-flower/

10 ways to crochet flowers.

If you've been following me for a while, you know that I only recently took up the hobby of crochet. I haven't yet made any flowers, though I've seen them all over Pinterest.

I finally had an occasion to make some flowers so I went to this tutorial to learn how. I chose three different ones to learn, but what I've found is that they all use pretty much the same basic technique. I learned these during nap time one afternoon. They were so easy, and impressive. I just had to whip up one of my yarn letters from Pin 43 to stick them on.


This is for soon-to-arrive sweet Baby PJ. One of my dearest friends is having her first baby in just weeks, and although no one really knows the gender yet, I wanted to make sure she had a little pink on hand, just in case. They are just safety pinned on. I am going to have to learn how to crochet a boy-ish accent in the next few weeks if I need to replace the pink with blue! I'm thinking stars? Yellow and blue stars?

Total cost: I only had to buy supplies to make the P. The flowers use so little yarn, I was able to use leftover pink & yellow I had in my stash.

Total time: I learned three different styles and completed them in less than 3 hours.

Final verdict: As one blogger warned, flowers are addictive. I am ready to just stick them on everything. Watch out little PJ! I may turn you into a little flower girl when your mommy isn't watching!

Thursday, July 26, 2012

Pin 108

Original pin:
Pinned Image
The link associated to this pin is a link to a link to a link to a link to a website in a language I can't read. It is not a tutorial. After a little research, I found it's home on etsy at http://www.etsy.com/shop/KnitStorm

These are adorable. I fell in love immediately. I pinned them to my knitting/crochet boards for the inspiration.

They are sooooo super easy to make. Whether you knit or crochet, you can make this!  If you don't knit or crochet, go buy one from KnitStorm! It is simply a rectangle with a few slip stitches to hold the ends together.

I am not going to post specific directions here because mug sizes are different and such. I started by picking a basic mug. (I knitted both of the ones below). Cast on (or chain if you are crochet) enough stitches to compensate for the height of your mug. Leave a little room at the top. You don't want the cozy to reach all the way to the rim of the mug, otherwise you will have a mouthful of fuzz with your tea!

After you have cast on/chained create a rectangle using whatever pattern suits you. Continue along until your rectangle measures from one side of the handle, around the mug, and is just a little shy of the other side of the handle. You want a little stretch so that the cozy is snug on the mug. Here I picked up the first stitch from the first row with the first stitch on the working needle and knit through both. (With crochet you could either work another crochet row through both the first stitch on the first row or just join the two ends with a slip stitch). I did this again for the second stitch and then cast of the first stitch so that there was only one stitch left on the needle. I knit through the third stitch and then cast off the second. For the fourth stitch I started to knit and cast off without going through the stitch on the first row. I knit and cast off all the stitches until there were only three remaining at which point I knit through the first row again as I cast off.

As I have said before, I am not a knitting pro, so if those directions are confusing, I apologize.

When the cozy was finished, I used some embroidery floss and cheap felt scraps to whip up the little tags and sew them on. I free handed them so they are surely less than perfect.

Before starting this project I looked around for some patterns. There are quite a few that use a button to connect the two sides, so you could go that route if you wanted. I didn't have any buttons handy and I really wanted mine to slip over the handle.

I know you are dying to see them.

I made this one first


Showing the way the cozy fits around the mug handle

Total cost: $0. I used yarn and felt leftovers from other projects.

Total time: About 3 hours each.

Final verdict: Very happy with the way they turned out. Just looking at these makes me want to curl up with a cup of hot tea. These will make great gifts in the fall.  Look out teachers. . .

Thursday, July 5, 2012

Pin 95

Original pin:
Pinned Image
http://crejjtion.blogspot.com/2011/09/crochet-hexagon-tutorial.html

A tutorial for crocheting granny squares.

On the way home from our vacation a few weeks ago I needed something to pass the time. I had some yarn and a crochet hook and decided the car ride would be a good time to learn granny squares.

Firstly, this website has some absolutely gorgeous photographs and gorgeous crochet projects.

Secondly, the tutorial was very easy to follow. There was only one item that wasn't immediately clear to my newbie crochet self. That was that after step one, in which you make the initial loop, that the next layer is worked through the ring you created in step one. I thought you were working through the loop stitches but I just couldn't seem to make that work. When I worked round two through the ring it seemed to come out like the picture. Someone correct me if I am wrong on this one. . .

After I worked through that first problem, the rest of the tutorial was awesome. I can whip these puppies out pretty quickly. I just kept going and made my squares with a few more layers. I have a couple squares lying around now. They are easy and fast to make. I'm going to have to revisit this site when my collection gets big enough because she shows you how to join them all up for a blanket.


Total cost: $0. I just used leftover yarn I had lying around.

Total time: 45 minutes - 1hour per square

Final verdict: I was surprised at how easy this was. This post is out of order because I actually made these before I made the baby blanket. It was a easy way to learn the double crochet stitch. Although this site doesn't actually detail the double crochet stitch itself, but the granny square is made with double crochet. I have this blanket made for me as a child that is a bunch of randomly colored granny squares. I am totally inspired to create one of these now that I can granny square! I'll probably finish it in about 20 years--in time for my grandchildren. Ha!

Tuesday, June 26, 2012

Pin 92

Original pin:
Pinned Image
http://onelittlerayndrop.blogspot.com/2011/04/classic-baby-blanket.html

It's raining babies around me. I love to make baby gifts. One of my dearest friends was having her baby shower this past weekend and I really wanted to make this for her. I found it originally on ravelry.com and pinned it to my crochet board. Ravelry had it rated as easy. Just what I need.

I grossly underestimated the amount of time this would take me. I am no crochet professional, that is for sure. I wanted to start this when we were on vacation but I didn't have time to get the yarn before we left so I had to wait until we got home. That gave me just 8 days to whip this together. I worked on it night and day, during every class my child had at the rec center, during nap time. . . and I finished it the morning of the shower, just in time, whew! It was far from perfect. I wish I had had more time to make it perfect. I can only hope the mistakes that are so obvious to me are not obvious to everyone else! I know the baby won't notice them, at least! I can say that although I felt rushed in making it, and its not perfect, it was made with lots and lots of love.

The pattern itself was gorgeous. I just love it so much. I made it with 100% cotton yarn (I Love Cotton from Hobby Lobby) and it was soooo soft. I wanted to keep it for myself and snuggle up with it. And it was easy, I'll admit that. I did have to google how to crochet in the back loop.

I have already started the next one. I don't know who it will be for yet, I have so many babies growing around me right now! But I guess whoever's popping around the time I wrap it up will get this one! I predict that at a leisurely pace, this will take around one month.

I didn't get a great picture of the finished product, I had to wrap it up and head out to the shower! But I snapped a quick close-up right before it went in the gift bag.
The scalloped edge is the border. The blanket is folded over on itself so I could show you the border. My rows were straight, but my picture made them look crooked.
Total cost: Not saying--it was for a gift! But I used 4 1/2 small skeins of cotton.

Total time: 7 days, all consuming! But totally worth it.

Final verdict: I want one for myself! Do you think and adult sized one would weigh a gazillion pounds? Probably.

Thursday, March 8, 2012

Pin 24

Original pin:


Perfect since I have recently re-picked up the art of crochet (after a 23 year hiatus.) This was really very easy and would be easy for any beginner because it only requires the ability to create the long chain. It is two long chains folded and knotted together just so.

In the time it took to watch one episode of DVR'd trash TV I had this beauty ready to go.

I can not find a place in my house to lay things flat for pictures that doesn't make a shadow.


Pinterest headband + Pinterest sock bun curls = Pinhead kind of day. heehee.

Total cost: $2 for some dollar store yarn and ribbon. It didn't use much so it could easily be made with scraps lying around.

Total time: 1 hour, distracted.

Final verdict: Very cute, easy, I like the bow tie closure at the bottom. It feels very feminine. I would totally make this as a gift for you.