Showing posts with label diy. Show all posts

Tuesday, September 22, 2015

How to Make Wall Decals Stick

Hello again faithful followers! Long time, no see. . . I MISS YOU!!! Life with three boys is crazy! Crazier than I could every imagine, but I love it nonetheless. Here is a little gift for you. A post I have been working on for, oh, about 19 months or so (!!!) Seriously, how do moms have time to do anything for themselves? It took me almost two years to get this gem ready for you guys!

Shortly before number three's arrival, I put his nursery together. (And shortly is an understatement. This was literally days before his arrival. Welcome to your life little brother.)  Sometime around midnight one night I decided to put up the wall decals that came with his nursery set. You know, those stickers that are supposed to go on the walls to decorate, but claim to be removable and repositionable and still stick.  I didn't think our walls were necessarily "highly" textured, but I could not make those darn things stick! I would put them on and mere seconds later they would slowly peel free and crumple to the ground. I searched online for tips and tricks but all I found were people with the same problem as me. Not one to be defeated, I figured out how to make those suckers behave against their will.


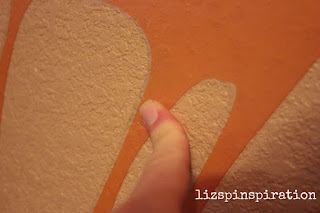
Let me backtrack a little bit. So, these particular stickers are Skip Hop brand, but this trick can apply to any of the vinyl stickers out there. Here is a close up shot of the texture on my wall, which is also covered in a semi-gloss latex paint.


After fighting with the ornery stickers for an hour or so, finding no help from my friend the internet, I was all in. I decided that these were going to stick where I wanted them even if I had to glue them up there with super glue (which is NOT what I ended up doing, so try this method first.)  Disclaimer: The following process didn't damage MY walls. I can't guarantee that this won't damage your walls so do a little patch test in an inconspicuous spot first. However, throughout this, my stickers have remained fully removable, repositionable and have stayed put for the 19 months they've been there. The photos here are not of the actual process when I put them up--because I was only blogging in my brain at the time, but I have used this process to repair decals that have come off thanks to sweetie pie's help. This decal I'm repairing is above his changing table and he has ripped it with his toes while fighting against his diaper changes, sweet little angel of destruction.


What you need--an iron and a presscloth. If you don't have a press cloth, just use a scrap of cotton fabric or a towel. Something to be a barrier between the iron and the decal.)  Set your iron to no steam and the heat to low-medium low to start. You may have to turn the heat up depending on how hot your iron gets and the thickness of your presscloth, but start low. You can always go up.

Position your decal on the wall where you want it. Place the presscloth over the decal.

Iron over the decal and presscloth with medium pressure making small circles for 10-15 seconds at a time. You are basically trying to soften the vinyl. Note--if you touch the actual vinyl with your iron you will most likely melt the vinyl to your iron thus ruining both your decal and your iron--so watch out!

Once you have sufficiently softened your decal, remove iron and presscloth. Run your hand along the decal using your fingers to really press the decal down into the texture grooves on your wall.


You may have to repeat the process a few times to really get a feel for how soft your vinyl needs to get and how hard to smooth the decal down so don't get discouraged if it doesn't work immediately. My decals were pretty big so I just worked it in sections around and around until all the edges were smooth against the wall. Other than that, its pretty simple. My husband did come in in the middle of the night to find me ironing the walls and he certainly gave me a crazy look. I just blamed it on the crazy pregnancy hormones and that lovely pregnancy insomnia and shooed him out of the room.

The top picture is the finished product of the original application. Here is the finished repair job:
Zoomed in. You can see a tiny crack where the decal had been ripped. 

But from a few feet back you don't even notice it. 
Hope this helps you! I would have loved to find this when I was in the middle of my frustration with the peeling decals. Happy wall-ironing!

Hope to see you again soon--I'll be back blogging regularly again just as soon as I finish running the boys to school, cello lessons, gymnastics, reading academy, Bible camp, doctor's appointments, Dayschool, tennis lessons, reviewing their homework, practicing spelling lists, returning library books, editing the school yearbook, selling 800 cases of fundraiser chocolate, feeding the masses, working my REAL job, kissing on all the boys, training for my next half-marathon, taking my husband out on a date here and there, PTA meetings. . . .

Tuesday, August 6, 2013

Pin 211: Homemade Ice Cream in a Baggie

Original pin:
How to Make Homemade Ice Cream in a Bag by familyfun #Ice_Cream_in_a_Bag #KIds #familyfun
http://myroyalkitchen.com/2011/12/homemade-icecream-in-a-baggie/

The boys and I decided we were ready to take on this challenge today--homemade ice cream in 5 minutes using plastic baggies. Seems a perfect summer activity for kids. I had some 1/2 & 1/2 leftover from a soup recipe last week so the only thing I had to buy was rock salt. Fabulously for me, the rock salt was on sale at the grocery today!

After dinner tonight we decided to whip these up. Things did NOT go as smoothly as I had planned. The basic idea is that you put the ice cream ingredients in a small baggie.  Then the small baggie goes inside the larger baggie with ice and salt. Shake a few minutes and, voila! you have ice cream. First problem was when I turned my back for one minute, little bit decided to shake his bag upside down. You can probably guess that ice and rock salt when absolutely everywhere. Refilled his and when I grabbed my camera to get an action shot, we found problem number two. (Thus no action shots.) The ice baggie was getting torn and leaking. Quick fix--double bag the ice bag.  Back to work when almost immediately, the ice cream baggie was ripped and leaking into the ice!
milky, icy, salty mess

Double bagged the ice cream bag and changed strategies.  I sat the boys down in chairs, wrapped the double bagged double bags in a towel and we went for more of an agitation/massage motion than shaking to avoid any more trauma to our baggies.


This strategy did not result in any more tears, no leaking, and we actually did end up with some ice cream eventually. It took longer than five minutes and my kids didn't have the arm strength/endurance to do this alone. I took turns with them agitating there bags. Maybe about 10 minutes after we had fixed all our problems and changed our strategies we decided our ice cream was solid enough to sample.


It probably could have gone an additional few minutes, but it was pretty ice-cream like. The taste was really good--much better than I anticipated. The boys dressed theirs up with sprinkles and I just kept thinking of the delicious candy mix-ins I didn't have.  We made two batches per the recipe. It easily made four servings (two servings per baggie).

Total cost: $2.49 for rock salt

Total time: It took us 25 minutes to solve all our problems and end up with a mostly frozen ice cream. Next time I predict it will be more like 15 minutes.

Final verdict: We will make this again. One of my favorite soups calls for a small amount of half-and-half and the remainder always goes bad in the fridge. This is a perfect solution to using up that left over bit. My recommendations (and plan for next time) double bag from the beginning. Double bag the mixture and double bag the ice. Also, I will stick with the agitation/massage action. It worked and just took a bit longer. The kids were really bummed they didn't get to eat their ice cream out of the bag like the kids in the picture.


Wednesday, July 17, 2013

Pin 210: McCormick's Meatloaf Copycat Recipe

Original pin:
Mum in Bloom ~: From Scratch: McCormick's Meatloaf Seasoning
http://muminbloom.blogspot.com/2010/04/from-scratch-mccormicks-meatloaf.html

Last night was meatloaf night around here. I had intended to pick up a spice packet at the store but yesterday was a little crazy and I forgot. Pinterest to the rescue. I just did a quick search and this was the first one to pop up. It claims to be the McCormick's recipe. I had all the ingredients on hand so I decided to give it a try.

My copycat picture of the ingredients. Her counter and backsplash are strikingly similar to mine as well. . . 
The final mix is a little more than I expected and I wasn't sure if this was for one meatloaf or intended to use for multiple. In the comments of the original post I found that it is for one so I dumped the whole thing in.
I mixed everything else in and the herbs were already starting to smell good. Just needed to add my extra ingredient that goes in all my cooking:
not ketchup. . . love.
My ketchup writing skills are a little sub-par. One hour later, and smelling delicious, the meatloaf was done and out of the oven. 

The meatloaf had a great flavor, although I'm not sure it was exactly McCormicks. It was a touch on the dry side so next time I might add just a bit more milk. I made it with extra lean ground beef so that may have caused the dryness. A little ketchup on top fixed that right up. My husband took one bite and said, "Is this a new recipe?" He liked it but he, too, noticed it wasn't quite the same thing.

Total cost: $0

Total time: 5 minutes

Final verdict: We really did like the flavor in this meatloaf. I didn't have to go out of my way to locate any random ingredients. It came together in seconds. We really did like the flavor better than the original. Next time I may make this in bulk so I can just measure up what I need. I will definitely make this again, and either use a less lean meat or add a bit more milk to keep it moist. 

Monday, May 13, 2013

Pin 204 & Pin 205: Wristlet Key Chain with Hand-stamped Charm

Original pin:

http://prudentbaby.com/2010/11/hot-mess/accessories-hot-mess/how-to-make-a-wristlet-key-fob-2/

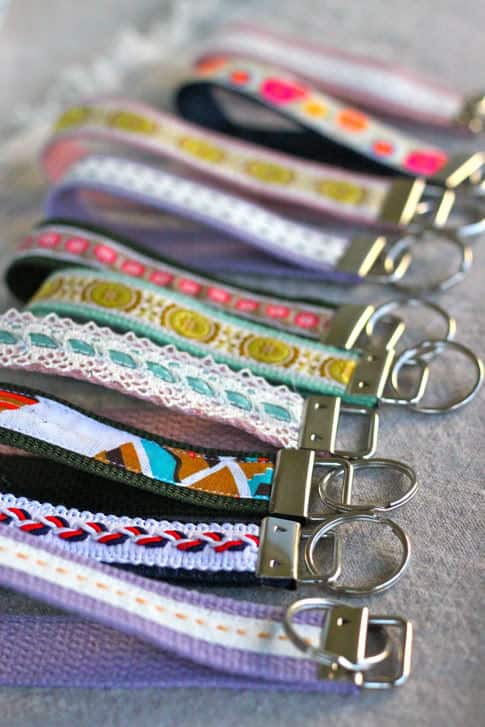
A wristlet keychain tutorial from the ladies over at Prudent Baby.

As I mentioned a  few weeks ago, I was putting last minute details together on Teacher Appreciation week. Like last year, I was in charge of putting together gifts for the whole preschool. Since I am on a super tight budget, I am always looking for inexpensive gifts to make for the teachers. Since I have to put together so many, they have to be quick and inexpensive. These keychains seemed to be perfect. I also was able to tie the whole luncheon theme together with the keychains. As I am sure many schools experienced this year, our preschool was entirely rekeyed with strict implementation of renewed security measures. All the teachers are having to carry their keys everywhere. We made keys the theme of our lunch.

I found a super deal on the webbing and picked up some matching ribbon. I had to order the key fob sets from Amazon because I could not find them anywhere locally. Click the picture to see the kit I am referring to:


I used the one inch width.

I brought all these supplies along on my girl's crafting weekend last weekend and went to work.
I actually skipped the step on fusing the ribbon to the webbing. I was feeling a little lazy. Instead I just held it in place and sewed along. Not much later I had this big pile of ribbons and webbing.
Time to start trimming!
I discovered a severe miscalculation at this moment. I needed 21 keychains and had somehow purchased and sewn enough ribbon and webbing to make nearly 80!! I only had hardware for 25 at my retreat so I packed the excess up. Guess I'll be giving a lot of keychain gifts in the near future!! I clamped up the 25 sets I did have and went to work on step two of my project.

Original pin:

http://happyhourprojects.com/jewelry-stamping/

Metal stamping is something I have taken up fairly recently (I asked for my first alphabet set for Christmas last year) and I kind of jumped into it blindly. I need all the help and tips I can get and this tutorial had some good advice. I picked up a few new tricks and learned that some of what I was already doing was on the right track.

I wanted to do some hand-stamped metal name charms to add to my wristlets. Lucky me! My friend across the crafting table at our retreat had some cuter stamping letters than mine so I borrowed hers and went to work.

In metal stamping, it always takes me a few tries to warm up to good stamping. Here was my first attempt at a charm that night:

I was talking and twirled the L without thinking! oops.
Just like with exercising, I must always warm up my stamping fingers before getting down to the serious stuff!

The rest went much more smoothly.


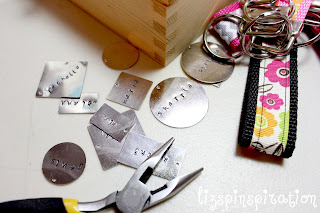
After my names were all stamped up and stained, I used a jump ring to attach them to the key fob hardware.

My busy, busy work station:
All the important supplies: stamping bench, pliers, nylon hammer, glass of wine. . . 
Once they were all put together I had these little beauties ready for all the teachers!


So cute! And fit right in my budget. 

Total cost: Prudent Baby put hers together for less than $1 each, but since I added the charm, mine were closer to $1.50. Still a pretty good price. I found a comparable wristlet selling for $9.99 without the personalized charm!

Total time: These were much faster to put together than I anticipated. Again, however, due to my sweet, sweet crafting scene, I wasn't much paying attention to time. It probably took around one hour to sew all 24 yards of webbing and ribbon together. With clamping and stamping, I would estimate another 2 1/2 hours or so. . . its fuzzy--there was pineapple lush cake involved in there somewhere. . . 

Final verdict: I love the way they turned out. They were so easy! I ordered some additional hardware when I got home from my trip to put together the rest of the wristlets. Hate to ruin the surprise, but if its your birthday. . . or anniversary. . . or if you are graduating. . . . or lonely. . . you may be getting one of these!

Tuesday, April 30, 2013

Pin 201: Baking Soda Mattress Refresher

Between working, illness, baseball, not to mention a zillion other things, I haven't been doing much pinning lately. Lucky me--this weekend I will be zooming off to a relaxing crafting retreat with some of my favorite crafting ladies. I'm hoping to have a slew of posts for you in the coming weeks. (Teacher Appreciation is coming up. . . hint, hint!) Meanwhile. . .


Original pin:

http://www.onegoodthingbyjillee.com/2012/05/the-countless-uses-for-baking-soda-besides-baking.html

Let me tell you, Jillee over at One Good Thing is one smart lady. She has a long list of great uses for baking soda. This one that I tried was a method to refresh your mattress.

Spring is in the air around here. Nothing gets me more in a cleaning mood than a cool spring day where I can throw open the windows and air the house out. Last week I did just that. I stripped the beds bare and laundered all the bedding (it was due). While they washed, I put together this concoction and went to work.

I recently bought this bottle of scent for use in another project (still looking for the final ingredient before I can try that one.) I figured there was enough here to spare a couple drops for this one.
I used about 8 drops per cup of baking soda. I whisked the scent into the baking soda so that I had a light, fluffy powder. There were a few baking soda clumps to break up.

An extreme close up of my powder!
I was staring at this trying to determine the best way to sprinkle it onto the mattress when I remembered some glass spice jars I had tucked away after they were empty. I funneled the powder into the jars and was able to fill three. I sprinkled a little more than one jar over my queen sized mattress.

An hour or so later I came back to vacuum it up. My whole room smelled delicious and fresh. I don't have any fancy attachment for the vacuum so I just climbed up there with the whole vacuum and went to town. My three year old thought I had lost my marbles.

When all the sheets and bedding were clean and dry and it was time to put the bed back together I grabbed my shaker again. Growing up, my mother would always put talcum powder on the bed when making it. It lends a nice smell and absorbs moisture. I decided this would work great for this purpose so I sprinkled the top of the mattress pad before I put the bottom sheet on. It left a nice scent and really refreshed my room.

I have a little more than a jar and a half left and I will keep sprinkling this on with my sheet changes until it is gone. I don't have carpet any longer, but if I did, this would be a good carpet deodorizer.

Total cost: I had both of the items on hand, but baking if I were guessing, it was probably less than $.30 worth of baking soda and fragrance.

Total time: 5 minutes to mix up

Final verdict: My room was so fresh! I loved it. The original calls for essential oils which I didn't have, but I did have this fragrance that worked great. I can't wait to use it again and again. The fragrance oils were so cheap that it would be easy to make a few different scents to go with the seasons.

Sunday, April 21, 2013

Pinprovement! French Bread Recipe

I may have said this ad nauseum, but I just love making bread. You'll probably think I'm a total dork now, but I am going to admit something to you--sometimes, when I'm making bread and it is baking and making my whole house smell delicious, it makes me cry. Absolute tears of joy. I could never go carb-free.

In October I posted Pin 144, a recipe for one hour French bread. My family liked it in its original form but it was very dense and something was just not quite right for me. I tinkered around with the recipe a little bit and found a combination that I like a little better. It is no longer one-hour, but more like 1 and 1/2 to 2 hours. Still much faster than some other recipes I have tried. I make this recipe regularly and freeze the extra loaves. When I want one, I simply pop it in the oven and soon I have fresh, hot, homemade bread again.


As I mentioned in the original post, there were a few steps that I was just itching to change up. The first one of those was the yeast.

I swapped out the regular yeast for fast rising yeast. I was looking for a fluffier bread so I wanted to use maximize my yeast activity and rise time.

My recipe looks like this:

2 1/2 c warm water
2 packages of Fast Rise yeast
2 T sugar
1 tsp salt
3 T extra virgin olive oil
7 c flour

Add yeast and sugar to warm water and let sit for 5 minutes until you see lots of bubbles. When I first started making bread, my number one mistake was not getting my water warm enough or getting it too hot. It should be 105-110 degrees or as indicated on your yeast package. My advice to new bread makers is to actually measure the temperature of your water.
After 5 minutes--I have bubbles completely across the surface.  All the white is bubbles, you can see a bit of clear water at the edges. 
Add salt and oil. Stir to combine. I make this bread using my stand mixer with the dough hooks. If you don't have one, you can stir by hand until it is too thick and then knead by hand to combine all the flour.

Time to add the flour. I increased the recipe to 7 cups. I add flour 1/2 cup at a time and allow it to mix.  The original dough was really sticky and difficult to handle. Depending on your dough and your environment, you may need a little more or a little less flour. Here is my very scientific, expert method of how I determine when I have enough flour.

The poke test:

Gently poke a clean, dry finger into the dough:


Pull finger out. If it is covered in sticky dough, it is still too wet. Keep adding flour.


When you have enough flour, the dough is pulling away from the side of the bowl more and your poke test will look more like this:

Now it is time to let it rise. My poor husband usually gets dish duty. I try to keep the dishes down to a minimum so here is a little cheat step. Doing this cheat step saves me one large bowl from dish duty.

The right way to do it: Coat a large bowl in olive oil. Place the dough ball inside, turning over once to coat all sides.

The cheater's way: LIGHTLY spray the sides of your current bowl and the top of the dough with non-stick cooking spray (like canola spray).

I also spray the side of the plastic wrap that will come in contact with the dough.

Then I put the bowl in my warming cabinet. (heehee) If you didn't read Pin 144 about my warming cabinet I like to rise in, let me sum it here. Preheat the oven to 350 for 1 minute, then turn it off. Place your bowl of dough inside and let it rise. It is perfect! My dough always rises perfectly in there, it is undisturbed and warm no matter what the actual temperature of my kitchen is.

Allow the dough to rise 30 minutes to 1 hour. The longer you let it rise, the more air pockets you create for fluffier bread. However, keep your eye on it. After 30 minutes in the warming cabinet this is how tall my dough is:

Which is also why I spray every surface with cooking spray.

Next, I spray my working surface with cooking spray and dust with flour. Punch down the dough and divide the dough into four parts. You will see in the pictures that I can not divide evenly. My loaves are always a bit differently sized so do not stress if your loaves are not even.

Place one dough ball in the center of your workspace. Cover the remaining parts with your plastic.

Pat the dough ball into a flat, long oval. Do not overwork the dough. You will know you are overworking it if you can not get it to cooperate with you. If it won't pat out to an oval and keeps bouncing back, cover it with plastic and walk away for 10 minutes or so. Then come back and try again. Starting with the edge nearest you, roll in a jelly-roll fashion to create the loaf shape. I kind of roll with a little, teensy, stretch along the way.
This may be a good time to mention herbed breads. If you want four loaves of herbed breads, you can knead in your herbs after your flour, before your rise. If you don't want to knead them in, or if you want different kinds of loaves, you can do it here. I don't like to knead them in in this step--the bread seems to get too overworked. I sprinkle the herbs on top of my oval before I roll it and it bakes out pretty evenly.

Place on prepared baking sheet.

How I like to prepare my baking sheet for bread:
Spray sheet with cooking spray. Place parchment or wax paper on sheet. Spray parchment/wax paper with cooking spray. You can also dust with cornmeal, but I don't find that this recipe needs it.

Once you have all four loaves on the sheet, cut slits in the top of each loaf. I use kitchen scissors to snip the cuts or you can use a sharp knife. Cover with plastic until ready to bake. A second rise is not necessary. I usually just let it rest while the oven preheats.

Place in a oven, preheated to 375 degrees. Bake 30-35 minutes or until your desired brownness. I like to brush melted butter on the tops as it comes out of the oven.

For a crisper crust, place a dish of hot, steaming water in the oven below the bread pan during baking.

Thirty minutes later I had these beauties (see my little runt loaf? Nothing wrong with a runt.)


The final result is beautiful, isn't it? Here is the fluffier inside:
I hope you like my adjustments! If you want a denser bread, or if you want to try out the original, go check out the link from Pin 144

As I mentioned in the beginning, I freeze these loaves. Wrap in aluminum foil and pop in the freezer. When you are ready to eat it, pop it into the oven, still wrapped in the foil, at 350 degrees for 30 minutes or until heated through. I'm not sure how long these would keep in the freezer because we usually go through ours at about a 1 loaf/week rate. 

Good luck and Happy Bread Making!!