Showing posts with label upcycling. Show all posts

Friday, May 10, 2013

Pin 203: Coin purse upcycle

Original pin:

No source available

What a clever way to reuse denim! Since there was no link available, there was no tutorial available either. I had to just wing it.

My friend gave me these shorts from her daughter that had been stained but had really cute pockets. She thought maybe I could find something to do with them. I had been holding on to them a long while when I saw this pin and knew it would be perfect.

I started by laying out the shorts flat and cutting outside the large seam around the pocket so I ended up with these two pieces:
I hemmed the top edge and then pinned right sides together. I stitched around the rounded edge. After trimming flipping right side out I stumbled across a small problem (like I tend to do when sewing without a pattern and/or plan. . . )  The hardware could not be attached in this way because I had sewed completely up the sides. I had to then rip out the side stitching an inch or so.
I had to rip back until the top of the flower patches.
Attaching the hardware was not easy. The type of hardware I had purchased required hand sewing. I had to borrow a thimble to hand stitch the hardware through the thick denim hem. No tears, but quite a few curse words later the hardware was attached. I had to re-sew the side seams by hand as best as I could. Phew, finally complete!  Thankfully, I was returning this to the original owner, a sweet little girl who will never notice a couple of flaws.


Don't look too closely at that hardware stitching on the end there. . . 
Total cost: A few dollars in hardware

Total time: Maybe two hours?? I did this during my crafting retreat last weekend and the time just drifted away. . . 

Final verdict: A cute idea. Next time I will try to find some hardware that isn't hand stitched on. And I will also know to leave the sides open until after the hardware is placed.

Monday, November 19, 2012

Pin 159

Original pin:
Pinned Image
http://naptimedecorator.blogspot.com/2011/11/time-for-thanks.html

A little Thanksgiving decor to spiff the place up.

Okay, where to start on this on. . .

My vision for this project was a little different. I liked the "thanks" concept but I planned to use different sized filled jars. And instead of painting on them, I decided to cut out the letter and stick it down in the jar. That way I could reuse it for something else later.

I wanted to fill my jars with fall things of nature--pine cones, acorns, etc. My boys are always picking up acorns around the neighborhood so I we went on a scavenging walk. Do you know how many acorns it takes to fill 6 jars? A lot. A heaping lot. More than I found just taking a quick walk around our block.  So I had been keeping my eye out for some oak trees. A few weeks ago I decided to take little one to a park that had some big oaks. I spent a long time gathering while he played. I seriously gathered at least an hour. I was very indiscriminate in my gathering. I just scooped up anything and everything that seemed intact and uninfested.
The haul.

 I took them home and washed and dried them well. I sorted them into three piles: green acorns, brown acorns, and caps.

Later that night after the little kiddies were in bed I set about the task of gluing acorns to acorn caps. As I worked from my piles spread out on white paper towels, I started to notice something. Little piles of dirt? Turns out my acorns were infested because soon after I saw little white worms poke their ugly little heads out. Okay, that's my cue to wrap it up. I screwed the lids on the jars (very, very tightly) of already glued acorns. The rest of the acorns were quickly shuttled back outside to the patio. 

In the morning, the "t" jar had these little fellas waiting for me:
They make me gag.
Since this is a Thanksgiving project, here are a few things I am thankful for:

1. I started the project the same day I brought home the acorns. They didn't sit in my house releasing worms for days before I noticed.

2. I was working on it at night. Seems that these little buggers are more active at night. I may have never noticed this if I was working during the day.

3. Mason jars with very tight sealing lids.

I did a little googling research and found out that this is very common with acorns. Who knew? I sure didn't. I got a lot of mixed information on how they get in the acorn, what they do in there, how to tell if the acorn is infested, I don't really have any great advice to offer here on this one. I did learn this:
That's how you can tell a worm has come OUT of the acorn.
 Totally disgusted, I had to put this project down for a few days and rethink my methods. There were about five acorns in my stash that we had collected from the neighborhood. These never released any worms. They were bigger and their caps were still on. (One website suggested that acorns that fall before their caps do so because the weight of the worm causes it to release from the tree early. True? I don't know, but a nice theory.) Anyway, I decided I would go find more of these acorns.

After searching all the public neighborhood areas without luck, I found two different neighbor houses with nice big acorns. I tried ringing the doorbell first, but with no response, I went ahead and collected their acorns. Sorry if you wanted those. Blame it on a really hungry squirrel.

I thought back to middle school science lab when we had to stick these bugs into a diorama. We froze them to kill them. I took all my acorns home, sealed them up in a big ziplock bag and froze them for 72 hours. Again, I googled some more avoiding about acorn worms. Some suggested freezing, some suggested baking. I decided to do both. I looked over my first stash as well. The green ones had never hatched any worms, so I decided to try these as well. After a good long freeze, I popped these babies in the oven for a few hours. The green turned brown but I didn't burn anything.

After they cooled, I put them back into a ziplock and sealed it. I watched it for two days to make sure there were no super charged worms that survived the freezing and the baking. Looked good. Back to work.

I still didn't have enough to fill my jars completely. I used toilet paper rolls to fill the back half of the jar. Then I cut out a letter and used a piece of clear tape to hold it in place while I filled the jar with acorns. When full, I pulled the tape off and put the lid on.

Once all the jars were full, I lined them up on my mantel. I popped a few of my leaf flowers from Pin 154 into one of the toilet paper holders. Here it is:


Look! No worms!


Total cost: $0
 
Total time: Days and days and days.
 
Final verdict: My Lu loves it. He asked me to leave it up there forever so we can always remember Thanksgiving. It was a lot of work. But I learned some lessons about crafting with acorns. I may never get rid of my perfectly prepared stash of acorns either.

Wednesday, October 24, 2012

T-shirt Makeover

The other day I was wearing the Peasant Shirt I made back at Pin 16.
I was thinking how easy it was and it really is a very comfortable shirt to wear. Then, like a lightening bolt, it hit me. Jersey knit. Let's make it from a t-shirt. I love, love, love t-shirt makeovers!

My favorite place to buy cheap t-shirts is at my favorite local dollar store. Availability is scattered, so if I see one in a color or size I like I usually just grab it.

I dug a black 2XL sized t-shirt out of the stash and went to work.
I cut a wide scoop neck from shoulder seam to shoulder seam. I also put a rolled hem on the sleeves.
I don't know why this picture looks so wrinkly. It wasn't that wrinkly.
I finished off the edge of the neck and then folded and pressed it under to create a casing. I threaded some 1/4 in baby elastic through the neck line (around 28 inches) and sewed it shut. After trying it on, I added a rolled hem to the bottom. I put it on and started creating looks. Look at all the ways I came up with to wear it:
Just on it's own. Relaxed fit, soft comfy jersey.
Spicing it up with some off the shoulder action!

I grabbed a black sash (back from Pin 132) :
Sash low on the hips

Sash at the waist, off the shoulder sleeves

Highest, empire waist, sash tied in the back
 Ahh! So many things to do with this one!

Total cost: $1

Total time: 45 minutes

Final verdict: Easy, breezy and versatile. I just got 5 looks for a dollar!


Tuesday, September 25, 2012

Pin 136

Original pin:

http://www.thecountrychiccottage.net/2011/10/how-to-make-sweater-pumpkins-no-sewing.html

Getting in the fall spirit around here. Since it is still in the 90's I need something else to do around here with all those sweaters. Sweater pumpkins it is!

Last week, I hit up a couple thrift shops looking for some pumpkin-y sweaters. I had a little trouble at first finding orange AND in my budget. I was looking around for more like the dollar-a-piece type of items, and all the sweaters were clocking in around $3-4. Time to get creative. So I came home with one child's sized sweater, one adult sweater, a stocking cap, and a lap afghan. Today I swung by the dollar store to pick up a grapevine wreath to make stems.

The loot.
I made my little orange one first. I followed the directions exactly. Time to shake it up to make the stocking cap.

I didn't want to cut open the hat anywhere since it only has the one opening.  I stuffed the hat to my liking and then decided to close it up a little differently than the first one. This time, I wrapped my grapevine stem piece in a little yarn and then used the tail of the yarn to sew around the rim of the cap.
I left the stitches loose until the end where I stuck the stem in and cinched it shut, tucking in the loose edges. A little hot glue held everything in place.

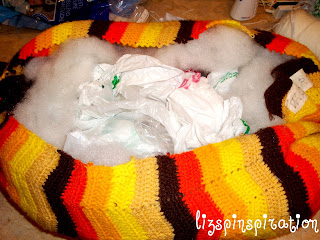
For my third pumpkin, I decided to take on the afghan. I really wanted the chevron pattern to show on my pumpkin so I was going to have to make it big. I started by cutting the afghan in half and working with one half. I ran out of stuffing so I started grabbing other things to stuff it with. There are some giant pieces of foam left over from an old, old, OLD project and then a ton of empty shopping bags.


When it was time to start gluing the edges shut on this beast I decided to skip the hot glue. I wanted to match up the stripes and I kept burning myself trying to do it so I decided to sew this one shut with some yarn. I ended up having to adjust the top a little as well to get the pumpkin shape I wanted. I tucked the excess down in the pumpkin and sewed the top shut using the same technique I used on the cap.

Since I was out of stuffing, and now nearly out of shopping bags, I decided to quit at three. We'll save the extras for something else. I posted this tease picture on facebook earlier today and all your guesses have inspired me. Looks like I will have plenty to work with.
My pumpkins!


Total cost: $10

Total time: 2 hours

Final verdict: A little bummed I ran out of stuffing so soon. They weren't as easy as they looked at first. I don't think I would hot glue again. I would sew the side seam and bottom seam shut. Personally, I think it is just as easy and looks nicer. Plus, if you mess up, it is so much easier to rip out stitches than hot glue. Stuff through the top, and cinch the top shut. If you don't sew, however, you'd better stick with her method. Cute idea, will add a nice festive touch to the house. You could make fabric stuffed stems to make them into pillows too.


Saturday, July 14, 2012

Pin 103

Original pin:
Pinned Image

http://www.polyvore.com/girls_night_out/set?.svc=copypaste&embedder=0&id=34159992

I had pinned this originally because I liked the pink shirt and I thought i could easily make this.

Turns out, I can.

Tonight I was going out for a friends birthday. While the boys were all napping this afternoon, I decided I wanted something new to wear tonight. While I didn't have this nice pink color in my scrap bag, I did have a blue shirt I'd been wanting to change up. It was a hand me down shirt that just never fit quite right. It was in good, like new, condition, but I just rarely wear it.

 I put it on inside out and, with a piece of chalk, drew a line following the collar line, over the bust and then down to the bottom sleeve seam exactly where I wanted to make my cut.
 Then, I cut the front following my chalk line and then cut the back pretty much straight across. I cut off the other sleeve just inside the seam. I took in the bust area so that it would be fitted and not slip down.

If I had extra fabric, I would have used the scraps to make the ruffles, but instead, I found another shirt from the scrap bag. I layed it flat and cut two inch wide strips from the bottom. I opened each strip up at one of the seams so that I had three long strips. I sewed a wide stitch straight down the middle of each and then pulled the stitch to gather the ruffle.

I sewed each ruffle along the baste stitch to the top edge of the collar all the way around the shirt. It took two ruffles to make the top ruffle. I placed the third ruffle on the front below the first ruffle to give it some fullness.

I tried it on and trimmed the shoulder strap in a little to give it more of a tank strap. Then it was done! Check it out!

You could easily add more rows of ruffles if you wanted it fuller.

I put it on with some white summer pants and was off to dinner. Very comfortable and plenty of room to eat in!

Total cost: $0

Total time: 45 minutes

Final verdict: I love my new shirt! The only thing I might change is that I didn't have any purple thread so I used some contrasting colored thread. You can see it a tiny bit if the ruffles are falling right. I would have preferred the thread to match, but its not too big of a deal. I might add another ruffle row to the front and the back but I don't want to add too much bulk under the arm. We'll see.

Thursday, July 5, 2012

Pin 96

Original pin:
Pinned Image
http://howaboutorange.blogspot.com/2012/05/summer-t-shirt-diy-projects.html

This blog has a link to Gap's facebook page which posted this flip-flop makeover using a t-shirt.

I have been wanting some gladiator-style sandals for two summers now, but haven't found the ones I liked in my price range.

I picked up a pair of flip-flops at the dollar store and dug an old shirt out of my scrap bag. The flip-flops were in desperate need of a makeover and the shirt was one I had bought ages ago. It had been on sale so I picked it up for cheap, but it never really looked good on me.

I did not follow the directions exactly. I did not want to sew these on by hand. I used small amounts of hot glue to put the strips of fabric on the flip-flops and keep the strips in place. These dollar store flip-flops could use the reinforcement. Plus, the thong is so thin on these shoes--the fabric would slip all around if I didn't.

I didn't get it exactly right the first time. I had to rip the first one out and re-do it. Luckily, the thin thong meant that I needed less fabric to wrap the shoe with.

My final product, a no-sew flip-flop makeover:
I started at the thong between the toes and hot glued the beginning of the strip here. I worked with only one strip at a time. The original looks like they wrap two at a time. I did that on the first shoe and it just looked sloppy and uneven on these skinny straps. That is the version I ripped out and re-did. I totally wrapped the straps, putting little glue dots on randomly. Then I took a second strip and tied it to the back end of the strap where it meets the base of the shoe. I glued this in place and that made the ankle straps. You could make these as long as you wanted, but I stayed relatively short.


I wrapped them differently than the picture the first time. Here is the re-do.
Total cost: $1

Total time: 1 hour

Final verdict: My feet do not have any photogenic qualities. But besides that, I like them. I can't wait to try them out. I am a little wary that they might fall apart when I wear them out because I used some thin knit fabric and hot glue on dollar store sandals, but I guess we will see. Other than that, I am happy with how they look. I think they are super cute and they were pretty easy to make. Extra bonus: They were definitely within my price range.

Thursday, June 21, 2012

Pin 90

Original pin:
Pinned Image
http://asmallsnippet.blogspot.com/2011/09/wanna-make-dress.html

I have made this dress before (See Pin 37) but the link actually has two styles on it. The long one in the pin is what I made first. This time I made the short version. I get so many compliments on the long dress and it is so comfortable I decided I needed the short one too.

This time I used a tank in my closet that was ooooollllldddd and some fabric that had been in my stash since well before my first child was born. In a nutshell, this dress was free!

There was a small drawback. Because the tank was so old and soft and stretchy to the point of being a little too stretchy, it gave me trouble sewing the two pieces together. I made it rather late on night and I just kept bungling it over and over. The weight of the skirt pulls the weak over stretched fabric down in the back which makes the back dip lower than the front. I had to make an extra wide sash to compensate for that.

It has actually been a while since I made it but I kept forgetting to take a picture of it when I had it on. I still love it and I get compliments on it all the time too! This tutorial is truly a winner!

Total cost: $0

Total time: I think I spent 2 hours on it because I kept bungling it up.

Final verdict: Love, love! Is it obvious since I have made this dress twice??

Saturday, May 26, 2012

Pin 79

Original pin:
Pinned Image
http://www.lovestitched.com/my-tutorial/knotted-jersey-headband-tutorial/

Knotted headband tutorial, promised no sewing.

I was so, so disappointed when I found this tutorial was not for this exact headband. This picture is from an etsy shop that the blogger used for inspiration for her headbands. I really wanted a wide, stretchy headband. It looks so sweet and comfortable here. The blogger combined this picture with the tutorial I used way back at Pin 24.  Because that tutorial uses hot glue and a ribbon at the back I knew that this wide stretchy headband was not the same project. The blogger uses much thinner strips of knit.

I found two leftover t-shirt sleeves in my scrap bag and played with different cuts to see if I could replicate this with a no sew method. After about 45 minutes, I gave in. I like to sew and I didn't want to give up the wide headband. I grabbed two more leftover sleeves (the first ones were pretty mangled by this point) and cut them into two matching loops.. I cut off the seam making them into two rectangles and then knotted them in the same method originally used. I matched up the ends and stitched them shut. I used a pretty tight stitch and stitched two rows on each band because I knew these would be under a lot of tension.

The final product:
Happy with my wide band and a teased ponytail.

 You could vary the size of the knot by how tightly you pull it. I needed it to be pretty tight. The sleeves I used were from a small t-shirt left over from Super Hero Cape day so I needed all the length I could get!
With some big sunglasses and fancy coloring I felt very Hollywood.
Hair up in the back in a messy bun.
Total cost: $0

Total time: After I gave in to the sewing and started with fresh fabric, about 10 minutes.

Final verdict: I love my stretchy wide headband. I told my husband it was my dirty hair day headband because it will totally hide a greasy hair day! He didn't think that was funny. Hey, we all have hot mess mommy hair days. Throw this on with a big pair of sunglasses and roll around town in style.

Monday, May 14, 2012

Pin 72

Original Pin:
Pinned Image
http://www.notesonawedding.com/diy-mason-jars-wrapped-in-twine/

You may have noticed these in Pin 71. As I mentioned in that post, I was having a little last minute scramble for jars for the teacher appreciation luncheon last week. I always save my jars when I am cooking to use as grease collectors so I had a few stashed under the sink. I tried soaking off the labels which worked for some, but two really had some awful glue on them. I tried hot water, the microwave, soaking, scrubbing, scraping. I didn't have any steel wool--this was an unexpected obstacle, but I did have some of those green heavy duty scrubbers. I called in Mr. Muscle and even he couldn't get this glue off. All we did was take it from a white gluey, sticky mess to a green mess as it shredded the scrubber.

ewww. gross.
I remembered pinning this and decided this was going to be the best solution to this problem. I didn't go back and look at the original pin at the time. I was just in "get-it-done" mode. I grabbed a ball of twine and my hot glue gun and went to work. When I went back later and read the original author's directions, we were pretty much the same. I used hot glue, but she used another type of glue. The nasty residue glue actually helped the twine stick right in place so I only used one dot of hot glue where I started. The ends I just tied in place.
The jar on the left I just tied the beginning end to the final end. The jar on the right, I did a few layers of figure eights and tied in the back.
These turned out super cute, were fast and easy to make, and fit in with our decor perfectly! The perfect fix to this sticky label problem.

In action
Total cost: $0, upcycled jars, leftover twine that originated from the dollar store

Total time: 5 minutes per jar

Final verdict: I loved this simple solution to hiding the ugly adhesive on the jars.