Showing posts with label pinjury. Show all posts

Wednesday, January 16, 2013

Pin 174

Original pin:
Pinned Image
http://mollykaystoltz.com/t-shirt-shag-rug-tutorial/

T-shirt rag rug tutorial

As promised, I am wrapping up unfinished projects. As some of my friends can attest, this one has been a looooooong time in the works. I started in in APRIL!! I worked on it pretty steadily April-May, dragging my bag of supplies to craft nights and work days. We got rid of all our carpet in May. I was making this scrap rug for my older son's bedroom. Right around that time we stumbled across this brand-new-in-the-package rug at a garage sale that is the one with the roads and buildings printed on it. He fell in love with it and I picked it up for $2. No need for this one so it was rolled up and put away. It took up a lot of space on my "craft shelf." Haha. I don't have a real crafting area in my home, so I randomly find space to cram my crafting stuff and this found its way onto a shelf--where it repeatedly fell off!

Let me rewind back to April. . .

I wanted this to be larger than the tutorial--which is the size of a t-shirt. So I bought fabric remnants to use instead of gathering a wardrobe's worth of t-shirts. All of my fabric came out of the remnants bin so it was fairly cheap. I chose a large piece of denim for the base because I thought it would be sturdy. Since I was not using knit for the scrap pieces, I cut all the fabric strips using my pinking shears to prevent some fraying. HOURS later, I was suffering from my first real pinjury!!
 
But now that I had all my strips, the real work could begin. I followed the tutorial to cut the base and weave the strips in. My base was so large I could only do about three rows an hour. Days and days later I made it to this point, at which it was rolled up and stashed away for nearly nine months.
 
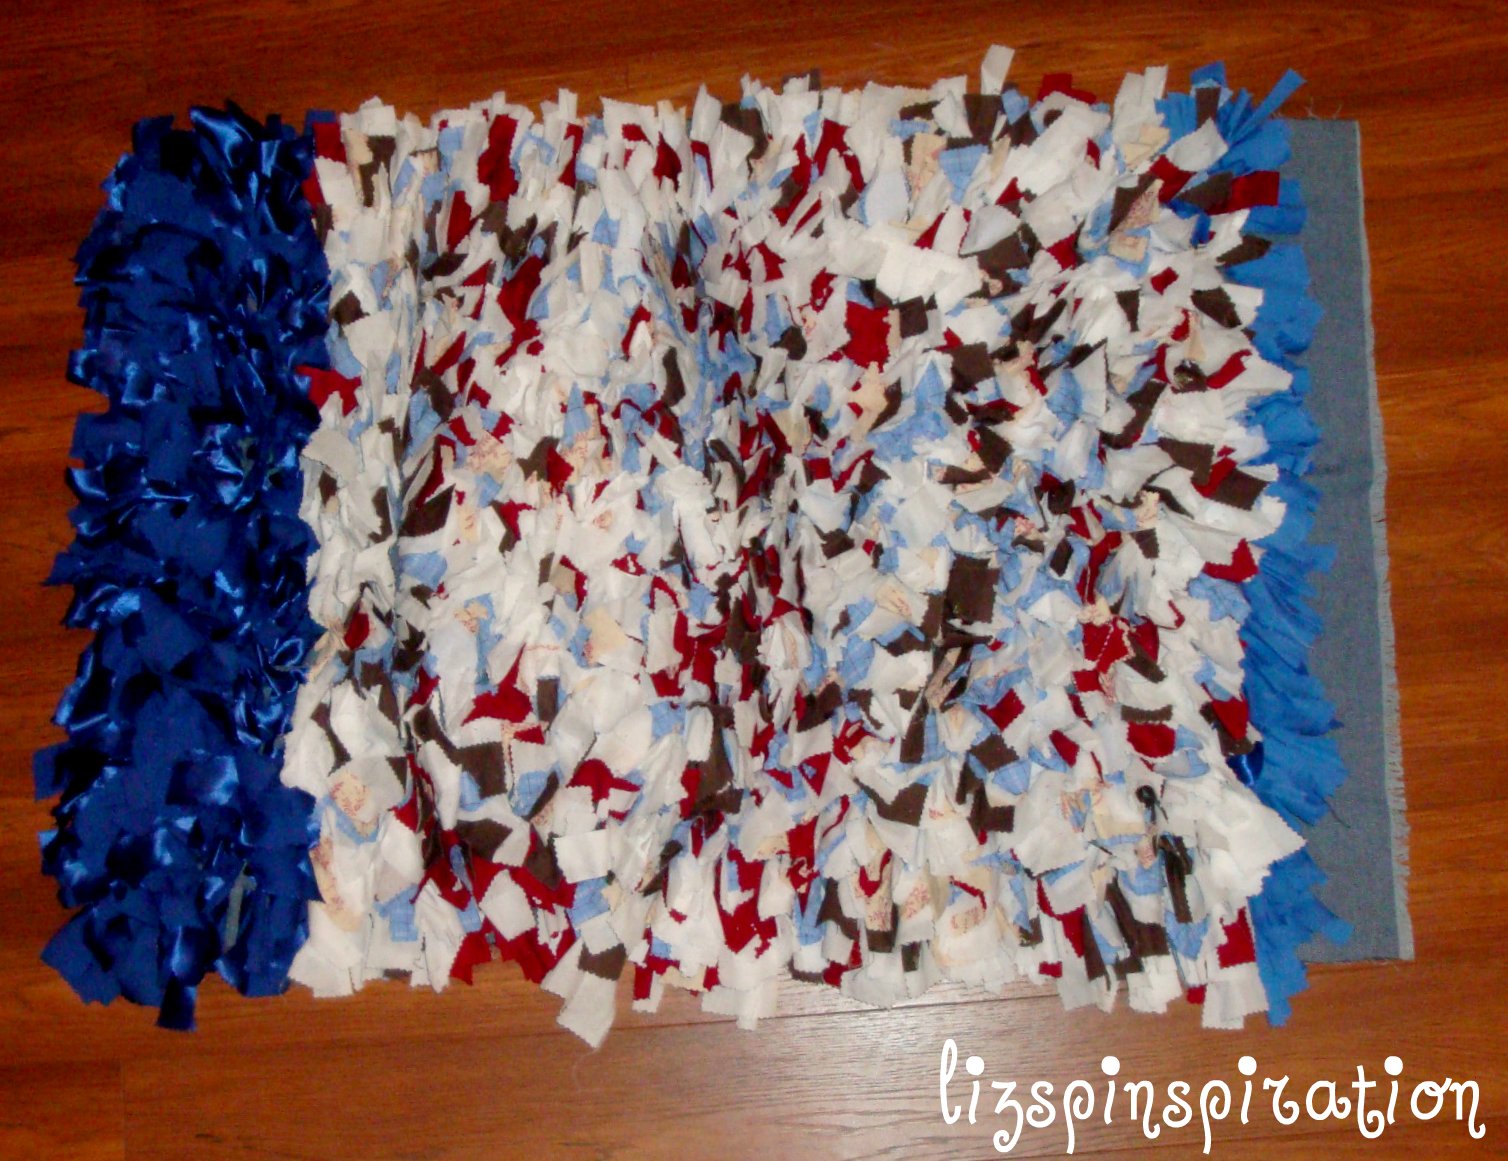
See how close this was to actually being finished!!!
Yesterday, I pulled it all out and finished the puppy up in about 45 minutes. Seriously, why couldn't I do that earlier?? Here is the finished product:


I didn't go in with a specific pattern plan, it just worked out that I used up all my colors early on and was left with a lot of blue. I started in the middle and worked my way out to each edge. I did the center row and then did one or two above and then one or two below, then back to the top for a few, and so on. . .

Since this doesn't really have a destination in my home any more--thanks to the much COOLER manufactured rug, I just kind of left it lying in the middle of the room where I finished it yesterday. When the boys got home from school I asked them "where do you think we should put it?" secretly hoping they might fight "my room! my room!" but the only answer I got was from super-cool L, "uh, how about on the floor."  They did play on it a little and pulled out a strip or two. Maybe its best NOT to put it in their room because I just may find one of them in a pile of strips with a holey swatch of denim one day as they deconstruct it.

Total cost: I am pretty sure I spent around $17 on fabric remnants

Total time: I am just going to have to do some math here . . . at three rows an hour and 41 rows plus the hours spent cutting strips, I am going to say all together I probably spent somewhere between 18-20 hours on this one.

Final verdict: Its a homeless little rug for now. I am glad to have it finished and off my craft shelf because it took up a lot of room. It was easy enough but I'm not convinced it is going to hold up to a lot. And I am a little worried about washing it and having to rebuild! Time will tell. . . To create another rag rug I would probably find a better way to secure the strips--tying or stitching or something. But I will start much smaller for the first trial.

Tuesday, September 4, 2012

Pin 127

Where have you been?? Where have I been? I'll tell you where--I took the 300/30 day ab challenge.

Original pin:
Pinned Image
http://www.lifeafteridew.com/2012/05/300-ab-challenge-results.html which is a link to http://kayciesantics.blogspot.com/2012/03/300-ultimate-ab-and-core-challenge_22.html which is the workout from another link taken from another blog and another. . . I don't know how far it goes. I followed the directions on the second link.

I can't believe I am actually posting pictures of myself like this on the internet. I am a little embarrassed so don't say anything too harsh about it, okay?

I don't consider myself to be totally out of shape, but I have never really had any core strength. Having two children pretty much ruins that for you. Here is my before shots, I had to soften them up a little bit to be brave enough to post them to the world. . .


Don't look at my misshapen belly button. :)
 
And then I started the challenge. It is 300 ab exercise moves daily for 30 days. Check out the links above if you want to see what exercises they are. From reading the comments on the above blogs it seems that these exercises are very similar to P90X--which I have never done so I can't really say.

I started this August 1st. I also did at least 30 minutes of cardio 2-3 times per week and ate a healthy diet.  I started out with a yoga mat on the floor. I couldn't do them all without assistance so I took my time--however long it took to get all 300 in.  Here is the journal I kept during this experience:

Day one: It took me one hour to complete the entire routine. Tough, but not impossible.

Day two: Finished in 25 minutes with the kids acting like maniacs all around. My tailbone is sore so I padded the mat with a folded towel.

Day three: OUCH. Hard. 25 minutes to complete. My tailbone is raw. I can't stand up straight because my inner hips are so sore. People are telling me to quit. I looked at the other links and many people commented that day four is the worst then it gets better.

Day four:  SO MUCH BETTER! i started feeling better early this morning. I padded the floor well. Exercises are getting significantly easier. Even did a few of the roll up-v-ups full out. But my tailbone is BLEEDING!!!! (That's an official pinjury.)


Day five: Bought some friction block for my tailbone. Using lots of padding on the floor. My tailbone is still sore, but not bleeding.  Exercises getting easier but it still took a long time because I keep watching those Olympic gymnasts. 

Day six & seven:  Continuing to get easier. Lots of padding but no more bleeding.

Day eight: Right flank felt tight when I started and then shooting pain when I started the wide leg sit-ups.  Couldn't go on without fear of injury.  Warm soak and icy hot. Don't know why I am not warming up before this. I should warm up and stretch first. 

Day nine: Warmed up with 2 mile run and some good stretching.  A little scared about how this is going to go. Started smooth, skipped all the hard ones for the end.  Made it through 23 roll up-v-ups before starting to have some pain.  So I did everything but the wide leg sit ups.  Pretty respectable. Will rest and icy hot and try again tomorrow.

Day ten: Well warmed up. Changed up the order again. Only made 15 roll up-v ups before pain and quitting.  Feel good though. Taking it slow and easy.

Day twelve:  Did all wide leg sit ups and roll up-v ups at the end of the workout. No pain!!

Day fourteen: Did full work out in original order. Did all exercises with no assistance (i.e., using furniture to help me keep my feet/legs down). Getting close to completing in 20 minutes. Warming up with jumping jacks and stretches. Stretching between exercises.

And it just got easier from there! By day 30 I was doing the full sequence in 15-20 minutes including my warm up. I used the friction block every day and my mountain of padding:


I don't know why the other posts don't mention warming up. This is a strenuous workout (well for me at least) and you SHOULD warm up first. Unless I had just finished my cardio then I did a warm up of 25 jumping jacks. I always stretched first doing some side bends, forward folds, and some cat/cow stretches. One post said to not do it after your workout because it will be harder, but I always found it much easier to do after a workout.

It works a lot in your thighs as well as your abs so don't be surprised if you feel it there too!

Here are the shots you are dying to see. . .the afters:

Still not ready to show the world that belly button one of those boys distorted.


I still have a ways to go, but I have never had definition like this before. I am proud of myself for sticking with it even though I had people telling me to quit at day three. Look at what I can do! I would like to continue to do core work but I don't think I want to keep doing this one every day. My tailbone might just turn gangrenous and fall off. I really slimmed down in my love handles too.

Total cost: $5.26 for friction block

Total time: 20 minutes-1 hour daily. I can totally whip this out now. By week 2 I was pretty proficient at it.

Final verdict: It feels like such an accomplishment to have completed it. It is amazing what we can make our bodies do. I would definitely recommend doing some sort of warm up and stretching before starting each time. Looking to change up the routine. What core routine do you like?