Showing posts with label holidays. Show all posts

Monday, August 26, 2013

Pin 212: Crunchers (aka Scottish Chocolate Caramel Bars)

Original pin:
Crunchers - A Swirl of chocolate, brown sugar, peanut butter, butterscotch and crackers
http://www.twirlandtaste.com/2011/01/crunchers-addictive-chocolate-brown.html

In July, (yes, I am way behind around here) I needed a dessert to take to our family reunion. I don't make a ton of sweets but my sweets board on Pinterest is full of delicious-looking things. I used the occasion to try something out. I pulled up this recipe for "crunchers." Club crackers layered with a caramel-y filling and topped with a butterscotch/chocolate layer. Yumm.

While this dessert definitely does NOT fall into my just-whip-together-something-amazing-as-you-glide-out-the-door category, it was not difficult. Just time consuming, and as far as Mr. Pinterest is concerned, uses far too many pots and pans to pull together.

I started with layering the crackers but I couldn't fit as many in the dish as the recipe said I should, so I switched to a larger dish. I could almost squeeze the right amount into this dish but my final dessert was not as thick as the original posters. When it came time for topping, I was certain the called for amount would not cover my dessert completely so I just added a few extra handfuls of chocolate chips and butterscotch and then ended up with a nice thick chocolaty layer.

All chilled and out of the fridge ready for cutting:
I popped it out of the dish and off the foil--surprisingly easy and smooth. Time to cut into bars. I wasn't sure what to expect while cutting--if it was going to be difficult or not, but it was really easy to cut.
So my layers are not perfect, my chocolate is pretty thick, but the bars themselves were pretty darn tasty. Not exactly what I expected, but a nice little combo of salty and sweet. I packed the bars up and took them to the family reunion. One of our cousins took one taste and declared them exactly like this dessert they fell in love with on a trip to Scotland. I guess that gives me "International Chef" status.

Total cost: umm. I forgot. It was July. Sorry folks.

Total time: Thirty minutes plus chill time.

Final verdict: They were easy enough and tasty enough that I will probably make them again, but I might wait for a special occasion--maybe Christmas parties or the next family reunion. I might also stick with a smaller dish and less crackers to have a thicker bar like in the original photo.


Monday, April 1, 2013

Pin 196: April Fool's Day Prank

Original pin:

http://mrsgoffskinders.blogspot.com/2012/03/best-april-fools-joke.html

A fun little April Fool's Day prank--a homemade batch of "brown-e's"!! Love it! (And by the way, this blog it is from has some really cute ideas for the pre-school/early elementary crowd. I'm going to have to spend a little more time digging around out there.)

I spent last night at work (my "real", paying-sort of job) so this morning and early afternoon were spent sleeping. Big El was at school and Lil' Dub was off at Grammy's house for the day. After I picked Big El up from the school bus, we hopped in the car to head out to pick up the brother. We were talking about April Fool's Day and what sort of funny things we could do when I remembered this fun idea. I LOVE a good pun. I hadn't intended on making any stops, and money has been tight the past month (thanks to birthdays, dental work, home repair, more birthdays, more dental work, more home repair. . . ), so I didn't have any cash on me. I have strictly forbidden myself from charging or debiting anything other than true necessities. However, one of my favorite dollar stores was on our way and we started digging change out from all the little storage spaces in the car.

We managed to pull together a few dollars and stopped in for our supplies. With our change, we bought foil, a brownie pan, some brown lunch sacks, and an Orange Crush (because hard work made us thirsty and we had a couple extra coins.) As any good crafter (or nurse), I always have a few tools with me, so I pulled out my suture scissors and went to work making some "E"s while Big El went to work on the Orange Crush. Moments later, we had a pan full of Es ready to present to Grammy and Pops.

He was so excited as we met them at the door bearing our special holiday brownies. When Grammy peeked inside and found the surprise, Big El burst into giggles.


We were able to pull it again on Pops and then again on Daddy. Good clean April Fool's Day fun!

Total cost: $3 (unless we add in the Orange Crush.) I could have put this together for $0 if I had had the clear brain to think of it before we left the house. Oh, the woes of working the night shift.

Total time: 5 minutes (plus baking time. . . hehehe)

Final verdict: I love it because it is a good pun. The kid's loved it because it was fun to play a prank on April Fool's Day. Now how are we going to top this next year??

Sunday, March 31, 2013

Candy Free Easter Baskets!

I am not a huge promoter of holiday candy. I like baking around Christmas, I like Thanksgiving pies. What I dread is the endless bucket of SweetTarts, Jolly Ranchers, Skittles packages, etc., that come home by the handful around the holidays. I throw them all in a bucket and try to ration them out to my children--who have proven to me many, many times just how wild a little sugar will make them. My littlest literally starts spinning around after a little sugar rush. In a month I usually end up tossing a lot of the candy. I am actually tossing the Valentine candy this week. I don't think it will be missed in the excitement of Easter.

I am not all bah-humbug, though. I did take them to our church Easter egg hunt today. I will have more eggs for them to hunt tomorrow--some with actual candy in them! Those without candy are usually stuffed with animal crackers, Goldfish crackers, pretzels, Cheerios, or other items with a little less sugar.

Our budget is tight this year. I did not really want to spend a lot of money on candy that would get tossed in a month or on trinkets that will break easily. I don't have a ton to spend on big ticket items. I thought it through and decided to buy stuff on my grocery list (or a near future grocery list) and make them a bit more festive and fun than usual. That way I am buying items I will need anyway and will get used.

Here they are followed by a list of what is inside. There are a few little indulgences in there. The whole basket contains only one sugar-y item which clocks in at 4 grams of sugar per serving.


Contents:
I recycled our Easter baskets from a previous year.


Easter themed Goldfish crackers: Since they got them in their baskets this year I didn't put them in the eggs.
Bunny-shaped Macaroni and Cheese: Total splurge! My kids usually get the store brand or homemade.
Toothbrush and toothpaste: To fight decay from the candy they do get!
Book: From the under $4 price range
Got Milk milk straws: My friend mentioned to me that she had picked these up for her son's basket and I thought they were a great idea! They are straws filled with a little flavoring (this is my sugary treat for them) that are used to drink milk. They flavor the milk as you drink. I figure the milk drinking balances the sugar out a bit.


Flip-flops: Spring is upon us and flip-flops are a summer necessity around here.
Squeezable applesauce: My kids love this stuff but it is not on our normal list. They are usually stuck with the jarred kind.
Mr. Bubble foam soap: They needed bath soap anyway.
8-Pack of new crayons: My oldest has realized the wonderfulness of a fresh pack of crayons complete with perfectly pointed tips. Ahhh, a boy after my own heart!

Total cost: About $23 each. Yes, that is a bit more than I would have spent filling their baskets with dollar-store treasures, but now I don't have to buy all these necessities on top of that. The crayons, milk straws, and books were the three items that wouldn't have been purchased at all. Those together were $6.50. I guess you could look at it from that perspective that the baskets were only $6.50 on top of our normal spending.

Final verdict: When I list out loud what I got them (toothbrush, soap, shoes) it sounds kind of lame. One day my kids may look back and think this was a lame basket, but I think its actually pretty great. I think they will love it!

Tuesday, March 26, 2013

Pin 195: Fun Fur Easter Wreath

Original pin:
P3091852 copy
The pin I had on my pinboard has an incorrect link but I liked this wreath so much I found what appears to be the original source and this is the link complete with a tutorial showing simply how easy this is: http://pattyschaffer.typepad.com/capture_the_details/2010/03/monday-make-it-spring-baby-grass-wreath.html

I pinned this a long time ago but had kept it in the back of my mind waiting for spring. After cleaning up the debris from Valentine's day, my mind went to this project. I sought out this yarn while at my favorite yarn store but was immediately turned off when I found it was $7.99 a skein. Because my original pin didn't have the correct source, I wasn't sure how many skeins I would need, but I was sure it would be at least three or four. This yarn is so skinny! Mission aborted!

I came home and started researching the original link. Turns out her wreath was only 8 inches but she only used one skein! Honestly, I was skeptical about this one. The next week, while at a different craft store I decided to check out their fun fur prices--just in case. I was pleasantly surprised to find it $2.99 a skein--and I had a coupon!! This project was back on.

I did want a larger wreath, so I purchased a 14" wreath. I bought a straw one because it was half the price of the foam. I left it in the plastic packaging to keep it neat. I also bought 2 skeins of the yarn. I started working on it that day. The more and more I wrapped, I just kept thinking, "There is no way that two skeins will be enough. NO way." I've been wrong before, and apparently I was wrong again. One skein covered almost 2/3 of the wreath!

See how small one skein is!! I can't believe it covered this much wreath.
Once I finished the first one and saw how much it covered, I squished it all in a little tighter before starting the second skein.

I had no trouble with the pins inserting or staying put in the straw wreath. Turned out to be a good swap. I used the entire roll of flower trim and then used scrap book paper, double sided tape, and a toothpick to make my little flag. I made it reversible and included a second phrase.


I just cut a long strip of white cardstock and folded it in half. I put a toothpick at the fold and secured it all with a strip of double sided tape.

I didn't think this would be a good outdoor wreath--especially with spring weather, so I hung it on the inside of the back door using a 3M release hook. I think it is super cute, and my kids like "petting" it. Lu-boy keeps asking if it is real grass.

Total cost: Okay, so overall it wasn't super cheap because I had to buy everything! Pink-head pins, ribbons, trim, wreath form, fun fur yarn. I spent about $22. But I love it so much I don't even care! And I can justify the bargain of the yarn not being $7.99 and using a coupon!

Total time: 2 1/2 hours

Final verdict: I think it is very spring-y. It was ridiculously easy. Once I realized that one skein really would cover an 8 inch wreath I started thinking about who I could make one for. I love it!

Saturday, February 16, 2013

Pin 186

Original pin:
Pinned Image
http://thespottedfox.com/diy-projects/diy-valentine-food-passport

I love this cute idea--its a "food passport." The idea is to write a bunch of different restaurants and try to visit them all throughout the year to eliminate the "where do we eat?" question. Perfect for my Valentine.

I found a perfect navy blue moleskin notebook at Barnes & Noble in a 2 pack for $6. Due to our normally busy Thursdays, we are celebrated our date night on Friday. Also perfect because that gave me time to put it all together during our mom's workday. I started by using my steel stampers to emboss the word "passport" on the front.


I decided to stamp out the restaurant names instead of writing them all out. I brought my rubber letter stamps and got busy.
It was really fun to do this with a group because whenever I got stuck on the next restaurant, I just asked the room for more suggestions. I also got texted in suggestions from my younger (and thereby, hipper) sister. I tried to avoid any place we go often, anything that was a large chain, and anyplace that we had been before but didn't love. There were just a few old favorites that made it in but most were based upon recommendations or ones we saw and had wanted to try. I did my best to include at least a few that would never, ever make my list but that I knew my husband would like. That's part of the gift. (Of course I get a gift out of this too--dinner out!)
When I was out picking up my moleskin book, I also came across these most-perfect stamps--passport style:
Each page got a lightly stamped passport stamp as well.


I only did one restaurant per page and ended up with 28 restaurants total. If you are local and interested, here is the list of restaurants I included:

1. Sweet Basil Thai
2. Big Shots Sports Bar
3. Cafe Medi
4. Bizzi's Wine Bistro
5. Uno's
6. Mi Cocina
7. Texas Land & Cattle
8. Fireside Pies
9. Brewed
10. Food Truck Park
11. Hibachi 97
12. The Melting Pot
13.  Jazz Cafe
14. Movie Tavern
15. Cabo Grande
16. P. F. Changs
17. Scat Jazz Lounge
18. Buttermilk Cafe
19. Miss Saigon Cafe
20. My Nizza Pizza
21. Nona Tatta
22. Piola
23. Fortuna
24. Bonnells
25. Mijo's Fusion
26. Dino's
27. Fred's
28. Babe's Chicken House


Where would you go?? If this is works as awesome as I suspect it does, I might have to make this a yearly tradition!

I could have saved the passport stamps to use and stamp each page as we go there, but then I would have to dig the stamp back out. We can just check mark or fold the corner or something.

Total cost: $15--including the extra splurge of the stamps. And NOT including the actual visits to all these places!

Total time: 2 hours

Final verdict: Funny, as we were headed out, before I had given it to him, we were having the dreaded "where should we go?" conversation. As we were driving down to a dining district we were passing a lot of these places! Once we got there I gave it to him and because it was so fitting in our discussion, he thought it was great. We are both so excited to start using it all up! I did have to give him a few ground rules--you don't get to check it off if you go there with your buddies, we have to actually eat our meal there, etc. After dinner we cooked up an idea for that second book that came in the two pack. We started our list for the "After-dinner Passport" when the question of "What should we do now?" arrived.  Other than the standard movie date, we already have about 7 or 8 things you can do on the fly after dinner. We are trying to think of the sort of things that you don't have to do too much pre-planning for. No exclusive, tickets-required engagements (like museum gala or something). For example, miniature golf, bookstore browsing, coffee, painting class. . .

What after-dinner ideas do you have?

Friday, February 15, 2013

Pin 184 and Pin 185

Original pin:
Pinned Image
This is not the link I had originally pinned, but the blogger has updated her site and the best post is here http://eclecticallyvintage.com/2013/02/cupid-float-valentine-drink/#

I needed a fun drink for the Kindergarten Valentine's Day party. I thought these were super cute and would be a real treat for the kids at their party. I bought all the supplies (I actually had a leftover jar of unopened cherries from Pin 163) and bought some fun party cups.

In planning my transportation logistics, I was thinking about getting the ice cream up to the school, keeping it frozen, dipping, dripping, sticking, melting. . .   Back to Pinterest I go. I had this pin filed away:

Original pin:
Pinned Image
http://www.realsimple.com/holidays-entertaining/birthdays/serving-cake-ice-cream-like-pro-10000001189696/page4.html 

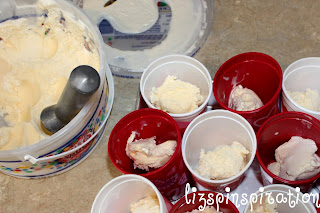
Real Simple suggested pre-dipping ice cream and freezing in paper cups to serve at birthday parties. I modified this suggestion a teensy bit to fit my situation.  The morning of the party, I dipped two scoops into each (clean--I ran them all through the dishwasher the night before) cup.

I packed them into my largest aluminum cake pan (aluminum helps keep things cold).

And then I covered the whole top and sides with aluminum foil. I put it back in the freezer. A few hours later, just before I left the house for the party, I put the whole tray in my large cooler on ice. I left everything in the cooler until just before the kids arrived in the classroom for their party. We set out the cups and, with help from the other mom's, added soda, whipped cream, straws, and, of course, a cherry!


Total cost: I served 22 kids. I used almost two 2-liter bottles of soda and about half a gallon of ice cream. A little over one bottle of whipped cream and a half-jar of cherries. Including the cost of the cups, it was about $12.

Total time: Less than 20 minutes. I think it took around 10 minutes to dip all the cups and maybe 5 to top them off in a team effort.

Final verdict: I love floats! It is such a childhood memory treat for me so I thought it was a fun idea for a classroom party. The pink color was just the icing on the cake for me! Most of the kids seemed to like them--I know mine did! Lucky boy, I have leftovers waiting for him after school today. The predipping trick was awesome. I didn't have to worry about dripping ice cream, forgetting a scoop, or melting leftovers. I just may start doing this for all my parties! And I will probably do floats for school parties again because it was so easy!

Tuesday, February 12, 2013

Pin 182

Original pin:
Pinned Image
http://dollarstoremom.com/2012/02/our-valentine-tradition-14-days-of-little-love-surprises/

I love this cute idea to help get in the holiday spirit. I pinned this a long before Valentine's Day and have been keeping my eyes out for some cheap Valentine-themed towels. Did I mention that this pillow is made out of towels? Like dollar-store-kitchen-two-per-pack towels? That is so my style. The idea behind the pillow is that there is a pocket on the front, and for the fourteen days of February leading up to Valentine's Day you leave sweet little notes and surprises for each other.

Unfortunately, I never came across said Valentine's day towels at the many dollar stores I frequent. I did, however, come across some St. Patrick's day towels. Put that together with a little red and voila! The "Lucky in Love" pillow is born.

Since I am making these for my two little boys who are notorious for sticky hands and snotty noses, I wanted to make sure these were washable. Pillow forms were on sale for half-price last weekend, so I picked up a couple of 12 x 12 pillows so that I could make these covers to slip on and off for washing.

I cut one 14 x 14 inch square and two 14 x 8 inch rectangles out of the shamrock towels.
Next I needed a pocket. I wanted to make my pocket out of the red and I wanted it to be heart-shaped. I needed to make a sturdy heart-shaped template. I keep a few empty cereal boxes in my craft stash because the thin cardboard is always coming in handy. I went to grab one off the shelf and found a Cheerios box in my hand. Looking down at it, I realized exactly how perfect it was.
It already had a giant heart on the box! What luck! It was the perfect size and now I didn't have to fuss with trying to get a perfectly shaped heart template. I cut out the heart and used it to trace two hearts out of the red towel.

I made a few attempts at getting this heart just right. One of the consequences of sewing on the fly is that you don't always do it the right way the first time. I'm going to try to show you the way I liked best but I didn't take many pictures of it.

I cut the two hearts out of the red towel. I stitched them right sides together almost completely around. Trim the excess, clip the corners, turn right sides out, press and topstitch around the whole thing, closing the open portion. I ended up with a nicely shaped lined heart pocket.
I pinned this to the center of the 14 x 14 square and stitched in place 3/4 of the way around, leaving the top open to make the pocket. Backstitch at the start and end to reinforce the pocket.
Yellow dotted line is the stitch line
Next I prepared the back. I serged one long edge of each rectangle to neaten it up a little. I sewed a 1/2 inch hem on one of the rectangles and topstitched close to the edge.
I pinned two pieces of Velcro in place on the hem and matched up the Velcro pieces on the serged edge of the other rectangle. I stitched the Velcro in place.

I laid the top piece down, right side up. I placed the back pieces on top, right sides together, lining up the Velcro strips and edges.
I pinned through all layers all the way around and stitched in place. Press, trim the excess, clip the corners and turn right side out. Press again and now it was ready for the pillow!
This was full version one, featuring heart version two. The heart is not exactly evenly shaped so I had to try it again.

Full version two, featuring heart version three--which I am completely happy with.

For comparison, version one on the left, version two on the right. Next to each other the lopsided-ness is much more obvious.

Total cost: $12 for two pillows--three shamrock towels, one red towel, two pillow forms

Total time: The first version took 1 & 1/2 hours, but since I had worked out a few kinks the second one was done in about 45 minutes.

Final verdict: I am going to give these to my boys on Valentine's day but I think I am going to have to replace the heart pocket on version one. My OCD-ness just will not allow that to stay when its twin is so much better looking. I know that my boys won't care in the least. The little lovebugs just adore anything I make for them.  I like her idea of sharing little messages but clearly missed the date on that one. These will be in season for at least another month, so maybe we will share messages from Valentine's day until St. Patrick's Day?  And now that I know how many dollar store towels it takes to make a cover, maybe I'll just whip a new one up for each season.


Sunday, February 10, 2013

Pin 181

I have an announcement coming soon, but its not quite ready yet, so until then I give you this Valentine's post:

Original pin:
Pinned Image
The pin linked up to http://www.recipebyphoto.com/heart-shaped-carrots-tutorial/ but the original idea and pictures belong to http://www.sophistimom.com/chicken-soup-heart-shaped-carrots/ with a recipe for the soup.

So if you can't tell from the teensy tiny picture, it is carrots that have been cut into heart shapes and tossed into a bowl of love, also known around here as homemade chicken noodle soup. I didn't use the recipe over on sophistimom, but I did love her carrot-cutting. She even said her brother does butterflies!! Wow! I'm impressed.

Last week I cooked up a big pot of chicken noodle soup. In the spirit of our upcoming holiday, I decided to cut my carrots into little hearts. I remembered this pin, but didn't actually go look at it or read it before I did it, so my technique was a little off.

I started with shaving the bottom of the heart. A few swipes on each edge to create a point.

Next came the wedge. I found this to be the hardest part. It was easier once I cut the carrot into smaller pieces (maybe 2-3 inches) and then wedged each section on its own. I made a little v-shaped cut into the carrot, aiming my point to reach in just inside the center ring of the carrot. It is hard to cut straight down, and my carrots weren't perfectly shaped so some of my hearts were not quite centered.
Can you see the v-shaped cut here?

Pulling out the wedge

And here is something vaguely heart-shaped.
Next I used my peeler to try and round out the edges a little to coax a heart shape out of this carrot. Then it was slicing time.
I didn't really want to waste a lot of food just for the sake of cute carrots, so the wedge and the heart were both sliced and into the pan they went.
A variety of heart-shaped resembling things and the scraps that made them.
When the soup was all ready, I ladled up the bowls of love for the boys of the house.

 
They were so incredibly under-impressed with my carrot cutting skills. First, I had to point it out to them.

me: Did you see the carrots??

boy: Yeah, they're good.

me: Did you see their shape??

boy: hmmmm. . .

me: They are hearts. You know, because chicken soup is made with so much love and its close to Valentine's day and. . . and. . . see? Hearts?

boy: Oh. Those are hearts? They don't look much like hearts.

me: (visibly disappointed) Oh, heh heh, yeah. I guess not.

boy: (because he is the sweetest thing ever even if he is a boy) No, mom, I see it! I love my carrot hearts. Yummmm yum.

Total cost: $0

Total time: Way longer than just dicing and slicing like I would normally do to prepare the carrots. Probably twice as long, but if you get a good technique down, it would probably be faster.

Final verdict: Even though my family was underwhelmed, I still think its a cute idea. My technique could use some work, but I'm not sure that I will put in the time or the effort to refine this skill. Although next time everyone will probably complain about there boring old round carrots.

And one more photo just for fun (and because I was playing around in the photo editor)