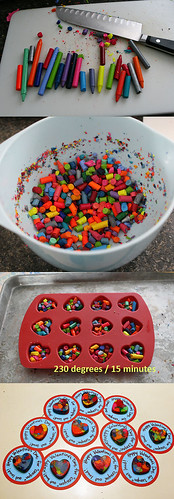
I was so impressed when I pinned this. I have been planning this one for a while because I knew I wanted to do it for Valentine's Day. I thought this was a great idea--and apparently everyone else does too! After I was done, I did some trouble-shooting research on the internet and found this absolutely EVERYWHERE!!
What I pinned:
(credit for the photo:
http://www.flickr.com/photos/61951289@N08/5672821563/sizes/m/in/photostream/)
My experience: I thought these would be fun Valentine's gifts for the boys to take to their friends. I already had some silicone heart baking trays I bought ages ago. I used them once and haven't pulled them out since, so when I saw this I was excited to get to use them again. We don't have tons of old crayons lying around because I am a thrower-away-er. If its broken and on the floor it gets tossed. So instead I picked up a couple of boxes of crayons from the dollar store. Luke helped me peel and break them until he got bored. It took a lot longer than I expected! I packed each heart full.
 |
| Ready for the oven! |
They had a lot of oil separated on top when they came out of the oven. I let them cool and popped them out of the trays.
 |
| Cooled and popped out |
The oily substance cooled to a waxy substance. I am not sure if it was a particular color that caused this or if it was simply because I bought the cheap dollar store crayons, but it didn't happen to all of them. The result on about 2/3 of them was this waxy layer that was just around the top edge on some and on others covered the entire top side. Also, not all of them melted completely so that they were smooth on the top.
 |
| Waxy top layer |
 |
| Side view of waxy layer |
The waxy layer did not leave any color on paper, so I decided it must go. I took my cheap dollar store knife I had purchased--because I didn't want to ruin any of my good knives with this project, and started shaving off the waxy layers.
 |
| The same heart as above minus the waxy layer |
(What seemed like) hours later, I had uncovered some beautiful, wax-layer-free beauties. Again, I attribute this to the cheap dollar store crayons, but my hearts disappointingly did not have the shiny exterior of new, quality crayons. After my internet searching of everyone else's crayons, I didn't see anyone else with this problem. Bummer. Now, minus the waxy layer, they color and are still fun--just not as pretty as I had hoped.
 |
| The finished project |
Total time: 2 hours (peeling, baking, and removing wax) + cooling time
Total cost: $3 for 2 boxes of crayons and one cheap knife
Final verdict: I would like to try this with quality crayons and see if I have the same results. I made 36 hearts with 2 boxes of 48 crayons so it could be done in smaller quantity for just a few dollars more. I still think its a cute idea and I saw some really fun color combinations out there on other peoples blogs. I'll be keeping my eye out for fun shaped silicone molds and maybe finding a place to stash those old crayons.


Try blow drying them for just a second to see if they go shiny next time. I had success with this technique but was using mostly Crayola (with a few stray dollar store) crayons. A few seconds of blow drying brought them up to a perfect shine!
ReplyDeleteGood to know. Thanks for the tip. I'll have to try that next time.
Delete