Thursday, February 21, 2013

Pin 190

Original Pin:
Pinned Image
http://www.mynameissnickerdoodle.com/2011/03/fabulous-food-friday-79.html

This is a copycat recipe for chicken nuggets promising to taste like a certain fast-food restaurant that isn't open on Sundays. I'll admit, I was skeptical from the start. How can one mimic such perfection? I'd been turned off in the past by the suggestion of pickle juice. I can't do pickle juice. But this recipe contains zero pickle juice.

I did have to send out the hubby for the peanut oil. I have never cooked with peanut oil before, I usually fry with vegetable oil. On the original blog page it said vegetable oil would substitute fine, but I wanted to go with the recipe this time--since I was feeling so skeptical and all.

I didn't marinate my chicken quite as long as I just ran out of time.  But I did follow all the other directions in the recipe.

First batch in the oil
And out of the oil
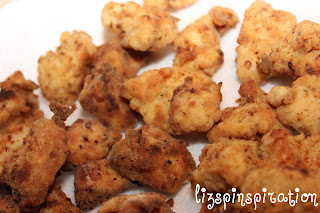
I left the first batch in the oil a little too long. I was waiting until it developed that golden color I am used to seeing and it didn't seem like it was getting there. When some spots started to get really dark, I pulled them out. They were really dry. They didn't taste bad, just too dried out. I tweaked my time a little and started pulling them out before they got that dark. By the time I made it to my last batch, I had it just right.
The darker, first batch is to the center-left-ish


Look pretty good, right? Pretty similar to the real deal? I thought they were pretty tasty, too. But the final evaluation was in order. . .
Serve them up to the kids. They absolutely loved them. The entire batch was gone in about 5 minutes. 

Total cost: I wish I could say, but my husband threw out the receipt and doesn't look at prices. I hear peanut oil is a little more expensive than vegetable oil.

Total time: 1 hour, no including marinating time

Final verdict: My skepticism was unfounded. This recipe was probably as close to the real thing as I am going to get with out a deep fryer and a franchise license. The family loved it and it is going to have to become a regular player in our dinner rotation. Only change I am going to make is that next time I am going to make at least double, if not triple the recipe!

Wednesday, February 20, 2013

Pin 188 & Pin 189

I present to you. . . The FIRST CHALLENGE PIN!! (If you have no clue what I mean by "challenge pin, click here)

 Suggested pin:
Pinned Image
http://holidaysparkle.blogspot.com/2013/01/the-fastest-way-to-peel-garlic.html

Suggested by Julie E., a quick method to peel garlic. It looks easy enough so I pulled this trick out for the next recipe I had calling for garlic.

I started with just one small bulb of garlic.
He'll never see it coming.

For my weapon of choice, I chose this pyrex measuring cup because of the handle.

It never knew what hit him.
Step one complete. Now its time to shake, shake, shake!
Things were looking promising, except for two little fellas that looked like this:

If the clove did not detach from the base of the bulb, there was zero peeling action going on. I popped these cloves off the base and gave them a few more shakes.

Voila! Poured the whole thing out and initially they appear to all be peeled.
After fishing them all out, it is confirmed, that they all are peeled!

I will admit, I was a little surprised at the whole thing.

Total cost: The price of one garlic bulb. I bought three for $1.

Total time: 5 minutes including two shaking sessions and picking through the mess.

Final verdict: Cool trick for sure! Worked just as promised. However, I only needed 2 cloves for my recipe. Not sure that it wouldn't have been faster for two cloves to do it the old fashioned way and now I have an extra dish to wash. However, the next time I make 30-clove Chicken, this will be the way to go!

Time to put that garlic to use!
Original pin:
 
http://firstlookthencook.com/2011/11/02/meatloaf-cupcakes/

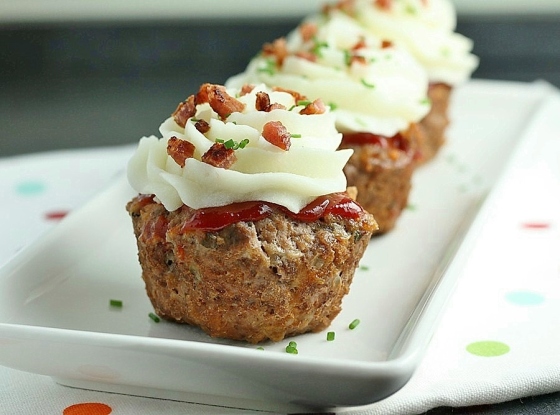
Meatloaf cupcakes!! So cute. I thought I could get my boys to fall for these, just for a teensy little moment. As you may expect, Eating Child likes meatloaf and mashed potatoes. Non-Eating Child sometimes likes meat but flat out refuses mashed potatoes. What kid doesn't like mashed potatoes??  I thought it was all a ruse and that I could prove it with my mashed potato "icing." This kid will do ANYTHING for a cupcake. I have a meatloaf recipe that usually goes over well with my family, but I decided to go with the recipe here to try it out.

Ready for the oven

I thought about skipping the bacon sprinkles but decided to include them in as part of the whole cupcake package. I did skip the chives however. By the way, you may have seen a pin about bacon in the oven. I haven't read it but I have been cooking my bacon in the oven for YEARS! I highly recommend it. I read about the oven method in a home magazine years ago and it totally changed my attitude about cooking bacon because it is just so easy. I just put a couple strips on a baking sheet and tossed it in the oven with the "cupcakes."


I originally planned on making my mashed potatoes from scratch, as suggested in the original post. But when I pulled my potatoes out of the pantry they were a little soft and went straight to the garbage bin. I subbed in the instant variety this time. Soon the meatloaves were ready!
Now comes the tricky part!! After cooling, I transferred them all to a baking sheet and set about icing them. It took a few attempts to get a feel for the mashed potatoes in my icing bag. I wouldn't claim to be a super icer anyway. Some of these came out pretty sad! The bacon finished cooking soon after the cupcakes and I crumbled it up to add sprinkles. Here are a few of my finished creations--the good, the bad, and the ugly. Mostly ugly.


Upon seeing these "beauties" the boys were overcome with dinnertime excitement. Each wanted the one with the most "frosting." I gave L a little taste of the frosting and he just couldn't place it.  He said it was good, and it tasted like . . . something, but couldn't figure out what. I kept giving him little tastes because it amused me to watch him try to figure it out. I sat the boys down and served up their dinner cupcakes.
Their excitement dwindled quickly when they realized the truth about dinner. As would have been the case with regular meatloaf and regular potatoes, Eating Child ate and Non-Eating Child didn't. The recipe itself was good. It had a little too much oregano for my tastes, but that could be easily changed. I liked the carrots inside but a little too much ketchup with the additional on top.

Total cost: I only had to buy meat because everything else I already had. About $6 for ground beef.

Total time: 1 hour 15 minutes including the cooking time.

Final verdict: The kids were underwhelmed and would have eaten/non-eaten with out the grand presentation. I think the presentation is cute and I felt a little like a gourmet chef putting so much effort into my food presentation. However, I probably will not spend the extra time to create an elaborate show. I may use the meatloaf recipe again, I may also bake it in cupcake tins to speed up cooking. The mashed potatoes had to cool quite a bit for me to be able to handle the piping bag so when it came time to eat they were really cold and a little unappetizing.  As I packed up the leftovers into plastic ware I thought about how layering them might make an interesting dish. Layer of meatloaf, spread some potatoes, layer meatloaf on top. Sort of like a mashed potato sandwich with meatloaf bread? The hubs is totally going to dig it.


Want to send me your challenge pin? Send me your favorite, least favorite, most interesting, most failed, skeptical, or any other pin on Pinterest and I'll try it out. Send to lizspinspiration@gmail.com .

One year later

Last February Pinspiration was born. Click here if you want to read that story. On February 21, 2012 I actually started sharing it with people, after completing and blogging 10 pins. You can read that story here.

I've spent the last few weeks thinking about which direction to take this project now. If you've ever really analyzed it, there are many weeks that I did not complete the full five pins for the week. Maybe I was really busy at work, sick, my kids were sick, running a marathon, or just feeling lazy. The bottom line here is that I achieved my original goal. That was to get out of mindless activity and get back into creating. To actually use the pins on my pinboards. Gone are the days of whittling away the time playing little video games or only pinning on Pinterest. I now use my evenings more productively.

I plan to go forward, keeping the pace--aiming for five a week, but not beating myself up if I don't get it. Some of the pins I really want to do, or am in the process of doing, require a lot of hours! I have a few half-finished projects going on that I would like to wrap up--weather and finances permitting!

Someone once complimented my blog, which I appreciate, but also made another comment that stuck with me. I don't remember the exact wording, but it was something along the lines of, "doing pins, that almost always work." I want you to know I am totally honest with you about my pinning experiences--the good and the bad. However, I agree with her that they usually work. That is probably because I am drawn to pins with familiar materials, techniques, or flavors. I pin things that I think I COULD actually do! Here comes the twist . . . I am ready to challenge myself, and for you to challenge me. I have started a pinboard on my Pinterest called The Challenge. I am going to pin things that I think look interesting but would not usually take on. I also would love to hear from you! Send me your requests. It could be a pin you did that worked awesome, or didn't work at all. Maybe a pin you are interested in but not quite sure how to make it happen. I would like to stretch myself to try new things. What are you interested in? What are your favorite things to pin? You can send me your ideas, requests, share pins you find by emailing me at lizspinspiration@gmail.com and I will stick them on my challenge board.Year two of Pinspiration will include some of these suggestions and challenges. Don't be fooled by the title "The Challenge" because it doesn't have to be a challenging pin. The challenge is for me to try something I wouldn't normally be immediately drawn to. It just isn't as exciting or motivating to call it "The Suggestion."

Also, on a much more depressing note, I will be taking a teensy break. I need to complete a certification test for my real job and it requires hours and hours of studying. That means after the kids go to bed I need to hunker down with my books and get that over with. My goal is to have it completed around spring break time, mid-March. My posting may slow down a bit until then.

So, in case your wondering, I now have 1,552 pins and have completed and posted on 187 of them. That's not even including the 20 or so I did before Pinspiration was born. That's still only 12% of my pin total!

Thanks for joining me on this journey. All of you inspire me and encourage me to keep going. I appreciate you more than you will ever know.


Sunday, February 17, 2013

Pin 187

Original pin:
Pinned Image
http://www.tasteofhome.com/recipes/Tomato-Tortellini-Soup?keycode=ZFB

Tomato Tortellini soup. Two of my family's favorites (tomato soup and tortellini) in one dish. Sounds like a winner.

I really was hesitant to use the canned condensed tomato soup for this recipe only because I have a really, really great tomato soup that I love to make from scratch that isn't difficult at all. But I was decided against it because it was planned for dinner on a night when we are usually crazy busy and I figured it would be a good time saver.  Condensed tomato soup isn't the worst short cut to feed my family.

I had to work tonight so I needed a recipe that was easy to toss together and travels and reheats well. Soups usually fit that bill.  I started the pasta boiling and mixed together all the other ingredients.

Mine was much more pink in color than in the original pin picture. I also did not have any sun dried tomatoes so I substituted a can of diced tomatoes. I love tomatoes. I eat tomatoes every day in one form or another. Next time, I would probably add in more tomatoes--maybe even up to three cans. I'll have to take baby steps because not everyone in my family would care for quite as many tomato bites as I do.  Because I was working, kitchen clean-up duty was going to be up to my husband. He passed by the kitchen and saw this:
"Oh, great. Two big pots to wash." Yes darling, but ONLY two pots to wash! This is seriously the only dishes required to make this complete dinner! I can mess up a kitchen with prep work quite nicely. I thought two pots to wash would be a breeze.

Less than 30 minutes later, I was ladling up my to-go bowl of soup.
Mine was almost pink in color, but maybe that has to do with the brand of condensed tomato soup used. Regardless, it was creamy and delicious and filling! I could barely finish this bowl! I had some homemade bread in the freezer that I warmed up in the oven to go along side. The little boys were unimpressed. The non-eater licked the butter off his bread and went back to playing. The eater was upset that his tortellini was mixed in his soup, but was willing to overlook that a little. He had a few bites, said it was good, and ran off to play with his brother.

Total cost: around $10 for a big pot of soup--easily 8-10 servings

Total time: 20 minutes

Final verdict: My husband and I really enjoyed it. I was surprised at how filling it was--I guess it is all that cream and milk in it. This one will definitely go in the rotation. It is a really easy, fast, busy-weeknight type dinner. I just may have to try tortellini in my own tomato soup and see if it is as good.

Saturday, February 16, 2013

Pin 186

Original pin:
Pinned Image
http://thespottedfox.com/diy-projects/diy-valentine-food-passport

I love this cute idea--its a "food passport." The idea is to write a bunch of different restaurants and try to visit them all throughout the year to eliminate the "where do we eat?" question. Perfect for my Valentine.

I found a perfect navy blue moleskin notebook at Barnes & Noble in a 2 pack for $6. Due to our normally busy Thursdays, we are celebrated our date night on Friday. Also perfect because that gave me time to put it all together during our mom's workday. I started by using my steel stampers to emboss the word "passport" on the front.


I decided to stamp out the restaurant names instead of writing them all out. I brought my rubber letter stamps and got busy.
It was really fun to do this with a group because whenever I got stuck on the next restaurant, I just asked the room for more suggestions. I also got texted in suggestions from my younger (and thereby, hipper) sister. I tried to avoid any place we go often, anything that was a large chain, and anyplace that we had been before but didn't love. There were just a few old favorites that made it in but most were based upon recommendations or ones we saw and had wanted to try. I did my best to include at least a few that would never, ever make my list but that I knew my husband would like. That's part of the gift. (Of course I get a gift out of this too--dinner out!)
When I was out picking up my moleskin book, I also came across these most-perfect stamps--passport style:
Each page got a lightly stamped passport stamp as well.


I only did one restaurant per page and ended up with 28 restaurants total. If you are local and interested, here is the list of restaurants I included:

1. Sweet Basil Thai
2. Big Shots Sports Bar
3. Cafe Medi
4. Bizzi's Wine Bistro
5. Uno's
6. Mi Cocina
7. Texas Land & Cattle
8. Fireside Pies
9. Brewed
10. Food Truck Park
11. Hibachi 97
12. The Melting Pot
13.  Jazz Cafe
14. Movie Tavern
15. Cabo Grande
16. P. F. Changs
17. Scat Jazz Lounge
18. Buttermilk Cafe
19. Miss Saigon Cafe
20. My Nizza Pizza
21. Nona Tatta
22. Piola
23. Fortuna
24. Bonnells
25. Mijo's Fusion
26. Dino's
27. Fred's
28. Babe's Chicken House


Where would you go?? If this is works as awesome as I suspect it does, I might have to make this a yearly tradition!

I could have saved the passport stamps to use and stamp each page as we go there, but then I would have to dig the stamp back out. We can just check mark or fold the corner or something.

Total cost: $15--including the extra splurge of the stamps. And NOT including the actual visits to all these places!

Total time: 2 hours

Final verdict: Funny, as we were headed out, before I had given it to him, we were having the dreaded "where should we go?" conversation. As we were driving down to a dining district we were passing a lot of these places! Once we got there I gave it to him and because it was so fitting in our discussion, he thought it was great. We are both so excited to start using it all up! I did have to give him a few ground rules--you don't get to check it off if you go there with your buddies, we have to actually eat our meal there, etc. After dinner we cooked up an idea for that second book that came in the two pack. We started our list for the "After-dinner Passport" when the question of "What should we do now?" arrived.  Other than the standard movie date, we already have about 7 or 8 things you can do on the fly after dinner. We are trying to think of the sort of things that you don't have to do too much pre-planning for. No exclusive, tickets-required engagements (like museum gala or something). For example, miniature golf, bookstore browsing, coffee, painting class. . .

What after-dinner ideas do you have?

Friday, February 15, 2013

Pin 184 and Pin 185

Original pin:
Pinned Image
This is not the link I had originally pinned, but the blogger has updated her site and the best post is here http://eclecticallyvintage.com/2013/02/cupid-float-valentine-drink/#

I needed a fun drink for the Kindergarten Valentine's Day party. I thought these were super cute and would be a real treat for the kids at their party. I bought all the supplies (I actually had a leftover jar of unopened cherries from Pin 163) and bought some fun party cups.

In planning my transportation logistics, I was thinking about getting the ice cream up to the school, keeping it frozen, dipping, dripping, sticking, melting. . .   Back to Pinterest I go. I had this pin filed away:

Original pin:
Pinned Image
http://www.realsimple.com/holidays-entertaining/birthdays/serving-cake-ice-cream-like-pro-10000001189696/page4.html 

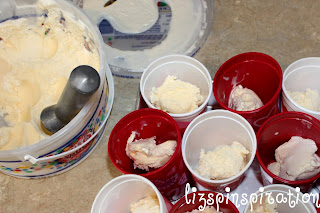
Real Simple suggested pre-dipping ice cream and freezing in paper cups to serve at birthday parties. I modified this suggestion a teensy bit to fit my situation.  The morning of the party, I dipped two scoops into each (clean--I ran them all through the dishwasher the night before) cup.

I packed them into my largest aluminum cake pan (aluminum helps keep things cold).

And then I covered the whole top and sides with aluminum foil. I put it back in the freezer. A few hours later, just before I left the house for the party, I put the whole tray in my large cooler on ice. I left everything in the cooler until just before the kids arrived in the classroom for their party. We set out the cups and, with help from the other mom's, added soda, whipped cream, straws, and, of course, a cherry!


Total cost: I served 22 kids. I used almost two 2-liter bottles of soda and about half a gallon of ice cream. A little over one bottle of whipped cream and a half-jar of cherries. Including the cost of the cups, it was about $12.

Total time: Less than 20 minutes. I think it took around 10 minutes to dip all the cups and maybe 5 to top them off in a team effort.

Final verdict: I love floats! It is such a childhood memory treat for me so I thought it was a fun idea for a classroom party. The pink color was just the icing on the cake for me! Most of the kids seemed to like them--I know mine did! Lucky boy, I have leftovers waiting for him after school today. The predipping trick was awesome. I didn't have to worry about dripping ice cream, forgetting a scoop, or melting leftovers. I just may start doing this for all my parties! And I will probably do floats for school parties again because it was so easy!

Thursday, February 14, 2013

Pin 183

Original pin:

No source available. If this is your sweet creation, let me know so I can give you credit!!

Happy Valentine's Day! I caved at the last minute and decided to craft up some Valentines for the kids. I had already even spent my $1 for the easy boxed kind. I'm not against those, I have used them plenty. It was just when you pair my crafty heart with my new camera obsession and mix in a little holiday spirit, I couldn't resist the urge to create.

I pinned this image a loooooonnnnggg time ago. Possibly over a year ago. I think it is a cute and clever idea.

Getting the picture was a bit more difficult than I anticipated. I showed the kids what we were looking for and they were so excited to create and shoot that they were wiggling around like they had ants in their pants. There was much jumping and twirling and superhero-style posing. I had trouble with them getting the fist rotation and placement (i.e., not directly in front of their face) just right. As I was editing I was thinking about a way to make this easier. They need something that they would normally hold upright. I thought about maybe a clear juice glass. They would naturally be inclined to hold this upright, create the right shape with their hand, and have more of a natural "handing-off" pose. It could be easily edited out, cut out after printing for the lollipop, or just obscured when the lollipop was in place. I have these small glasses I found in the dollar spot that would have been absolutely perfect--had I thought of it before hand.

It took me three separate sessions (I don't get much time with these crazy boys) to end up with two mostly workable shots. Here is what I started with:

Hmm. One of those superhero poses. He was alternating between superheroes and rock star.

I finally got his placement right after I pinned him down on the floor. It slowed him down just long enough and kept his fist forward. His eyes are a little diverted, but maybe he's looking at the lollipop?
After a little editing magic I had these ready (minus the pinspiration marks, of course):

names obscured to protect their superhero identities
I printed these out at one of those store kiosks that print them while you wait. I don't have a good photo printer so I just loaded them on a thumb drive and ran to the store.

I made the mistake of stepping into a craft store while I was out and I stumbled across the most perfect cardstock. I had to buy it to mount the photos. I cut the cardstock a little bigger than the picture, used an exacto knife to cut some holes in the appropriate places, and started assembling.  When L got home from school, I sat him down with a sacred adults-only sharpie marker to write in his classmates names. W's school specifically asks for generalized cards to make it easier for the kids to pass their own.  In the middle of assembly we had to make an impromptu trip to urgent care for the world's worst nosebleed--ugh.

Sometime around midnight, I finished them up. They were not difficult, nor really time consuming to assemble, it was just so late thanks to our 4 hour urgent situation. Here are the final results!

We just couldn't get the cute face and the right fist on this wild man. This will do.


Total cost: $14 without the cardstock, I bought a big pack for $10 and used 20 sheets of it. Somewhere less than $20 for 40 Valentines.

Total time: Really the actual photo taking was the hardest part. Assembly took maybe two hours because I had to cut all the cardstock to size. These would have been perfectly fine without the cardstock, but I like the look and it made them a little more sturdy.

Final verdict: I think they turned out pretty cute. Minus the funky hand position on L, but his friends will never notice that. They are going to notice the lollipop. I spent a little more than I planned, and way more than in years past where I use the dollar store box split between them both. I am happy with them. The boys had an absolute blast shooting them and getting them ready. I have honestly never seen my boys so excited to pass out their Valentines. We just may get in a tradition of photo Valentines. Also, while editing, I googled something about photo Valentines, and there are a ton of versions of this. Check out the image search for more ideas on posing and staging the shots. Another note, when you buy your lollipops, consider the wrapping. These had a lot of wrapping which limited areas of the photo that were visible when the lollipop in place so I had to account a large empty area in the picture.

And Happy Valentine's Day from Pinspiration!!