The hubs and I took off to Austin for a few days (and nights) to celebrate making it past the 7 year itch. On Monday we marked 8 years of marriage. Woohoo!
I took off Pinterest-ing for the trip as well. However, my hands are always itching to create something and I needed something to fill the time down. We had to fight through all that UT traffic going home from the TX-OU game and I knew we could be in for a looonnngg drive.
Lately I've been looking for a cute hat that was not necessarily a "team" hat to wear. I hadn't found anything I liked so I decided to just make one. I was strolling around JoAnns the other day when I came across a plain utility cap. I thought for sure I'd be able to find you a picture of it plain, but I was unlucky. You'll just have to use your imagination.
Saturday night before we left I worked on some crochet flowers at girl's craft night. I did a little more talking than crocheting, so these flowers took a bit longer, but I did use the same tutorial as I did back at Pin 113. Then when we hit the road, I worked on the edging piece and then sewed all the pieces on. By the time we hit Austin proper I was sporting this fine fashion:
Total cost: I had to buy some extra yarn because I didn't have that dark gray color I wanted so I spent around $10 total
Total time: 6-ish hours. Remember, I started the flowers while chatting and drinking wine, so time wasn't really important.
Final verdict: I am happy with my new hat. It is a bit more feminine than just a plain team-style ball cap. The bill is shorter and the hat has a different style shape to it. I used it a lot because we had wind, rain, and an early morning departure today.
Stay tuned for the Austin-Fort Worth return trip. . .
Showing posts with label road trips. Show all posts
Wednesday, October 17, 2012
Saturday, September 22, 2012
Pin 135
Original pin:

http://colbyalmond.com/12-creative-ideas-the-will-change-your-life/
Once again, I am looking for the simple ways to change. my. life. (OMG!!!)
If you remember, I tried the straw-in-the-soda back at Pin 126. Next up--number 4, perfect jewelry.
At the beginning of September I traveled to Chicago for an educational work-related conference. In packing my jewelry I remembered this trick. Not as easy as it looks.
First, none of the jewelry I wanted to pack fit through normal straws that I had in the pantry. The clasps were just too large. I must have very tiny straws, right?? I guess that's just what you get when you shop at the dollar store.
Lucky me, I save those kid cups with the giant straws from restaurants. Smart, clever me will just use those instead.
Well, that worked for some. . . but not all. Either that clasp in the original picture is super tiny or my necklace clasps are gigantic. I fit the ones I could through the big straws and the rest just got packed in my jewelry case like normal. I even forced one through by smashing the straw a little flat first.
I was a little worried about the excess that wasn't through the straw getting tangled on its own and then having to untangle it WITH the straw complicating the whole mess.
So did it work?? Absolutely! It was so awesome to be able to pull out one necklace at a time. Not a single snag or knot to deal with.
Total cost: $0
Total time: 10 minutes. Problem solving time here.
Final verdict: I may never throw those restaurant straws away again. They were the perfect size for my jewelry travel case. Even though not all my items fit through them, it was nice to have over half of them contained. The two that didn't fit were nicely separated by the strawed ones so I had zero tangles to mess with. I did have a little trouble getting the one I had forced through the smashed straw out and didn't want to pull too hard. I wouldn't recommend forcing them through like that. Overall, if you can make it work with what you have, I would recommend it.
http://colbyalmond.com/12-creative-ideas-the-will-change-your-life/
Once again, I am looking for the simple ways to change. my. life. (OMG!!!)
If you remember, I tried the straw-in-the-soda back at Pin 126. Next up--number 4, perfect jewelry.
At the beginning of September I traveled to Chicago for an educational work-related conference. In packing my jewelry I remembered this trick. Not as easy as it looks.
First, none of the jewelry I wanted to pack fit through normal straws that I had in the pantry. The clasps were just too large. I must have very tiny straws, right?? I guess that's just what you get when you shop at the dollar store.
| See all the clasps up next to that "normal sized" straw. |
Lucky me, I save those kid cups with the giant straws from restaurants. Smart, clever me will just use those instead.
Well, that worked for some. . . but not all. Either that clasp in the original picture is super tiny or my necklace clasps are gigantic. I fit the ones I could through the big straws and the rest just got packed in my jewelry case like normal. I even forced one through by smashing the straw a little flat first.
| smashed straw |
I was a little worried about the excess that wasn't through the straw getting tangled on its own and then having to untangle it WITH the straw complicating the whole mess.
So did it work?? Absolutely! It was so awesome to be able to pull out one necklace at a time. Not a single snag or knot to deal with.
Total cost: $0
Total time: 10 minutes. Problem solving time here.
Final verdict: I may never throw those restaurant straws away again. They were the perfect size for my jewelry travel case. Even though not all my items fit through them, it was nice to have over half of them contained. The two that didn't fit were nicely separated by the strawed ones so I had zero tangles to mess with. I did have a little trouble getting the one I had forced through the smashed straw out and didn't want to pull too hard. I wouldn't recommend forcing them through like that. Overall, if you can make it work with what you have, I would recommend it.
Thursday, June 14, 2012
Pin 88
Original pin:

http://www.funcheaporfree.com/2012/04/how-to-survive-12-hr-road-trip-with-two.html
This site listed a bunch of ideas for making car traveling with kids easier.
I didn't use all her ideas, but a few of them came in super handy for the ride. First, see that turquoise square bucket in the picture? That fits so perfectly in between car seats and I just happened to have a whole slew of them in the playroom. We packed up our red one with books and toys and put it in between the seats for the ride so they would have easy access to help themselves to their things. This was good and bad. Good because they could reach their things. Lu was really good at putting the toys back in the bucket and helping his brother reach things he wanted. Bad because Wild Bill could reach things when he was mad and would just start grabbing and throwing anything and everything he could get his hands on. This bucket provided an endless supply of ammo. Also, the placement of the bucket made it hard for Lu to reach his buckle to put himself in his seat. Not a deal breaker but something to consider. I think this style of bucket would work even if you didn't have two seats to wedge it in between. It is sturdy and wide so I don't think it would slide around or tip easily.
The second tip I took from this site was about snack baskets. I purchased each boy a basket from the dollar store. Then I loaded up one of our large baskets with our trip snacks. I filled each boys small basket with snacks and juice boxes and placed them on the floor in front of their seats. When they wanted a snack it was easy to reach, gave them a selection while still allowing me to control their options (as opposed to the unlimited gas station selection or eating 5 packages of Goldfish in a row out of the main bucket). This worked out really well for us. There was zero fighting over who got the last package of cheddar bunnies because neither of them really knew what was in the other's basket. Once we were in the condo I replenished their baskets daily and they chose their snacks from here. This is a little like we do at home only they share two big baskets in the pantry.
Those were the two items that I took from this blogger. The other things that helped us out for the trip were:
1. They each got to pick out a toy at the dollar store earlier in the week but not play with it until the road trip. I put these in the red bucket and it was the first item they pulled out. I think they each played with them for the first hour or so. Dubya picked out the little mermaids (his current obsession) and really played with them the entire trip. Slept, ate, and bathed with the things. One of them is balding now because she had so much love. Best dollar he ever spent.
2. I let the boys pick out a new CD at Target. They were dying to listen to it but I made them wait until the trip. Jake and the Neverland Pirates soundtrack--good for a beach vacation.
3. We had a garage sale last month. In cleaning out the closets I found my old Discman. You can bet that puppy got a lot of use on this trip. There is only so much Jake and the Neverland Pirates soundtrack a girl can listen to. One spin on the car player and it is into the Discman with you. As a bonus to me, I loaded the disc onto my iPod too so that one boy could listen to it on the Discman and the other could use the iPod. Everyone was happy.
4. They did each get a turn on the iPad each way. We actually loaded a new game while we were gone so on the return trip it was all new fun.
5. A big stash of wipes and hand sanitizer nearby kept everything, and everyone, relatively clean.
Total cost: $2 for the snack buckets.
Total time: 0 minutes
Final verdict: They both worked out great. The toy bucket had its disadvantages and may or may not be making an appearance on the next car trip--which is no where in sight currently. The toy bucket was nice to have around. Once we got to our destination, it was easy to carry in and kept the toys corralled instead of spreading all over the condo.
http://www.funcheaporfree.com/2012/04/how-to-survive-12-hr-road-trip-with-two.html
This site listed a bunch of ideas for making car traveling with kids easier.
I didn't use all her ideas, but a few of them came in super handy for the ride. First, see that turquoise square bucket in the picture? That fits so perfectly in between car seats and I just happened to have a whole slew of them in the playroom. We packed up our red one with books and toys and put it in between the seats for the ride so they would have easy access to help themselves to their things. This was good and bad. Good because they could reach their things. Lu was really good at putting the toys back in the bucket and helping his brother reach things he wanted. Bad because Wild Bill could reach things when he was mad and would just start grabbing and throwing anything and everything he could get his hands on. This bucket provided an endless supply of ammo. Also, the placement of the bucket made it hard for Lu to reach his buckle to put himself in his seat. Not a deal breaker but something to consider. I think this style of bucket would work even if you didn't have two seats to wedge it in between. It is sturdy and wide so I don't think it would slide around or tip easily.
The second tip I took from this site was about snack baskets. I purchased each boy a basket from the dollar store. Then I loaded up one of our large baskets with our trip snacks. I filled each boys small basket with snacks and juice boxes and placed them on the floor in front of their seats. When they wanted a snack it was easy to reach, gave them a selection while still allowing me to control their options (as opposed to the unlimited gas station selection or eating 5 packages of Goldfish in a row out of the main bucket). This worked out really well for us. There was zero fighting over who got the last package of cheddar bunnies because neither of them really knew what was in the other's basket. Once we were in the condo I replenished their baskets daily and they chose their snacks from here. This is a little like we do at home only they share two big baskets in the pantry.
| The baskets fit perfectly next to their eating tubs on the floor. |
1. They each got to pick out a toy at the dollar store earlier in the week but not play with it until the road trip. I put these in the red bucket and it was the first item they pulled out. I think they each played with them for the first hour or so. Dubya picked out the little mermaids (his current obsession) and really played with them the entire trip. Slept, ate, and bathed with the things. One of them is balding now because she had so much love. Best dollar he ever spent.
2. I let the boys pick out a new CD at Target. They were dying to listen to it but I made them wait until the trip. Jake and the Neverland Pirates soundtrack--good for a beach vacation.
3. We had a garage sale last month. In cleaning out the closets I found my old Discman. You can bet that puppy got a lot of use on this trip. There is only so much Jake and the Neverland Pirates soundtrack a girl can listen to. One spin on the car player and it is into the Discman with you. As a bonus to me, I loaded the disc onto my iPod too so that one boy could listen to it on the Discman and the other could use the iPod. Everyone was happy.
4. They did each get a turn on the iPad each way. We actually loaded a new game while we were gone so on the return trip it was all new fun.
5. A big stash of wipes and hand sanitizer nearby kept everything, and everyone, relatively clean.
Total cost: $2 for the snack buckets.
Total time: 0 minutes
Final verdict: They both worked out great. The toy bucket had its disadvantages and may or may not be making an appearance on the next car trip--which is no where in sight currently. The toy bucket was nice to have around. Once we got to our destination, it was easy to carry in and kept the toys corralled instead of spreading all over the condo.
Labels:
for the boys,
kid food,
kid fun,
parenting,
road trips,
snacks
Wednesday, June 13, 2012
Kid's Car Dining
This wasn't a true pin because I didn't find it on Pinterest, but I totally stole it from Lindsay's facebook picture she posted a while back. She posted a cutie with a perfectly sized and perfectly deep tray in his lap munching down a happy meal. She found hers in the dollar spot at Target but they are no longer. I had to find my own solution because I thought this was just genius. This was my one splurge in preparing for the car trip because I spent more than I had planned on them.
In the storage section at Target I found some boxes that were just the size and depth I had envisioned. And as a bonus these had lids which I thought would be perfect since we would be in the car. After dining, I could just pop the lids back on and clean them out at the next stop.
I stored them on the floor beneath their seat so they were easy for me to reach and the lids protected them from dirt and grass falling in them. (I had to sticker them with their names so that there was zero chance of fighting over which tray belonged to which boy.)
This size couldn't have been any more perfect. They fit just in between the edges of the car seat so that they sat on their laps comfortably.
Once we got to the condo, these were used again. With limited seating options, I served a few meals in these and let the kids park it on the couch. I loved these so much. I may use them around the house for special movie meals in the living room or keep them permanently stashed in the car for meals on the go. They were so good at containing the mess.
Originally I thought they could also use the closed tubs for play/coloring surface, but since they had the cookie sheets, (see Pin 87) they never tried that idea out. However, these were also good for baby mermaid swimming.
Total cost: $10 for two tubs with lids
Total time: 0 minutes.
Final verdict: Loved having these in the car. They contained the eating mess from their laps and then the lids contained the leftovers until we could stop to clean up. Thanks for making me a better traveler, Lindsey! I always knew you were a smart mom.
In the storage section at Target I found some boxes that were just the size and depth I had envisioned. And as a bonus these had lids which I thought would be perfect since we would be in the car. After dining, I could just pop the lids back on and clean them out at the next stop.
I stored them on the floor beneath their seat so they were easy for me to reach and the lids protected them from dirt and grass falling in them. (I had to sticker them with their names so that there was zero chance of fighting over which tray belonged to which boy.)
| Lunchtime! |
| Stored down below for easy access |
Originally I thought they could also use the closed tubs for play/coloring surface, but since they had the cookie sheets, (see Pin 87) they never tried that idea out. However, these were also good for baby mermaid swimming.
| Wibby and his red mermaid he picked special for the trip. |
Total cost: $10 for two tubs with lids
Total time: 0 minutes.
Final verdict: Loved having these in the car. They contained the eating mess from their laps and then the lids contained the leftovers until we could stop to clean up. Thanks for making me a better traveler, Lindsey! I always knew you were a smart mom.
Labels:
cleaning,
food,
for the boys,
kid food,
parenting,
road trips,
snacks
Pin 87
We just got home from our beach vacation so the next few posts will all be pins we did on our trip.
Original Pin:

http://mykindofmakeover.blogspot.com/2011/07/magnetic-puzzles.html
This blogger suggested to place magnetic strips on the back of puzzles to do in the car on a cookie sheet.
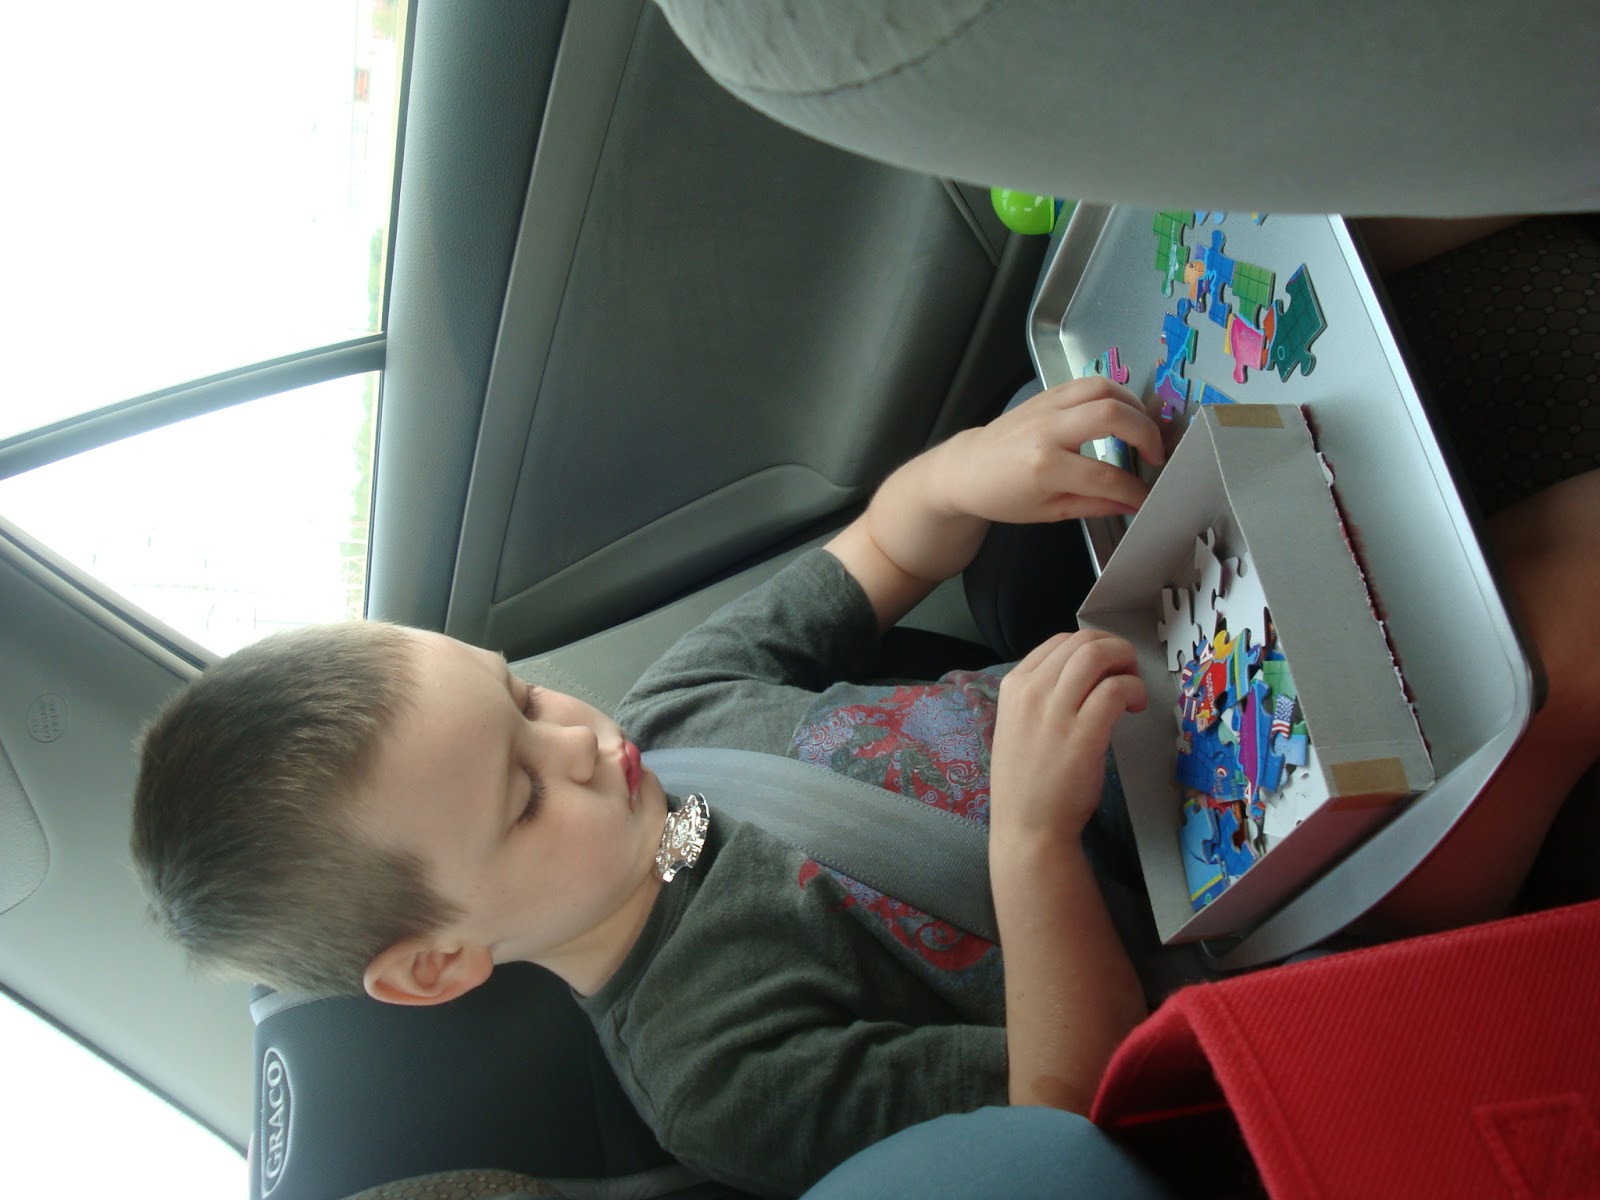
I didn't do the magnets but I did do the puzzles and the cookie sheet. I picked up a dollar store cookie sheet and a dollar store puzzle for big L. He loves doing puzzles and this was actually the first thing he pulled out once we hit the road. Since it had a lip on the edge, I thought it would still work for the car despite the magnetics.
Our dream was shot down pretty quickly when he discovered that the puzzle was too big for the cookie sheet. Bummer. Guess we should have checked that one out before we left.
However, the cookie sheets did come in handy for the car ride. I had picked up two (because you can't just have one item and two boys) and they were awesome for coloring book surfaces and baby mermaid swimming while we were in the car. On the return trip, I used one for my lunch platter. They were great noise makers, too, when the boys were really getting antsy and bored. That's when I snatched them and stashed them under the seat (which, by the way, they are super easy to store since they are so thin.)
Total time: 0 min
Total cost: $3 because we had to have two cookie sheets.
Final verdict: They didn't work out for the puzzle this time. Maybe next time we will make sure to check the finished size of the puzzle first. But they did come in really handy for the long car ride. These will probably make it to future car rides.
Original Pin:
http://mykindofmakeover.blogspot.com/2011/07/magnetic-puzzles.html
This blogger suggested to place magnetic strips on the back of puzzles to do in the car on a cookie sheet.
I didn't do the magnets but I did do the puzzles and the cookie sheet. I picked up a dollar store cookie sheet and a dollar store puzzle for big L. He loves doing puzzles and this was actually the first thing he pulled out once we hit the road. Since it had a lip on the edge, I thought it would still work for the car despite the magnetics.
Our dream was shot down pretty quickly when he discovered that the puzzle was too big for the cookie sheet. Bummer. Guess we should have checked that one out before we left.
However, the cookie sheets did come in handy for the car ride. I had picked up two (because you can't just have one item and two boys) and they were awesome for coloring book surfaces and baby mermaid swimming while we were in the car. On the return trip, I used one for my lunch platter. They were great noise makers, too, when the boys were really getting antsy and bored. That's when I snatched them and stashed them under the seat (which, by the way, they are super easy to store since they are so thin.)
Total time: 0 min
Total cost: $3 because we had to have two cookie sheets.
Final verdict: They didn't work out for the puzzle this time. Maybe next time we will make sure to check the finished size of the puzzle first. But they did come in really handy for the long car ride. These will probably make it to future car rides.
Subscribe to:
Posts (Atom)