Sunday, January 20, 2013

Pin 178

Original pin:
Pinned Image
http://www.compartmentlife.com/2011/11/the-pinterest-challenge-fall-2011-toilet-paper-or-art/

I am always looking for home decor at affordable prices and free is pretty much up my alley. I informed my family to start saving rolls and very quickly I had more than I knew what to do with. It was eye-opening to see exactly how much toilet paper we use in this house! Then my bag just sat there. . . and sat. . . and sat. . . and sat. . . Until I decided to start up these "unfinished projects." So here we are with the completion of, yet another, unfinished project.

It took me just a few weeks to fill up this bag with toilet paper rolls, paper towel rolls, and any other cardboard roll we might come across.

I fired up my glue gun, parked myself in front of the TV (I had some DVR to catch up on) and went to work. I cut one-inch strips and just started gluing together at random. I didn't really have a plan. I did find a really sturdy roll (I think it came from foil) that I was able to cut with a sharp knife and preserve the circle shape. This came in really helpful because it provided some super-sturdy anchors. Hours later, day one's progress was done and I was off to bed.

I was not able to work on it on consecutive days, so this project was not done in four days total, just four episodes of work on it. A few days later, day two progressed in the same way as day one.

And for some size perspective, those tiles are 12 inch by 12 inch in size. This project was growing fairly quickly!

Day three I was getting to the bottom of my stash of rolls. I had already put my family on alert to refill my bag!


Somewhere shortly before day three ended, the project was starting to look like a giant snow flake. NOT what I was going for, so I had to really strategize to avoid the snow flake look. Worried that it might head back in that direction, I called the gluing stage complete after day three.

I picked up some spray paint at the store last week. I found some metallic style paint in "oil rubbed bronze" for a metal look without being too shiny.

After it dried it was ready to hang up. A year ago I took everything from my mantle and have been trying to figure out what to put there next. I put this in the big empty space. Since packing away the Christmas decorations, I haven't put anything back on the mantle, so it looks really empty in my pictures. Guess I'll have to work on that next.


It is pretty sturdy and fairly light. It is held here with one thumbtack in the center circle.
 
 
Total cost: $5.99 for the spray paint. Otherwise, I used the entire bag of rolls, not sure how many, and about 6 hot glue sticks.
 
Total time: It was a little time consuming to do all the cutting and gluing. I did all the cutting and gluing over three sittings--about eight hours total. Then the spray painting was done over around 20 minutes total, split into three sessions, allowing drying in between.
 
Final verdict: It is an inexpensive way to fill some space. I think I like it. Up close, you can see many flaws--jagged edges, unequal heights and spacing, exposed hot glue. But hanging up so high and being painted so dark, a lot of these imperfections are not as obvious. My husband was a little unsure about the whole project from day one, but now that it is hanging, he admits he is surprised at how much better it looks that he expected. We are not completely sold on it yet, but I'm just going to let it hand there a while longer and see if it grows on us. Another problem is similar to the problem I had with the sock bun--I felt weird that people would know I had a sock on my head. Well, now I wonder if my guests will look up and think about my toilet paper rolls hanging on the walls. 
 

Would you?

Friday, January 18, 2013

Pin 176 & Pin 177

Original pin:
Pinned Image
http://www.familyfeatures.com/feeds/food/FeatureDetail.aspx?ID=4018

Yummy-looking lettuce wraps with apples, grapes, and an interesting combination dressing


Original pin:
Pinned Image
http://www.yummymummykitchen.com/2012/01/superfoods-skinny-tips-lululemon.html

A colorful, healthy salad.

I bought some pomegranates a week or so ago when I found them on sale and had this super-foods salad in mind. However, I had not gotten around to making it and was hoping my pomegranates had not gone bad.

Last night, I opened the refrigerator to start preparing dinner and found a wealth of leftovers and produce needing to be eaten. I had pinned the lettuce wraps recently and my mind went immediately to that when I saw the grapes and leftover chicken. I didn't have everything for the super foods salad, but it was time for the pomegranates to get a crack.

I started with chicken I had cooked the night before. It was diced and cooked in the skillet with a little olive oil and a little seasoning.


Next up came the diced grapes, pomegranate seeds, and a stalk of celery left over from a few dishes in the last two weeks.


Then I threw in some walnuts and diced avocado, followed by almond butter and honey. The original recipe calls for peanut butter, but the pinner tagged it with almond butter. I went with almond butter.

 
All that was left was to spoon it over some lettuce leaves and roll it up. I had some leftover cilantro lime rice that I spooned on top of the lettuce before I topped it with the mixture. Then I had a little trouble with the rolling. Either I stuffed my leaves too full or my leaves were to large, but I could not get them to roll pretty or stay rolled. No worries, I ate it anyway. It was hard to eat with my hands anyway because the filling was sticky.


Oooo, boy! It was delicious. So delicious, in fact, that I had to eat it again for lunch today. Only problem was that there was no more rice or chicken. I substituted in some diced mozzarella and chopped my romaine lettuce. Now I had a chopped salad! I never would have thought to use almond butter as a "salad dressing" but that is basically what it was fulfilling. It was a little hard to coat everything when I made it as a salad today, but it worked well enough.

And here is my confession. . . I keep thinking about it. I want to eat it for every meal. Lucky me, I have two more pomegranates in my fridge right now.

Total cost: $0 because it was left over night!! I may have spent $1 on the pomegranates (for 3!! good price) weeks ago.

Final verdict: Yum. Yum. Yum. Unsuccessful as a wrap but successful in the flavors! A super combined pin recipe that I am going to use again and again. I was surprised that almond butter would even work with these flavors. And knowing I could use peanut butter as a substitute will help when the almond butter is all gone.

Wednesday, January 16, 2013

Pin 175

Original pin:
Pinned Image
http://styleawip.blogspot.com/2009_12_01_archive.html

Isn't that scarf beautiful?? I couldn't locate any details about who makes it, but the link mentions that it is $1,100!! Wow.  I had it pinned to my "I could make that" sewing inspiration board. Yesterday was gloomy, snowing, and cold. I took myself to the fabric store to create my interpretation.

I was looking for an easy replication that did not require hand sewing. I bought a quarter yard of lace and a quarter yard of some super soft knit fabric. In retrospect, I didn't do this in quite the right order, but I am trying to tell you what I think a more appropriate order would be. The pictures may not match up exactly to the directions. I measured off two cuts of eight inches of lace and applied some fusible web to the top two inches of each.

I trimmed the top along the lace pattern just to have a prettier edge than a straight line.
Then I removed the backing, and ironed it onto the bottom two-three inches of each end of the scarf.
Next, I sewed along the edges of the lace overlapping the fabric, just to secure it in place. I did not stick right along the cut lines.
My stitch line--more like an approximation of the edges.
The final step was to add a rolled hem to the edges of the scarf.
 
All done!
 
 
Time to wear it out to dinner with the girls!


Total cost: $5. Wow! I saved $1,095! Wait until my husband hears how thrifty I am.

Total time: 45 minutes--even with doing things a little out of order. I bet this could be done in 20-30 minutes next time.

Final verdict: It was sooo soft. It was fairly light weight too so it didn't feel bulky. I am not a fan of winter wear, but this didn't bulk me up and feel too wintry at all. It is very versatile and can easily be paired with lots! I am happy with the outcome!


Pin 174

Original pin:
Pinned Image
http://mollykaystoltz.com/t-shirt-shag-rug-tutorial/

T-shirt rag rug tutorial

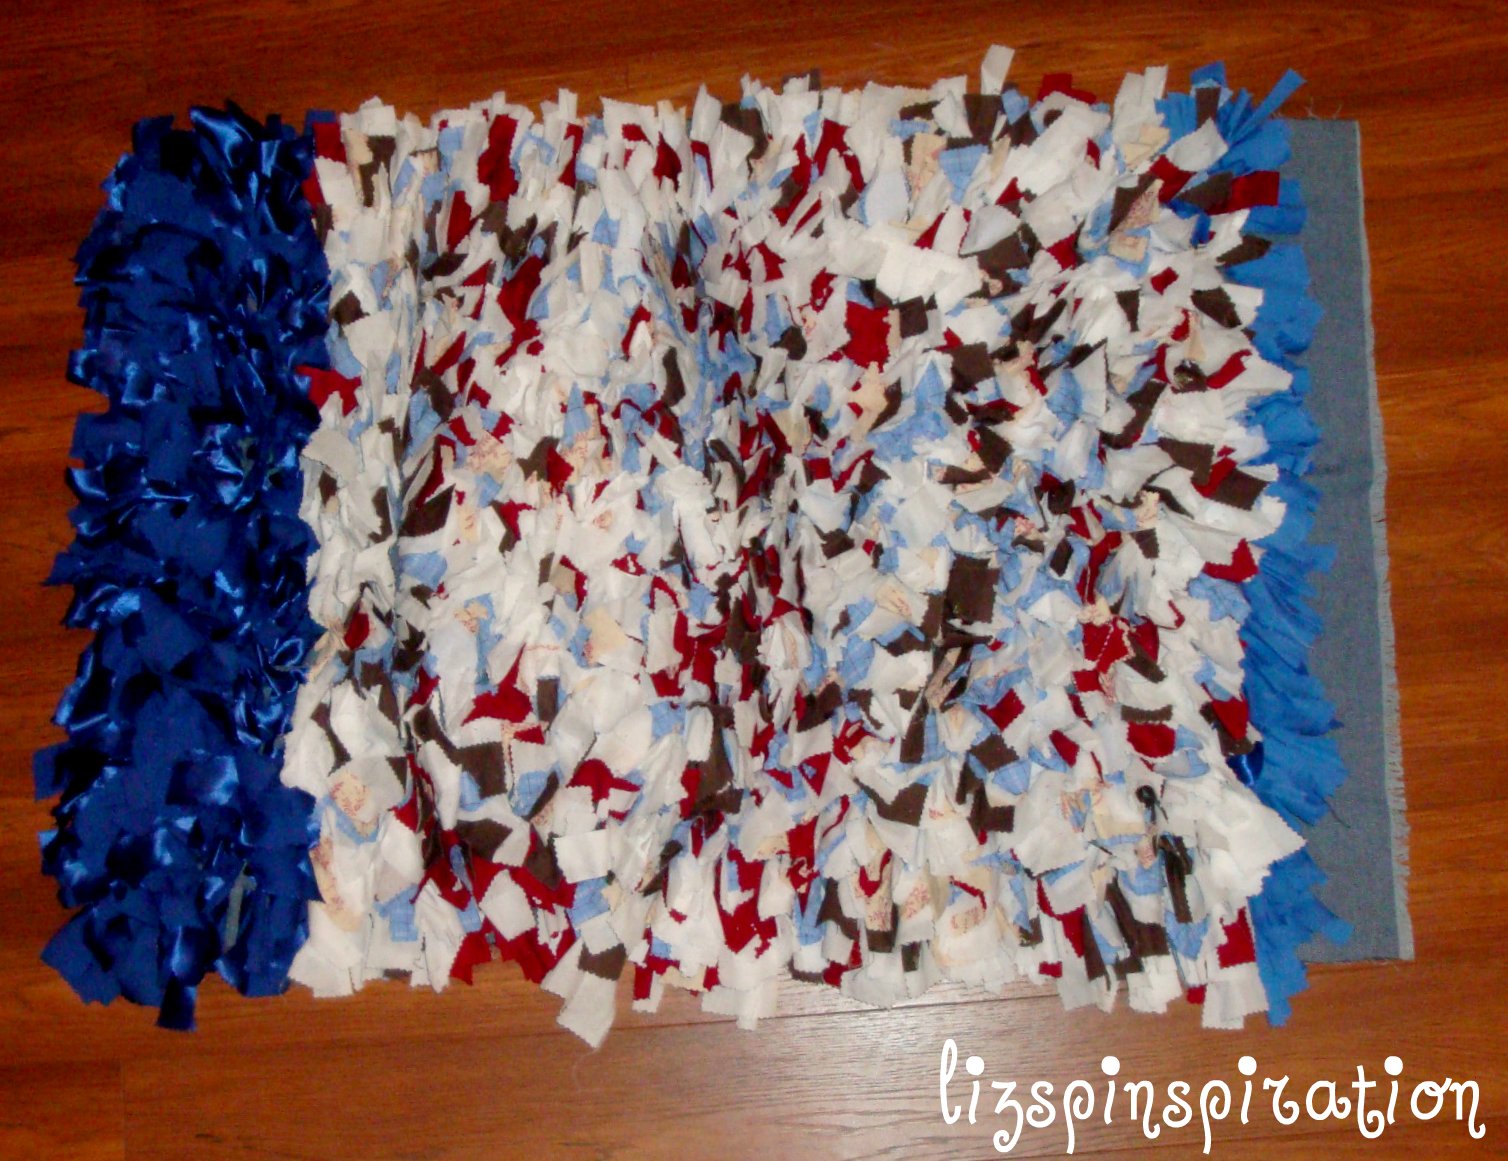
As promised, I am wrapping up unfinished projects. As some of my friends can attest, this one has been a looooooong time in the works. I started in in APRIL!! I worked on it pretty steadily April-May, dragging my bag of supplies to craft nights and work days. We got rid of all our carpet in May. I was making this scrap rug for my older son's bedroom. Right around that time we stumbled across this brand-new-in-the-package rug at a garage sale that is the one with the roads and buildings printed on it. He fell in love with it and I picked it up for $2. No need for this one so it was rolled up and put away. It took up a lot of space on my "craft shelf." Haha. I don't have a real crafting area in my home, so I randomly find space to cram my crafting stuff and this found its way onto a shelf--where it repeatedly fell off!

Let me rewind back to April. . .

I wanted this to be larger than the tutorial--which is the size of a t-shirt. So I bought fabric remnants to use instead of gathering a wardrobe's worth of t-shirts. All of my fabric came out of the remnants bin so it was fairly cheap. I chose a large piece of denim for the base because I thought it would be sturdy. Since I was not using knit for the scrap pieces, I cut all the fabric strips using my pinking shears to prevent some fraying. HOURS later, I was suffering from my first real pinjury!!
 
But now that I had all my strips, the real work could begin. I followed the tutorial to cut the base and weave the strips in. My base was so large I could only do about three rows an hour. Days and days later I made it to this point, at which it was rolled up and stashed away for nearly nine months.
 
See how close this was to actually being finished!!!
Yesterday, I pulled it all out and finished the puppy up in about 45 minutes. Seriously, why couldn't I do that earlier?? Here is the finished product:


I didn't go in with a specific pattern plan, it just worked out that I used up all my colors early on and was left with a lot of blue. I started in the middle and worked my way out to each edge. I did the center row and then did one or two above and then one or two below, then back to the top for a few, and so on. . .

Since this doesn't really have a destination in my home any more--thanks to the much COOLER manufactured rug, I just kind of left it lying in the middle of the room where I finished it yesterday. When the boys got home from school I asked them "where do you think we should put it?" secretly hoping they might fight "my room! my room!" but the only answer I got was from super-cool L, "uh, how about on the floor."  They did play on it a little and pulled out a strip or two. Maybe its best NOT to put it in their room because I just may find one of them in a pile of strips with a holey swatch of denim one day as they deconstruct it.

Total cost: I am pretty sure I spent around $17 on fabric remnants

Total time: I am just going to have to do some math here . . . at three rows an hour and 41 rows plus the hours spent cutting strips, I am going to say all together I probably spent somewhere between 18-20 hours on this one.

Final verdict: Its a homeless little rug for now. I am glad to have it finished and off my craft shelf because it took up a lot of room. It was easy enough but I'm not convinced it is going to hold up to a lot. And I am a little worried about washing it and having to rebuild! Time will tell. . . To create another rag rug I would probably find a better way to secure the strips--tying or stitching or something. But I will start much smaller for the first trial.

Wednesday, January 9, 2013

Pin 173

Where are all those "unfinished projects" I promised? Well I guess I got hungry and snuck in a bunch of food posting while I finished them.

There are reasons they are unfinished.

Number One was blatantly obvious this week--MONEY!! I spent my extra cash during the holidays and don't have a whole lot to spend supplies.

Number Two: Weather. It has been raining cats and dogs the last few days and I just can't bear to get out of the house more often than that. Besides, it is ridiculously cold and I just can't stand the cold. Anything lower than, say, 45 degrees and I'm bundled up in my fleece and uggs sitting by the fire moaning about the cold. Sorry. I am a life-long Texan. Give me days and days of 110 degree weather but keep your snow.

Number Three: Work. I mentioned a job change a few weeks ago. I am in the process of tying up all my loose ends at my current job and training my replacement so I've put in a little extra time and energy towards that lately.

Number Four: Holiday hangover. Not of the alcoholic type, unfortunately. Just the general exhaustion paired with the extra chores that need to be done. Packing up all the decorations, sorting through all the holiday rubble of paper, toy packaging, and sorting. Clearing out old toys and clothes to make room for the new ones. Catching up the household chores of cleaning and laundry. Getting everyone back in the rhythm of school and chores.

Blah, blah, blah. On with the food.

Original pin:
Pinned Image
http://allrecipes.com/recipe/golden-crescent-rolls/

I have been a bread making fool lately. You readers may already know just how much I love making bread. I have an extra fondness for yeast breads. I think the week of Christmas I made some sort of yeast bread nearly everyday.

This pin worked a little backwards. I had in my head that I wanted to make some pigs-in-a-blanket (aka, PIBs) but I wanted a different option for the bread other than the canned crescent dough. After a little online research I found this recipe that looked delish and pinned it right on to my cooking board. I started the dough that night. I followed the directions mostly. They were simple and the dough was very easy to handle. I rolled it and cut it into triangles as directed, but as I was rolling them with the little piggies inside I decided that next time it would be better to make rectangles for my pigs. As crescent rolls alone, triangles would be fine. Also, I halved the triangles since I was using cocktail sized pigs.

Not included in the original directions--I lined my pan with wax paper sprayed with cooking spray. I will not have my bread ruined by sticky dough ever, ever again.

I got a little lazy with the next step, which turns out later to be not a super-duper idea. As I was rolling them up and putting them in a dish, I found that all but maybe six or seven would fit comfortably. Well it was well past midnight at this point and I wasn't feeling like preparing a second dish for six measly PIBs. I also wasn't going to waste this (what I hoped was) fabulous dough either. So I worked very hard to squeeze these last ones in. I ended up with two left over that I just wrapped in tin foil. The original recipe called for an hour rise, but I just covered the dish with plastic wrap and put it in the fridge overnight. In the morning I pulled them out about an hour before I was going to bake them. Just before popping them in the oven they were perfectly risen, however the rising made them even closer together.
eek. look how tightly crammed the are.
A short, short 10 minutes later they were all done and golden.
Guess I should have rotated these halfway through. My oven baked them a little unevenly.
Well, mostly at least. They were all golden on top and the crust felt set. I was a teensy weensy bit worried about the middles since the cooking time was so short. I had baked the two loners just on the tinfoil along side so I sampled those. They were perfect. Deliciously buttery. The dough was light in texture and proportioned perfectly with the little piggie. These tasted exactly like the ones I get from my favorite donut shop and pay $1.50 each for (but only mine were smaller. Maybe half sized of theirs.)  As we dug into them my fears about the middle were confirmed. The rolls towards the middle were not fully baked on the sides where they touched. While it was far from raw, it wasn't quite done so it made it a little doughy. I ate them anyway. Lesson learned--don't pack them in so tightly. I didn't take a picture of them before they had risen, but before rising they were placed in the pan just close enough to not be touching. Next time I will place them maybe 1/2-1 inch apart. They did a lot of rising before and during baking.

Total cost: I only had to buy the cocktail weenies for around $3.29

Total time: About 25 minutes to make the dough, 20 minutes to roll the PIBs plus baking and rising time.

Final verdict: This was a really good dough! With or without the piggies it would still be delicious. They even taste better than the canned rolls. I can't wait to try this again--and do it a little better. But I am also imagining the possibilities with them. This could be substituted for all the million recipes out there that call for crescent rolls. The recipe says it makes 20-30 rolls so that would be the equivalent of almost three-four cans of the premade stuff. How much do you pay for a can of those? A couple bucks for 8? Is that right? My total unofficial, uncalculated, and unconfirmed mathematics says that you could probably make this whole batch for at least what you pay for one can--probably less. While I can't say that they are technically "better" for you health-wise than the canned stuff you do at least have the control over what you put in them. Now if I could just stop making bread maybe I could lose some of these holiday pounds. . .

Sunday, January 6, 2013

Pin 172

Original pin:
Pinned Image
http://www.whooga.co.uk/Cleaning-Ugg-Boots

How to clean Ugg boots.

I've had my Uggs a long time. I think I've had them for somewhere around four years. I protected them with water & stain repellent when they were new, but other than that, I haven't done any sort of maintenance care to them. In the cooler months, I wear them a lot--pretty much anytime I think I can get away with it. After wearing them out in the Christmas Day snow we had I decided it was time to give them a spa treatment.


I pulled this up and started reading. My first thought was that I though it was odd that a company which seems to be a competitor for Ugg boots would be offering a guide to cleaning them. Is this trustworthy? After a little further investigation I offer you this bit of worldly information: The word "ugg" is a generic word. It refers to any type of fleece-lined sheepskin boot. The word happens to be trademarked in over 70 brands. So this particular company is only offering advice on how to care for their boot, also referred to as an ugg.

Okay. Confusion cleared and I can move forward. Many moons ago, when I received my Uggs, my thoughtful husband also bought me the tools to maintain them. For the first time ever, I dug them out.
cleaner and protectant
suede brush


More before pictures for you. My boots weren't terribly dirty. Some noticeable spots on the top of the foot and some dirty areas on the heels and around the top of the calf.


Oddly enough (which I would have known if I had ever pulled out the cleaner bottle) the directions on the cleaner bottle were very similar to the directions on this website. Step one was to brush. I noticed a big change just after a little brushing so I took a few pictures for you.

WOW! Did I even need to continue? I was a little worried about getting them so wet. Just for a little insurance, I asked my husband if he would replace them if this ruined my boots. Both the directions told me to so I jumped right in.  I soaped them up following the dilution instructions on my bottle and rinsed them off. Found a nice spot for them to dry and went to bed.
all wet.
In less than 24 hours they were completely dry and ready for the next round of brushing. All the spots had not been removed. There were lots of warnings on the tutorial and the cleanser bottle about scrubbing too hard so I went a little easy on them. The dirtiest spots on the heels and calves are pretty much gone. The spots remaining are on the top of the foot. They are not water spots or anything identifiable. I don't have a clue what they could be. Probably something sticky one of my kids drooled on me. There are a few tips on the tutorial for removing stains if you know specifically what they are--ink, blood, oil, etc. I just left them since I don't have a clue. Here they are all clean--well, cleaner, at least--and brushed:


Total cost: Currently, zero. At some point, long, long ago, someone spent some money on the cleanser. I looked it up on amazon and it seems that you could spend around $8 for a bottle of cleanser or up to $25 for a whole kit.

Total time: 1 1/2 hours plus drying time. It took me a while to brush these puppies. At least they dried faster than I would have expected.

Final verdict: It seems to me that brushing them may be the most effective step for me. I'm not tromping through much mud and snow. Maybe now I will brush them more often, or at least when I start to notice they are dirty. It is probably a good idea to clean them as the cold weather moves on before they get put away for the summer. Seems that the original repellent has done its job since these still look pretty good after four years. Off to re-apply that repellent to keep these babies happy.


Thursday, January 3, 2013

Pin 171

Happy 2013!!!

Original pin:
Pinned Image
http://blogchef.net/baked-tacos-recipe/

When I first saw this pin I thought it would be a great way to prepare tacos quickly--assembly-like style.  After I planned the meal for this week I started to read through it and all the comments. I immediately started to reconsider when I read all the comments stating how soggy the tacos were. But a few comments later people started remarking about how the tacos stayed together so well. They did not break when you bit into them. With young children, crunchy tacos are always a challenge so I decided to go ahead with the plan. If these truly stayed together then this pin could really be something special.

The recipe made 18-20 tacos!! My family of 4 wouldn't eat that many so I halved it. That meant I ended up with a 1/2 can of beans and 1/2 can of tomato sauce leftover, but we can probably find a use for those somewhere. It was easy to mix up. I had a little over 1 lb of meat so I added a little extra tomato sauce to moisten the mixture up a bit to help it combine. I filled 12 taco shells about 1/2 to 3/4 full. I could probably have filled them fuller, but again, I knew my kids would turn up their noses if there was too much meat in their tacos.
 
I even had a little meat mixture left over. Maybe because I had a little more than 1 lb? Or because they weren't full?
 

 I also left out the cayenne pepper because I knew my little ones would not eat it if they were spicy. I underestimated how much Colby jack I had so I topped off mine with a little Colby jack and some freshly shredded Monterrey jack I had. After a sprinkle of chopped cilantro these were ready to go in the oven.


 Ten short minutes later I pulled these yummy-smelling babies out of the oven toasty and melty.


They were really, really tasty. You can see in the pictures that my taco shells were not packed tightly together. They were crispy almost the whole way around. The bottom 1/3 was softer, but not soggy. The ultimate test here, though, is breakage factor since that is what ultimately sold me on this dish. Guess what?? Not a single taco broke. Big L ate a whole taco and not one shred of cheese, crumb of shell, or dash of meat fell out of the taco. He was waving it around as he talked and the thing stayed together. It was slightly amazing. This is life-changing for tacos in my household! Lil W didn't bother to eat that night. He said he didn't like "burnt tacos." That little non-eating child doesn't know what he is missing.

With lean ground beef and fat free refried beans, this dish was filling without being crazy in calories. I also completely forgot to top with all my favorite taco garnishes--lettuce, tomato, sour cream, guacamole. And they were so tasty even without it. I had halved the recipe because I was afraid leftovers would not keep because then the shells really would be soggy. Not to worry now because my husband ate 9 tacos! He thought they were that good.

Total cost: Around $7

Total time: These were fast! Prepped and baked in about 30 minutes. Great for weeknights. If you were really in a hurry you could substitute prepackaged taco seasoning for all the herbs.

Final verdict: Winner, winner, taco dinner! I wish I had known about this "no-breakage" trick when my kids started eating real food. We just may start having tacos more often. The recipe itself was delicious so the breaking thing is just a bonus. And the leftover meat and beans has already been wrapped up in a soft tortilla and devoured so I guess I only have that 1/2 can of tomato sauce to deal with.